Showing posts with label Mini Bulb. Show all posts

Tuesday, 12 April 2022

Curiosity Cabinet


I picked up a lovely box from the car boot on Sunday.


I played around with some patterned papers on the inside.


I started to pull some pieces together to put on the inside. I made these candles from straws and hot glue.


I created another embellishment using resin bones inside a glass vial and gluing a button on the end to keep the contents inside. It also helped to have a flat surface to glue it into the cabinet.


Next I started to play around with how I wanted to display the objects inside.


And kept going until all the shelves were filling up nicely.


A view of the left side of the completed box.


This is what I settled on for the bottom two shelves of the box.


These are what I settled on for the top two shelves of the box.


And a photo of all the shelves.


And the view from the front of the whole cabinet.


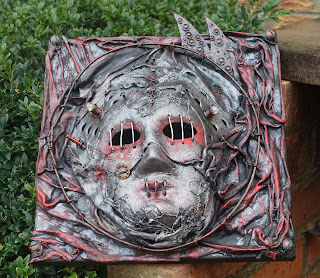
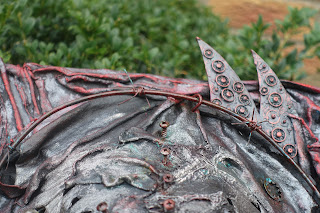
The outside has been painted with charcoal rusty paint to give it texture. Once dry I also gave it a coat of varnish.


This is the closure.

Friday, 3 December 2021

Spiked Mask Canvas


I saw a canvas made by someone on FB and I absolutely loved it. so I decided to have a play and put my own touches to it.  Although, I have to say, I loved it so much, I didn't change too much but didn't want to completely replicate it.

I used a full face mask and a fancy brown decoupage mask, I fitted them together to make on mask. Used t-shirt fabric and paper deco with bronze powertex.


Once completely dry, I started adding hardware and wire.


I painted over the top with silver acrylic paint.


Added red paint and red pigments to the canvas once really dry.


Took a quick photo outside before it rains again!


A few close ups. Added pieces of wire to the eye sockets.


I tried to re-create the effect of barbed wire.


I added three netting staples over the mouth.


A line of screws to the forehead.


Red acrylic paint around the eye and mouth area. Lots of waxes and pigments also used.


This is the original that I was totally inspired by.  Cate Wilshaw of Dark Imaginings was the creator of this fabulous piece.  She completed it nearly 3 years ago, but I have only just come across it. I love it.


This is the whole piece.

Wednesday, 20 October 2021

Cabinet of Horrors


I picked this jewellery cabinet up at the car boot last Sunday.


I painted it with black powertex and then took the door off and painted the inside.


Then I added some grit paste and covered the insides with Halloween patterned paper.


I created a shelf on the left hand side.


Then I decided to give it a coat of black paint with silver in it.


It looks quite good with the texture.


Close ups of the patterned papers in situ.


Then I filled the shelves with lots of tiny and mini horrors.


And from the side.


Then it stopped raining, so I took some photos outside.


From the left side.


From the right side.


Close up of the top left shelves.


Close up of the top right shelf.


And finally a close up of the bottom shelf.

This is for sale in my online shop.

Friday, 8 October 2021

Spooky T-Light Holder


Another item picked up at the car boot. The top of a t-light holder, bottom was missing. I dry brushed it with black powertex.


I made some mummy moulds and painted them with black powertex.


I then decided I needed more mini cogs, bones and skulls.


I found a piece of MDF in the shape of a cog. I painted it with black powertex and made a bit of an arrangement using mini embellishments.


I couldn't decide if I wanted to put something inside and glue it down.  I inserted a few different pieces but you just couldn't see properly what it was meant to be.


I also couldn't decide if I wanted to glue the top down or leave it free.  I decided to leave it free and glued down the mini embellishments in front of it.


I glued some of the mini embellishments onto the frame of the holder.


I used silver treasure gold and brushed iron alchemy wax on them.


This is the top taken off the bottom and you can see that the mummies look like they are stranded in the air!!


And this is how the bottom set of embellishments stack up.


And here are the two pieces separated but in the same photo.


All put back together again with the mummy feet matching up with the cogs.


This is the view from the back.


I lifted the top off the base and added a battery candle. The flame flickers, so it was quite a nice effect.


Then I switched it for a multi-coloured battery t-light.


This is the reason why I didn't want to glue the top piece down.  It looks fabulous with the light coming through.

Blog Archive