Showing posts with label Dog. Show all posts

Sunday, 10 November 2024

POST GRUNGE- MIXED MEDIA DECADENCE WITH FINNABAIR


Class one - Steampunk cockapoo


Re-design by Prima, fibre image, dog and butterfly wings.


Stuck on a canvas with soft gel and then whilst edges are still wet, pull out the fibres and then paint over with a coat of soft gel.


Janet drying her canvas after coating it with soft gel.


Next steps, the wings.


The shop set up.


Everyone having a great morning.  Huge room, very spacious.


Cut the wings out and then cut around the dogs head / ears.  Draw round the wings.


Blending the background colours into the canvas with a kitchen sponge and impasto paints.


Then trying to remember where the wings go, paint those parts with white gesso.


Filling in the gaps where the wings don't quite fit with impasto paint.


Wings are stuck down and started to add embellishments.


Anna demoing adding the acrylic paint with the sponges to blend the background more.


And finally added the clear domes.


Our table adding the final touches.


This is my finished piece - I LOVE it


Class two - Resist Panel (Darker shade of Gold)


Cover a portion of the substrate with white gesso.  Use soft gel through a stencil to create a resist.


Everyone creating their resist.


Then chose the top paper to cover over the gesso and created a wash for the bottom with acrylic paints (black and burnt sienna).


 Started to build up the composition.


Glued everything down with heavy body gel and added a couple of thin coats of white gesso drying in between.


Our table of creativity.


And just to prove that I was actually there!!


Gave everything a good heavy coating of black gold wax and then touched up with honey.  Used black and brown mix of acrylic paint to add shadows (not very good at that bit).


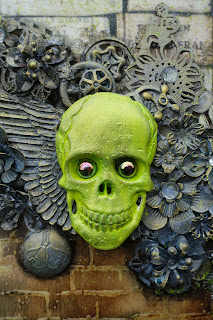
I painted and waxed the main image in acid and lime green as a contrast.


I added green paint to small areas of the composition so it followed through.


Added some lime green splatters.


I added some of the black gold wax onto the skull and filled in the eye sockets.


When I got home I added the Tim Holtz words.

Had an absolutely fabulous day.

Thursday, 2 April 2020

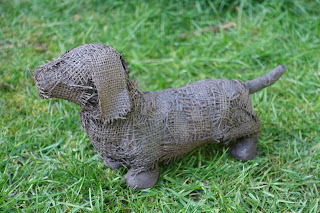
Sausage Dog


I mixed white powertex with bronze to create a lighter brown. I used small pieces of hessian to cover the body and make the ears.

Sunday, 12 August 2018

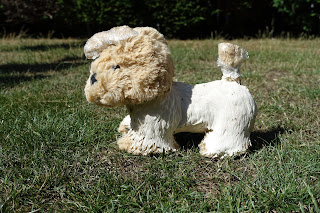
Soft Toy Dog


Remember my car boot finds from last weekend? Well here is the soft toy.


I cling filmed the ears and the tail and 'painted' on the ivory Powertex.


I just did the back, body and legs and then set it outside to dry.


Next I did the face and the paws. I actually rubbed the Powertex into the paws and the muzzle as opposed to painted it on. I styled the muzzle on how I wanted it to dry and also made sure the fur on the feet was flattened so he would stand up on his own once he'd dried out.


Once he'd dried, I took the cling film off and powertex'd his tail, ears and nose. I used the transparent on his already black nose. I styled the ears and used cling film to keep his tail straight whilst it dried. 


Left him on the grass outside to dry.


And here he is playing in the garden.


I love how he looks like he's running towards me!

Saturday, 4 August 2018

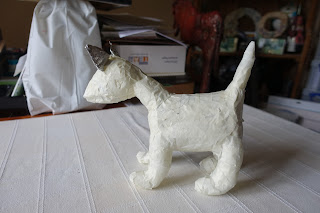
Hessian Dog


Inspired by lovely makes dotted all around the grounds at the Powertex garden party, I knew I needed to have a go at a little dog after seeing Tracey's fabulous make above.


I have no idea how she made hers, but this is how I started with mine to get a basic shape. Garden wire, half a kitchen roll tube and bubble wrap stuffed inside the tube holding the legs, head and tail in place.


I used tin foil to build up the legs, head and tail. Then covered it in paper tape to hold it all in place.


I used bubble wrap to fatten up the legs and give the belly a bit of bulk and again covered with paper tape.


I rolled out some clay and put a thin layer over the back and head and under the belly. I took the foil ears off and made some clay ones. I only put the tinfoil ones on to see where they were going to go whilst building the head.


I used small strips of hessian dipped in ivory Powertex building up textures to cover everything but the paws. I left them until the rest of it was dry.


Once dry, I went back in and covered the feet, also making sure he would stand up.


I gave him some eyes. I decided to use transparent Powertex on the cotton for the eye so it stayed white and didn't get lost on his face.


However I did use ivory to stick it on and also on the other eye, but I should have stuck to the transparent. Remember though, transparent isn't water / weatherproof, so will need to be varnished if going outside.


Close ups of the fab texture the hessian makes.
  

View from the overhead.


I went back in and painted over the ivory Powertex I'd got on his eyes!


Just saying 'hello' to Fraz.


So now he is finished. I'm not going to add any colour to him because when you try and add pigment or bister to ivory Powertex, for some reason it just looks mucky.

He roughly measures 10" long by 8" high.

Blog Archive