Showing posts with label spikes. Show all posts

Saturday, 29 September 2018

Wet Felting Workshop - Spikes and Craters


So today I attended a wet felting workshop with felt maker, Jenny Pepper. It was a lovely day, which was lucky, as I travelled to Scarborough for it.


The first thing we did was laid out three layers of Merino wool and created a pre-felt.


This is Liz creating her prefelt.


This one belongs to Jenny who came all the way from Cumbria, somewhere near Hadrians Wall.


Jenny (the tutor) helping Liz out with her prefelt as it was quite thick and she needed to add more soapy water.


This was one of Jennys samples showing a few different techniques that I wanted to try.


We each created a base and then stopped for a bite of lunch. I just went with a plain cream. Jenny gave us a demo of how to create the different craters and spikes and flaps and then we had a play on our own pieces using the previously made prefelt.


We used the prefelt as it has still got some felting life left in it, so it will adhere easily to the background piece which was just laid down (3 layers), wetted and left until we needed to use it.


The after much rubbing and rolling and more rubbing and rolling and hot and cold water shocks x2 finishing with cold and rinsing out and cutting and sealing the cuts, this is what I ended up with.


I love how it came out, I forgot to say about the spikes on the bottom, they were the last thing to be felted after everything else had been wetted out and rubbed.
 

And this is how Carols turned out. I didn't get a photo of Jenny's and Liz's finished pieces as they left pronto, as their lifts had arrived before I got chance.

Had such a lovely day and my piece is now drying in the airing cupboard.

Saturday, 9 June 2018

Wet Felted Vessels Workshop


Today I went to the lovely Needle and Thread near Lincoln run by Sally, to do a wet felted workshop with Robyn. 


Firstly we had to decide on the shape of our vessel. We all (I say all, there were only two of us) chose to keep it simple and do a bowl shape, so we started off with a circle. Covered both sides in two layers of merino and put it to one side.


Next Robyn showed us how to make various things including canes, balls, spikes and prefelt.


This is my cane in the making. Once you get it started you can roll it in bamboo and it really helps to stiffen it up.


I decided at the eleventh hour to change my shape to an eye sort of shape. just so I could get all the elements on that I'd made.


Anchored the pieces down, but looking back I think I used too much, especially around the top of the larger cane circle.


Robyn had brought her drum carder and kindly let us have a go with it, so we were able to make our own batts for the top coat and blend loads of different colours together. Nepps and silk waste was also added. Eveything was then wetted down and we worked around each element for which seemed like ages to make them all 'stick' together.


Robyn laying her top layer down.


Wendy working her individual elements into the main piece over a piece of thin plastic.


In the room next door they were using free machine embroidering to create pictures.


After working around all the individual pieces to make sure they are all linked with the wool.


This one is Robyn's.


This one is Wendy's.


We then rolled about 40 times, turned 90 degrees and turned it over to until all 4 ways had been done and the resist started to buckle. 


Once this happened we took the resist out by making a cut through all the layers and pulling it out through the hole. Did the hot and cold shrink thing, threw it on the floor a few times to shock the fibres. Soaped it again in hot and cold, worked the edges so we didn't end up with a seam and basically worked it until we were happy with the look and feel of it.


Once happy with the way it had felted, inside and out, we cut the small resists out that we put in to make the craters.


Once worked and shaped, we stuffed them with carrier bags to help them keep their shape.


And a view from the top.

I will be back tomorrow once it's dried to show you close ups of the different elements.

Thursday, 28 December 2017

Little Monsters


I made one of these each day over Christmas, but today is the first day we have seen any sun to take a half decent photo. The spikes and some of the balls have been wet felted as I wanted to experiment with them and add them into my needle felting.


All three of the spikes and the two blue balls were wet felted and attached after they'd dried.


The spikes and the pink balls are wet felted. The blue and black balls are dry felted onto the body.


The four spikes and two small balls are wet felted, everything else is needle felted.


Inspiration for all of these was taken from this photo on pintrest by Amanda Graham. However, I am still unsure as to whether they were wet or dry felted or a combination of both.

Friday, 10 November 2017

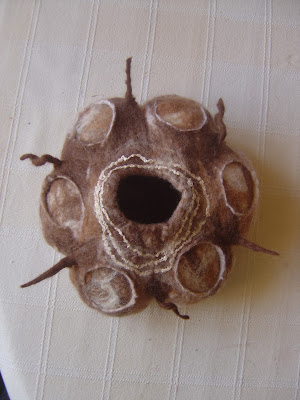
Craters & Spikes


I decided to make my resist from cardboard as I wanted it a bit thicker because I wanted to slightly shape it and didn't want to create a seam.


I also wanted to experiment with craters, so I made six circle resists and a tiny ball of wool to mark where I'd placed each one.


I also wanted to make some spikes, so I rolled one end just with water and left the other end fluffy. I wrapped three round cocktail sticks, but that wasn't necessary at this stage.


Next I placed my layers of wool over the template.


I did both sides and then decided which side I wanted the holes on.


Once the resists had been covered in wool, I placed the orange dots in the middle so I could easily identify where the resists were. I also decided to see what linen bouche would do too so laid it down in a spiral around the middle.


I wrapped the twisted lengths in cling film as I didn't want them to felt to the base but I did want them to become attached at the fluffy end.


I wet the fluffy ends and massaged them onto the base with soap and water.


I worked on both sides and then when I thought I'd finished I pulled the cling film off and soaped and rolled them individually in my fingers.


I cut a hole in the middle and pulled out the cardboard resist and shrunk it more by rolling, hitting with hot and cold water and throwing it on the mat. Once I was happy with the shrinkage, I cut the resists out using the orange dots as a guide.


And once I was happy with everything, I stuffed it with cloths and dusters, tied it to help it keep it's shape and twisted three of the spikes around the cocktail sticks. 

It's now in the airing cupboard drying.


So this morning I took it out the airing cupboard, took the string off, took the cocktail sticks out and unstuffed it.


And I was really, really please with how it came out. Again, I learnt a lot from the process and what to do differently next time.


I probably should have worked the edges more and next time I won't cut as much out so I can leave more of a crater.


These ones worked a little better.


And the spikes held their shapes, the straights and the spirals but in future they need to be longer and thicker to start with.


Finally a view from the top with the linen bouche and the original hole.

But for a first try at incorporating a different shaped vessel, spikes and we'll call them craters, I am really, really please with the outcome.


Blog Archive