Showing posts with label Tags. Show all posts

Friday, 24 May 2024

Cabinet Frames and Cards

Mr T!m Holtz of Idea-ology has just brought out a fabulous release of new items.  However, some of them to me are 'convenience items' and can easily be made from what you already have.  Therefore, I decided to make my own.


So I made a masterboard from scraps, cut out rectangles and ovals using dies to create the frames.


And I was left with the middle parts, so win win.


I then made some tag shapes and covered them in various background papers.


I also decided to make some more clusters as I was going along as I wanted to try and incorporate them somehow in the tags and frames.


And this is what I ended up with.  The three tags on the right have three of the above clusters incorporated in them.

Thursday, 4 April 2024

Masterboard tickets and tags


I've seen quite a few people making masterboards recently so I thought I'd jump on the bandwagon and make one too, but I chose to use only lines.


I turned it over and made some tag shapes.


I was left with these two pieces so made them into tickets.


Then I started to stamp on them with black and red ink.


Added a red reinforcer.

Monday, 29 November 2021

Accordion Book


The front


First couple of pages.


Lots of tag pockets on these two pages.


More pockets to add tags into.


This is the back.


The back sides of the pages


Just one pocket on this one so it didn't get too bulky.

I watched a series of 4 youtube videos by Tracie Fox and was inspired to make an accordion book.

Wednesday, 3 November 2021

Spooky Junk Journal


I made a junk journal type book for a friend out of recycled used envelopes.


These are the first couple of pages.


I tried to keep it fairly light hearted and not as gruesome as it could have been. 


Some of the pages are really plain, but room has been left for journaling.


I incorporates some die cuts and some resin mould pieces.


I didn't want to make it too bulky as I didn't put a closure on it.


These two pages house some tags.


And this is the right page with the tags removed.


These are the middle pages.


The envelope pocket flips out on the right page.


And there are 3 tags / journaling cards in the pocket.


These are my favourite two pages.


This is a double spread page with a piece of white netting between the pages.


The netting is covering the left page in this photo, it's very subtle, but a nice effect.


Again very plain pages, but writing space if needed.


Nearly there.


The back inside cover has a pouch with a tag in it.


There is another pouch on the back of the above tag which houses a journaling card.


And finally, this is the back cover.


This is the removable tassel that is attached to the spine with a safety pin.

I hope she likes it as this was part of a 9 day course I am enrolled on with Anna aka Finnabair.

Friday, 19 February 2021

Tags


The backgrounds of all the tags are the pages that went wrong with the gelli-plate image transfers.


I just simply took some elements and created collages with them.


And this last set, the gelli plate pull was really dark!


And here they are all together.

Sunday, 17 January 2021

Vintage Tags


I made some more tags today but with a vintage theme.


Some close ups of the tags.


Used some mini clusters which I'd previously made.


Saturday, 16 January 2021

Tags


Had a play with some Teesha images, magazine pages, Tim Holtz dolls and some patterned papers.


Sunday, 10 January 2021

On the Road - Combi Camper Challenge


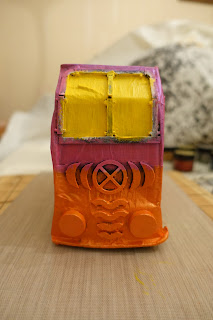
So over on the Powertex Australia Creative Hub FB page Ashley has started a challenge called 'On the Road - Combi Camper' and the idea is that we create a camper van to virtually travel around different points of Australia and create other challenge pieces when we get there. You can get a kit, but I wanted to challenge myself and see if I could make something like.  I used cardboard, bubble wrap and masking tape to get the basic shape.


I gave it all a coat of black powertex and once dried I used easy structure paste through a stencil on the roof.


I mixed up a batch of stoneart clay and made some flowers and a word.


I decorated the front with wooden pieces so they would stand out.


And then one side, wheels are done in cardboard.


And then more or less the same thing on the other side.  I wasn't precious about getting them exact, just similar will do for me.


I added more stencilling with the easy structure and then dry brushed everything in white pigment.


Next I got more or less everything out to get some colour on there.


As you can see, I went for bright bold colours.


And on the front I used quite a few chipboard offcuts and blended the colours in.


I'd decorated a few other bits and bobs I found in my stash.


Made sort of a spare wheel to put on the back panel and some lights and bumper.


I made a surfboard for the roof, let's face it, you can't have a camper van without a surfie now can you.


And this is what I ended up with.


And from the other side.


And this is the back.  I added some fibres to the ring and you will see why shortly.


That's because I've added a compartment inside and needed something to be able to pull it out easily.


And this is the front.


View from the top with the surfie.


A few close ups.


A bit of stamping.


Stone Art flowers on the roof.


And on the wheels.


And finally I made some tags including some postcards and a couple of tickets in case we need to get in anywhere.


This is my first tag.  As we are virtually travelling around Australia, my thinking is that when we make a stop I'm going to date a tag, write the place name and then after a bit or research, write a bit about it on the tag, or send a postcard and fill in a ticket.

Let the adventure begin xxx

If you want to join in, go to the FB page for Powertex Australia Creative Hub and join the group.

Blog Archive