Sunday 30 April 2017

Follow Your Dreams


This is the middle sized huge mdf tag, measures approx 12" x 6.5" and I covered it with a piece of the Jane Davenport papers I got when I was on holiday.
 

I sprayed three mini boxes with DecoArt media misters, script stamped in white chalky paint and covered the edges with washi tape.


Next I found something to put in the boxes, these images were stamped onto fabric and cut to fit inside the boxes.


I die cut some letters from chipboard and coloured them with DecoArt media primary yellow, cyan and magenta paints.


I decided to place the boxes next to each other on the tag.


And the last couple of words painted in the same bright colours.


And this is the completed tag. I didn't want to cover up the lovely background papers too much.

That's Crafty have a challenge on this week of 'bright', so I'm entering this tag.

Friday 28 April 2017

Rustic Style Tag


I came across this video by France Papillon which I partly used to create this tag but obviously me being me, I wavered off and put my own slant on it.


Added a coat of white tinting base, a layer of weathered wood on the stencilled area and then a coat of paynes grey and dark grey and wiped back.


After a layer of ultra matte media varnish I applied a layer of patina antiquing cream and again wiped back.


Added quinacridone gold.


Next I added champagne metallic lustre over some of the stencilling.


Added more quin gold until I was happy with the look.


Added some script stamping with white chalky paint and coloured a few chipboard pieces.


Wrapped rusty wire around the circle and added the heart.


Close up of the stenciling and quin gold over the lustre.


Close up of the top of the tag, more metallic lustre and the stamping.


And finally the finished tag.

All products are from the DecoArt range.

Thursday 27 April 2017

Destiny 1234


Exactly the same process with this 12" x 12" piece of mdf board and modelling paste.


A coat of tinting base.


I used the media sprays for the background, drying inbetween different colours.


Using sand paper I sanded back over the modelling paste.


Flicked on some white chalky paint.


Outlined the stencil and filled it in again as before.


Placed the stencil back over the image and used black gesso through it.


Added a word and some numbers through a stencil and outlined with white Posca pen. Outlined the edge with black pen.


And taken outside which reflects the true colours.

Wednesday 26 April 2017

Live your Dream


This is a huge mdf tag which measures approx 14" x 7". I put some white modelling paste through parts of a 12" x 12" stencil.


Once dry, I painted it with tinting base.


Painted it with dark grey and then medium grey media paint and wiped back.


I added some colour using the media paints.


Put a coat of whitewash over the top to mute the bright colours.


I stencilled through the image with white chalky paint and then filled the whole space in.


Once dry, placed the stencil back over the top and stencilled through with black gesso.


I didn't like the way the head went on the right hand side, so I filled some of the white in with grey.


I added some more stencilling and some stamping in the background.


I touched the butterfies up with turquoise and purple metallic lustres. 


And a final photo outside in the sun.

All products are from the Decoart range.

Monday 24 April 2017

Indian Tag Book Part 2


The next thing to do was to put a backing on the tags using another piece of farbric.


And the same on the small tags.


Next was to sandwich the tag between the fabrics with the sewing machine - easier said than done, as you can see I went wonky and too wide down the right, but hey ho!


Having sewn around all the little ones first, I did get a bit better by the time I got to the big ones!


The next step was to add the couching to the edges. I have done this before, but looking back it was about 7 years ago!! 


Once they were done I cut them out. I'm sure I could have got closer to the couching but I left a bit of a gap as I didn't want to cut into it by mistake and have it fall off!! 


As you can see, I left some of the fabric pieces hanging over.


And here they are with their images on all blinged up (well not too much!).


And here are the little tags to go with them.


And finally all of them together.

I haven't quite decided how I am going to display them yet.

Sunday 23 April 2017

Indian Tag Book


Today I was lucky enough to go to a workshop not far from me near Lincoln at a place called Needle and Thread.


It's an absolutely fabulous venue with perfect views.


And fortunately for us, it was a gorgeous day.


More green fields, trees and a lovely blue sky.


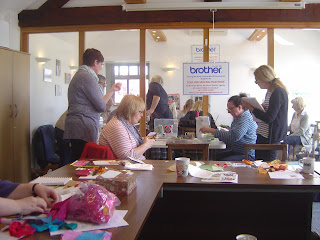
This is where the workshops are held, there are two rooms.


The workshop was taken by Angie Hughes, a textiles artist who is absolutely lovely and so down to earth as well as being a fantastic teacher.


So this is sort of what we were aiming for by the end of the session.


This is Angie giving us some instruction before we start.


And getting enthusiastic about it all!!


So off we went to choose some fabric for the front of our tags.


Next some instruction on how to use the sewing maching and a quick demo.


And Emma having a close up look!


Collecting bits of fabric, some stamping, images, sari ribbon and foil to start to build up the tags.


Layering the bits and bobs to build up the tags.


As you can see, there was plenty of stuff to choose from and play with.

11am was coffee / tea and cake time. Top one is strawberry and the bottom one is tahini and dark chocolate.


The lovely lady on the right stood up is Jan. She kept us supplied with teas and coffees all day.


And this is Angie sat in my chair next to Emma, sewing some metalic thread around a circle for me on one of my tags!


And this is Sally, the lady who organises it all. Behind her there is an embroidery class going on.

I will be back at some point to show you my finished tags, once I've finished them!!!

Blog Archive