Showing posts with label Gesso. Show all posts

Thursday, 14 August 2025

Clockwork Muse


I took a piece of wood from the shed, cut a piece of black lace and I also wanted to incorporate the plastic film strip. Then I started to lay embellishments down.


And I just kept building up the layers.


I finished it off with a frame and a face in a pocket watch piece of chipboard.


I stuck everything down including the piece of tissue paper on the bottom right hand corner.


I gesso'd with the white.


Then used chest of gold paint, aged brass wax and finally patina green wax to highlight the edges.

Sunday, 18 May 2025

Industrial Bird House


I picked this bird house up today from Aldi for a fiver.


I prised the door and the starfish off the front.


Next I covered all the sides with an industrial style paper.


I cut up a sheet of rhinestones on a mesh background into various shapes and stuck them on the back and the two sides.


I took the roof off and covered both sides with air dry clay.


I pressed different embellishments, tiles and found objects into the clay and I left some of them in to create different textures and interest.


I added clay to the bottom of each of the sides and the back underneath the panel of rhinestones.


And again pushed found objects and embellishments into the clay.


I gave everything a coat of white gesso and once dry a coat of green paint. I used PaperArtsy Tinned Peas.


I added shades of yellow ochre and raw umber with water to the project and kept drying between adding the different colours.


Then I knocked it back a bit by re-apply the green but with a dry brush effect.


Next I added some waxes, aged brass, gold and silver.


I added some carmine for a rust effect and then started working on the top section of the bird house.


Once stuck down, I gave them a coat of gesso.


Then I painted the sides with the same green and umber and ochre paints.


Added the same colours of waxes.


Feet added and studs to the roof.


Monday, 24 March 2025

Steampunk Moths


With not much of an idea in mind, I started laying out some resin pieces on a wooden panel.


Gave the substrate a coat of white crackle and also added pieces of Prima Re-Design Poly Decor.


Stuck everything down and gave it a couple of coats of gesso.


I mixed some mica powders with acrylic extender and made a paste which I painted over the crackle.


I used a different colour or mica powder and painted the steampunk moths.


I painted the main elements with Finnabair metallique rustic brown paint.


Added some waxes until I liked what I'd go.  I decided only to use the large steampunk moth in the end.  Added some TH words from the sticker book. 


Close ups


Love how it came out.

Sunday, 10 November 2024

POST GRUNGE- MIXED MEDIA DECADENCE WITH FINNABAIR


Class one - Steampunk cockapoo


Re-design by Prima, fibre image, dog and butterfly wings.


Stuck on a canvas with soft gel and then whilst edges are still wet, pull out the fibres and then paint over with a coat of soft gel.


Janet drying her canvas after coating it with soft gel.


Next steps, the wings.


The shop set up.


Everyone having a great morning.  Huge room, very spacious.


Cut the wings out and then cut around the dogs head / ears.  Draw round the wings.


Blending the background colours into the canvas with a kitchen sponge and impasto paints.


Then trying to remember where the wings go, paint those parts with white gesso.


Filling in the gaps where the wings don't quite fit with impasto paint.


Wings are stuck down and started to add embellishments.


Anna demoing adding the acrylic paint with the sponges to blend the background more.


And finally added the clear domes.


Our table adding the final touches.


This is my finished piece - I LOVE it


Class two - Resist Panel (Darker shade of Gold)


Cover a portion of the substrate with white gesso.  Use soft gel through a stencil to create a resist.


Everyone creating their resist.


Then chose the top paper to cover over the gesso and created a wash for the bottom with acrylic paints (black and burnt sienna).


 Started to build up the composition.


Glued everything down with heavy body gel and added a couple of thin coats of white gesso drying in between.


Our table of creativity.


And just to prove that I was actually there!!


Gave everything a good heavy coating of black gold wax and then touched up with honey.  Used black and brown mix of acrylic paint to add shadows (not very good at that bit).


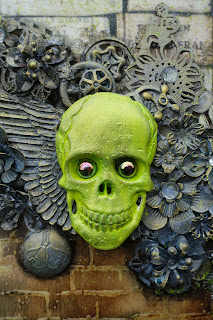
I painted and waxed the main image in acid and lime green as a contrast.


I added green paint to small areas of the composition so it followed through.


Added some lime green splatters.


I added some of the black gold wax onto the skull and filled in the eye sockets.


When I got home I added the Tim Holtz words.

Had an absolutely fabulous day.

Blog Archive