Showing posts with label Wool. Show all posts

Wednesday, 3 November 2021

Spooky Junk Journal


I made a junk journal type book for a friend out of recycled used envelopes.


These are the first couple of pages.


I tried to keep it fairly light hearted and not as gruesome as it could have been. 


Some of the pages are really plain, but room has been left for journaling.


I incorporates some die cuts and some resin mould pieces.


I didn't want to make it too bulky as I didn't put a closure on it.


These two pages house some tags.


And this is the right page with the tags removed.


These are the middle pages.


The envelope pocket flips out on the right page.


And there are 3 tags / journaling cards in the pocket.


These are my favourite two pages.


This is a double spread page with a piece of white netting between the pages.


The netting is covering the left page in this photo, it's very subtle, but a nice effect.


Again very plain pages, but writing space if needed.


Nearly there.


The back inside cover has a pouch with a tag in it.


There is another pouch on the back of the above tag which houses a journaling card.


And finally, this is the back cover.


This is the removable tassel that is attached to the spine with a safety pin.

I hope she likes it as this was part of a 9 day course I am enrolled on with Anna aka Finnabair.

Friday, 1 May 2020

Tuesday, 28 April 2020

Toilet Roll Tag Wallets


Recycling toilet rolls.


Made cuts in the right places and painted them with black gesso.


Decorated the fronts and created more pockets.


And these are the backs with more pockets.


Stripy pockets and spotty tags.


 Spotty pockets and stripy tags. 

Friday, 26 October 2018

Halloween Candlestick Holders


So here we are, all set up for another play.


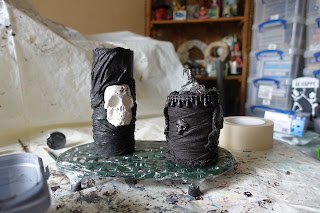
I took a cardboard tube, the core of a kitchen roll, drew around the clay skull and roughly cut it out without squashing the tube.


I checked that the skull fitted in the hole, but I didn't want it loose.


Using masking tape I created a shelf about an inch down from the tops of the tube.


I started covering them with black Powertex. 


I covered the battery tea lights with cling film.


I covered both of the tubes in fabric and other embellishments. Once the fabric was on the taller tube, I pushed the skull into the hole.


Added more clay pieces, lace and wool.


Added the clay wings.


I painted everything in black Powertex and then set them outside to dry.


I brought them back inside and left them overnight to totally dry.


Once dry, I took out the tea lights which were still covered in cling film. The fabric where they'd been sat was still a bit wet, so I left them out to let the fabric fully dry.


Once totally dry, I dry brushed them with silver and turned on the tea lights.


And these are the opposite sides, ie the back.

Had loads of fun making these and love how they've come out.

This step by step is over on the Powertex Blog today too. Why not pop over and check out what else is on there.

Saturday, 29 September 2018

Wet Felting Workshop - Spikes and Craters


So today I attended a wet felting workshop with felt maker, Jenny Pepper. It was a lovely day, which was lucky, as I travelled to Scarborough for it.


The first thing we did was laid out three layers of Merino wool and created a pre-felt.


This is Liz creating her prefelt.


This one belongs to Jenny who came all the way from Cumbria, somewhere near Hadrians Wall.


Jenny (the tutor) helping Liz out with her prefelt as it was quite thick and she needed to add more soapy water.


This was one of Jennys samples showing a few different techniques that I wanted to try.


We each created a base and then stopped for a bite of lunch. I just went with a plain cream. Jenny gave us a demo of how to create the different craters and spikes and flaps and then we had a play on our own pieces using the previously made prefelt.


We used the prefelt as it has still got some felting life left in it, so it will adhere easily to the background piece which was just laid down (3 layers), wetted and left until we needed to use it.


The after much rubbing and rolling and more rubbing and rolling and hot and cold water shocks x2 finishing with cold and rinsing out and cutting and sealing the cuts, this is what I ended up with.


I love how it came out, I forgot to say about the spikes on the bottom, they were the last thing to be felted after everything else had been wetted out and rubbed.
 

And this is how Carols turned out. I didn't get a photo of Jenny's and Liz's finished pieces as they left pronto, as their lifts had arrived before I got chance.

Had such a lovely day and my piece is now drying in the airing cupboard.

Blog Archive