Showing posts with label Media Crackle Clear. Show all posts

Tuesday, 15 March 2022

Trust In Rust Challenge


I collected all these pieces of rust over a few days by picking them up out of the gutter on our doggie walks.


Next I started to play around with some of the pieces.


I covered the canvas with patterned papers.


Added some clear crackle.


Once fully dry I smeared some burnt sienna over the crackle so it would sink in the gaps.


Then for the next coat I used carmine in the Finnabair range.


Close ups of the rust.


This is to show the dimensions.


This is the completed piece laid flat.


And this is the completed piece stood up.

I am entering into the Finnabair #trustherustchallenge 


Thursday, 22 July 2021

Second Altered Brandy Liqueur Bottle


The second of the lovely square brandy liqueur bottles.


I painted it in black powertex and then used clear crackle paste over two opposite sides and left it over night to do its thing.


Then I painted it in metallic rust Lumiere paint.


I rubbed over the crackled panels with umbra antiquing paste.


Painted and stuck on the embellishments with black powertex.


And the same on the other side.


And the view from the top.


Then I painted them with metallic paints and also used metallic waxes.


And the same process for the front.


And finally a view from the top.

#rusteffects #powertex #upcyclingchallenge

Thursday, 8 April 2021

More mould creations on pieces of wood


I wanted to try out my new colours of waxes.  The substrate is just wood from our old green gate - it works great.

I picked up the clear crackle instead of the clear modelling paste, but it was okay.

Wednesday, 3 June 2020

Vintage Style Double Tag


Using some of the die cuts from the books I got from The Works I started to play with the layouts.


I also incorporated some of the embellishments I made too.


I used clear crackle paste through a stencil and then rubbed over with treasure gold in gold, green and blue.


Close up of the treasure golds.


And the crackle.


I machine stitched the tags 


and added some lace trim.


Butterfly wings and T!m's Paper Dolls.


And finally the finished tag.

Friday, 10 February 2017

Acrylic Crackle Square


Having watched Andy Skinner on Hochanda on Wednesday, I searched for some acrylic shapes and came across these 3" x 3" squares which I think Chris sent to me as part of a prize. I didn't have any two step crackle so decided to see if it would work with clear media crackle, which as you can see, it did.


Next I made up a wash of media paint to seep into the cracks to further hi-light them.


Next I found out why it was important to stamp the substrate first instead of after the crackle has been applied. The stazon when stamped took some of the crackle off when the stamp was pulled away. But I carried on and painted the triangle of the eye with titan buff media paint.


Once the titan was dry I painted the background with pyrrole red and then heat set.


And finally I peeled the backing off, which then became the front and this is what was revealed. Where the paint has splodged is where the stamp pulled the crackle off.

Had good fun playing though. All the products were from the DecoArt media range.

Saturday, 28 January 2017

Pocket Letter Atc Set


Chris enticed me into a swap of 9 atcs with a theme running through them all. I got to choose the theme for her, so I chose shades of pink, black and white and butterflies. Now apparently they are called pocket letters as they are meant to have an element of surprise.


So my element of surprise was on the back. These are the backs, basically another set of 9 atcs with a theme.

We are at a Powertex workshop in Nottingham today, so we are swapping them there, hope she likes them and the surprise!!!

Sunday, 11 December 2016

A Play Inspired by Andy Skinner on Hochanda


After watching the rewind shows of Andy Skinner and DecoArt on Hochanda I was inspired to have a play yesterday. I didn't really have anything in mind, just got a few pieces of mdf out and tried out some techniques, most of which I've done before. Was slightly gutted when I emptied my whole mdf box to find I'd got no large tags left :o(


As I say, I had no real idea of what was going to go with what, so this morning once everything was completely dry, I started to assemble pieces and these are what I came up with.


The mini dream tag was originally meant for this background, but I love how the colours in the heart just co-ordinated perfectly.


I used prussian blue hue to enhance the cracks in the heart.


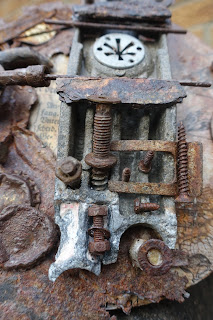
Lots of rust techniques going on in this one.


Close up of the rusty heart and cog.


I wanted to put this on a tag with a white background with a large crackle but instead I used a piece of embossed rust effect card and a piece of corrugated that I'd made at some other time.


Close up of the heart which was stamped and crackled on the 3 corners and then black antiquing cream used to enhance the cracks.


Close up of the rusted embossed card. You can see how I made this here.


This was one of Andy's new techniques, well the technique isn't new, it's the product you use that is different, luckily I had some triple thick glaze and the colours dispersed perfectly.


I stenciled the word onto a mini mdf tag and covered with clear media crackle and I got some wonderful cracks. I used white antiquing cream to enhance them.


And finally my large heart simply painted with relic and stamped with one of Andy's background stamps in everlasting chalky paint. 


Blog Archive