Hi all, just thought I'd let you know that I have decided to leave the Just for Fun design team and challenge blog. Hence the reason I have taken the logo off my side bar. For me it was getting to the stage where it was no longer 'just for fun'. It started to get too political with rules and disqualifications etc. Fun and interpretation of the theme to some people is different to others and in my opinion we should all be able to express ourselves freely without being judged.
See you around
Sam

Showing posts with label JFF. Show all posts
Showing posts with label JFF. Show all posts
Sunday, 18 September 2011
Thursday, 25 August 2011
JFF - Week 30 - Black, White, Silver & One Other

It's the last week of the colour theme over on JFF this week. I chose to add red as my colour of choice.
The background is corrugated covered in white, black and silver acrylic paint. The wings are die cut from vellum and run through the big shot. The frame is the scrap piece from the slide mounts of a couple of weeks ago, with an image and stamped words mounted in them. I added a piece of red ric-rac to the bottom, three red gems and the red fibre to hang.
Thursday, 18 August 2011
JFF - Week 29 - Black, White & Silver

Week three on JFF this week is to add another colour to last weeks black and white. So this week we have the theme of black, white and silver.
I made a circle slider, well that's what I am calling it anyway!!
To check out how to make it, watch this youtube snap

This is it opened out.
The bottom circle is made from the alterations clock face with a backing of a thich vellum run through the steampunk embossing folder. I used the crowned circles spellbinder dies and cut all the sizes in black and white. I stamped the PA gentlemen plate 3 image and used the circle punch to cut it out. The middle and smaller circles are based on the crowned circles. The middle out of the clock was run through the embossing folder and painted in silver and swooshed over with black acrylic. I punched a circle in white card and stamped it with a PA image from travel plate 1 and also a circle in vellum which I ran through the embossing folder. And finally for the top circle I added a stamped word image, an embossed cog which was swooshed in black acrylic and a small cog painted with silver acrylic and the smallest crowned circle in black with a spinner and brad. Brads were added to the circles to make the movement.
Thursday, 11 August 2011
JFF - Week 28 - Black & White

So here we go with week two of the colour theme on JFF. Just add black to white and there we have it, this weeks theme is black & white.
I decided to re-visit the slide mount box. To find out how I consturcted it, check out the step by step on the Techniques Zone.

This is a sample of the edges. I left them plain on this one.

I then made another one.

I edged this one with sequins.
Thursday, 4 August 2011
JFF - Week 27 - White on White

It's my turn again to set this months JFF theme and I've chosen 'add a colour'. So week one is a single colour, which is white. So I guess you could say this weeks theme is white on white.
I painted a piece of corrugated in white gesso. When dry added a touch of pearl to give it a hint of metallic. Die cut some of t!m's flowers in card and vellum. I then put them through the swiss dots embossing folder. Curled the petals on the vellum one, layered them up and added a button.
I die cut the banner from white card, added a white rub off that says paradise, which doesn't show up very well and added some dots in liquid pearls.
I added a piece of lace down the right hand side and finished off by adding three pearls.
Thursday, 28 July 2011
JFF - Week 26 - Fabric and or Fibre

Fabric and or fibre is this weeks JFF theme. I decided to use both. The background is a piece of muslin which has been stamped with acrylic paint. I heat transferred an image onto another piece of muslin which I frayed around all four edges. I used a large zig-zag stitch to attach the thick piece of wool down the right hand side. I unravelled a dyed silk carrier rod and using free motion sewing, attached it and added a piece of ribbon across the middle. I left the threads so I could attach the button. I stamped the word dream and added gems. Down the left hand side I added a piece of deep green silk organza, once it was attached I blasted it with the heat gun. Finally I added a piece of lime green ribbon to hang.
Thursday, 21 July 2011
JFF - Week 25 - Metal

This weeks theme over on JFF is metal. I've taken a different approach with this one and used wire for my metal. I made this spider with a couple of wooden beads and bent pieces of wire to shape the legs and also gave him a body. I used a white paint pen for the eyes.
Thursday, 14 July 2011
JFF - Week 24 - Corrugated

JFF this week is asking for corrugated. This base piece is around 10" x 10". I painted it with white, pistachio, black and brown eco friendly acrylic paint. Then I covered most of it up!!! I stamped various clock images onto card with distress stains and used distress inks to colour them. I ran the glassine paper through the big shot using the TH pocket watches texture fade and coloured it with distress stains. Stamped the saying and ripped it out of the card, coloured it and mounted it with silicone glue. The clock centres are brads and spinners. Added a piece of string to hang.
Thursday, 7 July 2011
JFF - Week 23 - Plastic / Acrylic

This weeks JFF is all about plastic and/or acrylic. I chose to fuse black and white strips of plastic carrier bags together to create the background as above.

I embossed the umbrella man onto a white piece of card, swooshed over it with black soot distress ink. Stamped the saying and die cut with a spellbinders label die. Cut a small cog with the movers and shapers die in silver card. Attached all to the plastics background with silicone glue and mounted the whole lot onto a piece of black card and added a piece of black hemp to hang.
Thursday, 30 June 2011
JFF - Week 22 - Anything Goes

Well not quite for the JFF DT this week. Instead we decided to pair up, send each other a few random bits and pieces and using at least five, the challenge was to make something with what you'd been sent. Above is a selection of what I got from Zoe.

And here is what I came up with. I used the beermat as the base and coloured it with copper acrylic dabbers. I unravelled the blue plastic coated paperclip and coloured that with the same colour. The two pieces of wood I covered in hazelnut dabber and stamped with black soot. The beermat was stamped with script from PBS again in black soot and also edged in the same colour. The piece of embossed chipboard at the bottom was also coloured with the copper and swiped over with the black soot. I cut the paperclip and made it into a couple of hangers for the top and bottom. I arranged the pieces of wood and placed the metal leaf on the top.
Thursday, 23 June 2011

Thursday, 16 June 2011
JFF - Week 20 - Doodles

It's Zoe's turn to choose this weeks theme over on JFF. I took a black sharpie pen and a white piece of friendly plastic.

I doodled my pattern onto the white FP.

Then I made a bead.
Inspired by Linda Peterson, FPTV.
Thursday, 9 June 2011
JFF - Week 19 - All Things T!m

I have set this weeks JFF theme and I chose 't!m'. Anything, something, all things t!m. I chose to use all things t!m.
- Brick texture fade for the background.
- Distress stains and ink to colour everything.
- Image is from 'the boys' stampers anonymous plate.
- The scroll is from the hanging signs alterations die.
- The hinges are grungeboard from the mixed minis set held with brads. The arrow is from the elements set.
- Tissue tape.
- And finally glossy accents for the crown.
Thursday, 2 June 2011
JFF - Week 18 - Eye Spy

A bit ago I had a play around with a glue gun and created some patterns. When cooled, I coloured the glue with rub n buff. I used the one on the left to make the hanging below.
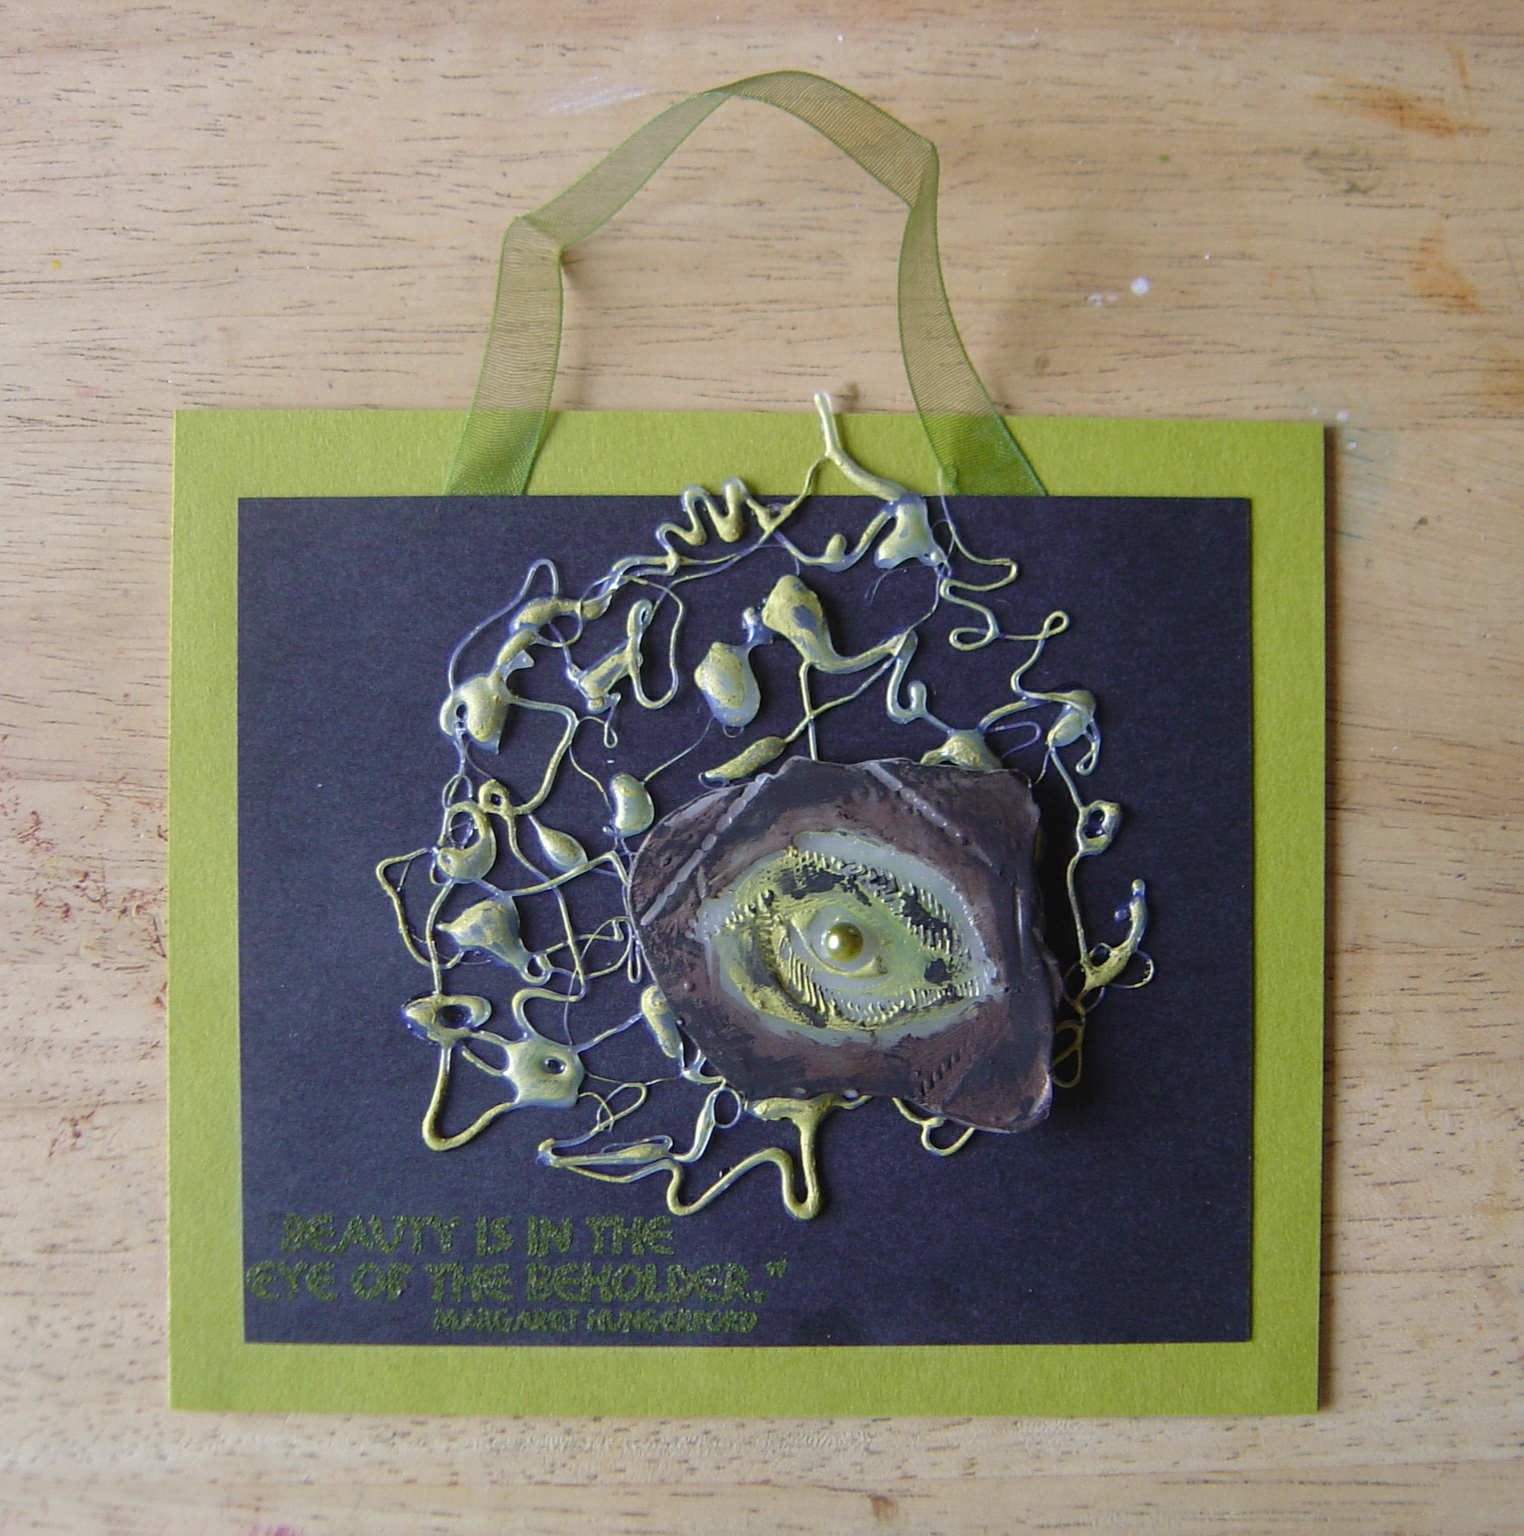
I stamped an eye into friendly plastic pellets and once cooled, coloured it with spanish copper and jade rub n buff. I added a large green gem for the inner of the eye. I mounted it on the glue. I stamped 'beauty is in the eye of the beholder' from the creative expressions spirit plate in peeled paint distress embossing powder onto the black card. I then layered it onto green card and added a piece of organza ribbon to hang.
Check out the JFF challenge blog as there is a different challenge set every Thursday.
Thursday, 12 May 2011
JFF - Week 15 - Scraplings

Over on JFF this week Neet has introduced us to 'scraplings'. I have to admit I had no idea what they were, not being a huge card maker and all that. But it makes sense doesn't it and they make quite good little cards in their own right. I attacked mine with my distress stains. I used a dark and a light to compliment each other and stuck a piece of ribbon over the join. Both the main images on the outside cards are stamped in black stazon and the middle one is stamped in the walnut stain distress stain.
Thursday, 5 May 2011
JFF - Week 14 - Inchies

Over on JFF this week it's Neet's turn to decide on the monthly theme, she has chosen 'size matters'. The first week, it's inchies. No, you aren't mistaken, this is not an inchie (1x1), it's a fat page (4x4). I created the background using the new TH distress stains, wild honey and forest moss. I stamped the images with walnut stain distress ink. I used the spellbinders labels 2 dies to mount the main image.

I then cut the fat page into 16 1 inch squares. I mounted them in a wooden frame I'd covered in gesso and went around the edges with walnut stain distress stain.
Thursday, 21 April 2011
JFF - Week 12 - Square(s)

This weeks JFF shape chosen by Von is 'squares'. The black section in the middle is square and everything else is slightly more, shall we say, rectangular!!! I masked off the number 2 and whitewashed the square with diluted black acrylic paint and stamped it with a homemade foam stamp in orchid eco friendly paint. The main background is sprayed with dylusions fuscia and lime ink. Once dried I inked the scrathes stamp with black distress ink and spritzed with water. The section with the image on is a piece of the sprayed paper and crumpled and curled at the edges and outlined with black acrylic dabbers. I scrunched a piece of music paper up and added that to bottom right. The word friends was stamped with white eco friendly paint. The letters are cut from the postage cuttlebug plate and dabbed with various colours of eco friendly paints. Everything is attached to a piece of card painted black.
Thursday, 17 March 2011
JFF - Week 7 - Try a new format

This is week 3 of Zoe's JFF monthly theme of 'let's try it out'. I couldn't think of anything new I could try so Zoe sent me the instructions for a twisted box fold card. I decided to make it into a mother's day card for my mum, hence the reason it's not too messy and inky. She really doesn't like anything like that. I did manage to use distress inks on the two triangle sections. I thought the weight of the flower might cause the card to fall over, but it's actually quite sturdy.

This is the card stood up.
Thursday, 10 March 2011
JFF - Week 6 - A New Technique to You

JFF this week is asking for a new technique, so I thought I'd try this out. Using alcohol inks on friendly plastic, and wow, I love the results. I melted two pieces of plain white together, swiped them with Ranger blending solution. Dripped blobs of AI onto the plastic. I let each colour dry before I applied another. I used a combination of blending solution and surgical sprits to 'lift off' some of the colour to create the lighter areas. For further info check out the art of friendly plastic blog from where I followed their instructions.

Once I was happy with the colour combo, I turned it over and heated the back with a hairdryer type heat gun (you can use the other type but just be aware as it seems to get hotter quicker) until it had a glossy sheen to it. I then placed a piece of rainbow transfer foil face up on the FP and rubbed it on. When it had cooled I peeled it off to reveal the above.

I heated the FP again and cut into it using a hand shaped metal cutter. Once cooled, I pulled the cutter from the FP and above is the result.

And this is the back.
Thursday, 3 March 2011
JFF - Week 5 - Mixed Media

I'm still away but Zoe has set this months JFF theme of 'let's try it out'. This week she has instructed us to play, so I got right to it!!!!
This is a 10" x 10" canvas. I freehand drew a heart and covered it with a very thick layer of texture paste. Once dry I coloured it in red pepper acrylic dabber paint and outlined the left edges with black. I covered the rest of the canvas with pistachio eco friendly paint using cut n dry foam. I edged it with bottle coloured acrylic dabbers. I used a paintbrush to cut the canvas into sections. I used various embellishments including, friendly plastic, clay, grunge board, buttons and utee to decorate.
Subscribe to:
Posts (Atom)
