Showing posts with label Resist. Show all posts

Sunday, 10 November 2024

POST GRUNGE- MIXED MEDIA DECADENCE WITH FINNABAIR


Class one - Steampunk cockapoo


Re-design by Prima, fibre image, dog and butterfly wings.


Stuck on a canvas with soft gel and then whilst edges are still wet, pull out the fibres and then paint over with a coat of soft gel.


Janet drying her canvas after coating it with soft gel.


Next steps, the wings.


The shop set up.


Everyone having a great morning.  Huge room, very spacious.


Cut the wings out and then cut around the dogs head / ears.  Draw round the wings.


Blending the background colours into the canvas with a kitchen sponge and impasto paints.


Then trying to remember where the wings go, paint those parts with white gesso.


Filling in the gaps where the wings don't quite fit with impasto paint.


Wings are stuck down and started to add embellishments.


Anna demoing adding the acrylic paint with the sponges to blend the background more.


And finally added the clear domes.


Our table adding the final touches.


This is my finished piece - I LOVE it


Class two - Resist Panel (Darker shade of Gold)


Cover a portion of the substrate with white gesso.  Use soft gel through a stencil to create a resist.


Everyone creating their resist.


Then chose the top paper to cover over the gesso and created a wash for the bottom with acrylic paints (black and burnt sienna).


 Started to build up the composition.


Glued everything down with heavy body gel and added a couple of thin coats of white gesso drying in between.


Our table of creativity.


And just to prove that I was actually there!!


Gave everything a good heavy coating of black gold wax and then touched up with honey.  Used black and brown mix of acrylic paint to add shadows (not very good at that bit).


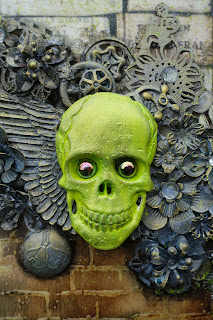
I painted and waxed the main image in acid and lime green as a contrast.


I added green paint to small areas of the composition so it followed through.


Added some lime green splatters.


I added some of the black gold wax onto the skull and filled in the eye sockets.


When I got home I added the Tim Holtz words.

Had an absolutely fabulous day.

Saturday, 29 September 2018

Wet Felting Workshop - Spikes and Craters


So today I attended a wet felting workshop with felt maker, Jenny Pepper. It was a lovely day, which was lucky, as I travelled to Scarborough for it.


The first thing we did was laid out three layers of Merino wool and created a pre-felt.


This is Liz creating her prefelt.


This one belongs to Jenny who came all the way from Cumbria, somewhere near Hadrians Wall.


Jenny (the tutor) helping Liz out with her prefelt as it was quite thick and she needed to add more soapy water.


This was one of Jennys samples showing a few different techniques that I wanted to try.


We each created a base and then stopped for a bite of lunch. I just went with a plain cream. Jenny gave us a demo of how to create the different craters and spikes and flaps and then we had a play on our own pieces using the previously made prefelt.


We used the prefelt as it has still got some felting life left in it, so it will adhere easily to the background piece which was just laid down (3 layers), wetted and left until we needed to use it.


The after much rubbing and rolling and more rubbing and rolling and hot and cold water shocks x2 finishing with cold and rinsing out and cutting and sealing the cuts, this is what I ended up with.


I love how it came out, I forgot to say about the spikes on the bottom, they were the last thing to be felted after everything else had been wetted out and rubbed.
 

And this is how Carols turned out. I didn't get a photo of Jenny's and Liz's finished pieces as they left pronto, as their lifts had arrived before I got chance.

Had such a lovely day and my piece is now drying in the airing cupboard.

Saturday, 9 June 2018

Wet Felted Vessels Workshop


Today I went to the lovely Needle and Thread near Lincoln run by Sally, to do a wet felted workshop with Robyn. 


Firstly we had to decide on the shape of our vessel. We all (I say all, there were only two of us) chose to keep it simple and do a bowl shape, so we started off with a circle. Covered both sides in two layers of merino and put it to one side.


Next Robyn showed us how to make various things including canes, balls, spikes and prefelt.


This is my cane in the making. Once you get it started you can roll it in bamboo and it really helps to stiffen it up.


I decided at the eleventh hour to change my shape to an eye sort of shape. just so I could get all the elements on that I'd made.


Anchored the pieces down, but looking back I think I used too much, especially around the top of the larger cane circle.


Robyn had brought her drum carder and kindly let us have a go with it, so we were able to make our own batts for the top coat and blend loads of different colours together. Nepps and silk waste was also added. Eveything was then wetted down and we worked around each element for which seemed like ages to make them all 'stick' together.


Robyn laying her top layer down.


Wendy working her individual elements into the main piece over a piece of thin plastic.


In the room next door they were using free machine embroidering to create pictures.


After working around all the individual pieces to make sure they are all linked with the wool.


This one is Robyn's.


This one is Wendy's.


We then rolled about 40 times, turned 90 degrees and turned it over to until all 4 ways had been done and the resist started to buckle. 


Once this happened we took the resist out by making a cut through all the layers and pulling it out through the hole. Did the hot and cold shrink thing, threw it on the floor a few times to shock the fibres. Soaped it again in hot and cold, worked the edges so we didn't end up with a seam and basically worked it until we were happy with the look and feel of it.


Once happy with the way it had felted, inside and out, we cut the small resists out that we put in to make the craters.


Once worked and shaped, we stuffed them with carrier bags to help them keep their shape.


And a view from the top.

I will be back tomorrow once it's dried to show you close ups of the different elements.

Blog Archive