Showing posts with label Glitter Spray. Show all posts

Saturday, 12 December 2020

StoneArt Tree


After watching day 5 of Ashley Hay's Creative Christmas Challenge videos I decided to have a go at making a tree but I didn't have a cone shape for the base, so instead I wrapped cardboard around a bottle.


Once dry, I took the bottle out of the cardboard and was left with a cone shape.  I mixed up stoneart and powertex to make a clay, rolled it out very very thinly and then tore it and powertexed it on the cone.


I did it in layers starting from the bottom upwards.


And here it is totally covered in the clay.


Once dry, I started to apply colour.


Once I was happy with the colour I gave it all a coat of varnish and then about 2 hours later a coat of transparent powertex.


Just love the ruffles of the torn clay mix.

Friday, 28 December 2012

Distress Stain Backgrounds


As I was browsing I found this YouTube video, so watched it and had a play.  I didn't have any of the glittery card, so I sprayed a white piece with some gold. This is the first print using squeezed lemonade, festive berries and spun sugar.  The Stampotique word background was stamped in vintage photo, spritzed with water and blasted with the heat gun, hence the reason it's not that clear. (It's not meant to be!!)


This is a close up of the gold glitter showing through.


And this is the second print, as you can see it's a lot lighter.  This time I inked the stamp and spritzed the stamp before stamping.

Friday, 1 April 2011

Grungy Monday - Number One!!!!


Inspiration to enter this challenge came from Alison and Hazel, thanks ladies.  This is my entry for this weeks premier of the new challenge at Grungy Monday set by Linda, the founder of the wonderful CoC challenges, but they have alas come to an end, so now she has started something new.  Hop over to have a look.

I sort of digressed with this though as I used my distress stains and glitter spray not the ink and the perfect pearls combo.  But I think it still qualifies as grungy!!!  The cog is grunge board coloured with walnut stain and vintage photo distress stains, the background is wild honey stain blended with tea dye distress ink over elements of the TH timeworks mask.

Sunday, 21 November 2010

Christmas Tags


Haven't had much time for crafting lately, but managed to make these three tags late yesterday, but had to wait until today for everything to properly dry and try to get a decent photo, but just for a change it's dull and raining!!!

The background colours were created with distress inks, old paper (left and right) and milled lavender (middle).  The december 25 is gold embossed.  The trees were stamped in a light green and then again in brown, string was added to finish.  The snowman was black embossed and coloured with purple eco-line ink.  Snowflakes where clear embossed onto the tag and also stamped in milled lavender.  The merry christmas was stamped in stazon royal purple.  The snowflakes were cut using the die in the big shot on grungeboard and coloured with purple twilight and pearl dabbers.  The trees were stamped in hydranger blue stazon.  The believe was stamped in black stazon onto purple and gold spritzed card.  The letters were diamond glazed.


The blue trees were spruced up with clear stickles.


The tag was sprayed with gold glitter spray.

Sunday, 14 November 2010

Postcard Canvas


Carrying on the clay theme, I made a postcard, but I decided to mount it onto a deep 4 x 6 canvas.  I've entered a postcard swap on one of the yahoo groups I belong to, I'm just waiting to hear if this will be acceptable or not, due to the depth.  Unfortunately the colours on the photo haven't come out as it looks IRL.  They are much brighter and you can see the stamping.


This is a snippet of one of the side pieces.  I painted it with various shades of blues and purples.  I outlined the edges of the canvas with black paint to frame it.


******Edited***** The sun is shining this morning so I've been able to capture the colours better.


More Clay Pieces


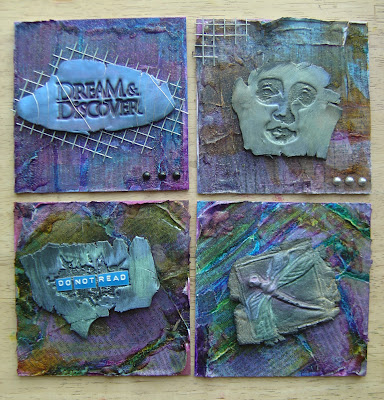
As my clay atc's were so successful, I decided to make some 4 x 4's and added the clay pieces as the focal point.  I created the backgrounds in exactly the same way as the others.  Top left is mounted on a piece of mica.  Top right is a mould whereas the other three pieces have been stamped into, so it's raised.  On the bottom two I've added wire mesh, wire and gems.

*****Edited***** The sun is shining this morning so I've been able to get a better photo to show the real colours.


Blog Archive