Showing posts with label Idea-o-logy. Show all posts

Friday, 24 May 2024

Cabinet Frames and Cards

Mr T!m Holtz of Idea-ology has just brought out a fabulous release of new items.  However, some of them to me are 'convenience items' and can easily be made from what you already have.  Therefore, I decided to make my own.


So I made a masterboard from scraps, cut out rectangles and ovals using dies to create the frames.


And I was left with the middle parts, so win win.


I then made some tag shapes and covered them in various background papers.


I also decided to make some more clusters as I was going along as I wanted to try and incorporate them somehow in the tags and frames.


And this is what I ended up with.  The three tags on the right have three of the above clusters incorporated in them.

Monday, 29 November 2021

Accordion Book


The front


First couple of pages.


Lots of tag pockets on these two pages.


More pockets to add tags into.


This is the back.


The back sides of the pages


Just one pocket on this one so it didn't get too bulky.

I watched a series of 4 youtube videos by Tracie Fox and was inspired to make an accordion book.

Wednesday, 3 November 2021

Spooky Junk Journal


I made a junk journal type book for a friend out of recycled used envelopes.


These are the first couple of pages.


I tried to keep it fairly light hearted and not as gruesome as it could have been. 


Some of the pages are really plain, but room has been left for journaling.


I incorporates some die cuts and some resin mould pieces.


I didn't want to make it too bulky as I didn't put a closure on it.


These two pages house some tags.


And this is the right page with the tags removed.


These are the middle pages.


The envelope pocket flips out on the right page.


And there are 3 tags / journaling cards in the pocket.


These are my favourite two pages.


This is a double spread page with a piece of white netting between the pages.


The netting is covering the left page in this photo, it's very subtle, but a nice effect.


Again very plain pages, but writing space if needed.


Nearly there.


The back inside cover has a pouch with a tag in it.


There is another pouch on the back of the above tag which houses a journaling card.


And finally, this is the back cover.


This is the removable tassel that is attached to the spine with a safety pin.

I hope she likes it as this was part of a 9 day course I am enrolled on with Anna aka Finnabair.

Saturday, 30 October 2021

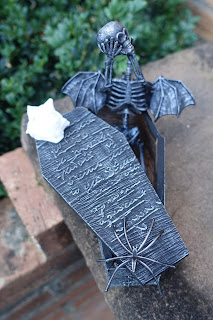
Skeleton in a Coffin


I bought some plastic skellies from Pound Stretcher. I pulled the head off and added a pair of bat wings.


Then I positioned the arms and put the head between them and just sat it in the coffin shape purely just to dry, or so I thought!


Then, just to keep everything together, I placed the lid on the top of the box.


I decided to decorate the coffin. I used texture paste through a stencil and painted everything black.


I used white paint to dry brush to bring out the textures.


I was playing with the idea of what to put on the coffin and I ended up with just these two.


The rain stopped so took the opportunity to take some photos outside.

This will be up for sale in my on line shop.

Thursday, 25 March 2021

Altered Photo Frame


I decorated an old photo frame with fibre paste and tar gel, once dry I painted with black pearl acrylic paint.  For the inside I embossed a couple of pieces of silver foil tape, covered in black gesso and wiped back.


I used gilding paste and metalic flakes on the embellishments and I coloured the skull with liquid acrylics.  The words are T!m Holtz chipboard quotes.


Sunday, 2 August 2020

Friday, 29 May 2020

Vintage Stuffed Envelopes


This envelope is approx 7.25" x 5.25".  It has two pockets and is full of ephemera.


Back of the envelope and closure.


Inside the envelope. This is approx postcard size.


Envelope number two is square, 6" x 6" and has three pockets.


Back of the envelope and closure.


I put a tag inside this envelope.


Side by side stuffed with ephemera.

Blog Archive