Showing posts with label skull. Show all posts

Sunday, 16 June 2024

Ray Ray’s Creative Circus Class of 2024 Retreat - Part One - Nuneka Box


Although this looks like a wonderful place to stay, it really was dire from every aspect.


Not only were the rooms tiny, and I mean tiny, not just small, tiny.  They were filthy with crumbs and grit all over the carpet.  It was clear that they'd not seen a hoover for some time, and this is probably because there is no room to get a hoover in.


The lounge area was okay and my food was fine, but the same couldn't be said for Janets. Hers finally arrived about an hour after everyone else had eaten even though it was ordered the same time as mine.  She didn't even get what she asked for!!


So this was the function room, hardly any natural light at all and green and blue strobe lighting, not exactly ideal.  No plug sockets for heat guns either, so the gang got together to get that sorted out whilst we found ourselves a seat and dived into our goodie bag.


They were all the same but slightly different, if that makes sense. So they all had the same contents ie a stamp plate, but it was a different set of stamps.


So here we are, getting acquainted with our neighbours.


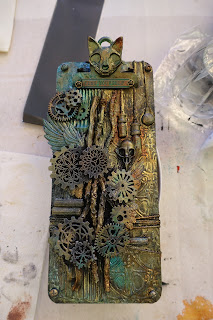
This is Nuneka and this is our first project.


Started off using 3d gel through a stencil.


Tore a piece of cardboard and glued it down.


Our table, Nanette, Helen, Dawn and ........


and ................ Janet!!


Added random string and lightbulb casts.


Popped all the cogs out and painted everything with black gesso including the resin pieces.


Started to arrange a composition using the biggest elements first.


Dry brushed with white gesso.


Then I used the light green sparks (fairy wings) randomly over the project and flooded it with water spritzing everywhere, dried it and ditched the water.  This gave me a gold shimmery base colour.  Using 3 more colours of sparks paints (two blues (night shadow) and a brown along with the green) placing them where I wanted them to stay and lastly added a bit of carmine for the rust and spritzed.  I only concentrated the rust in the top right hand side but let it drip.


And this is what I ended up with.  I still need to add the focal point when I decide what I want.  The original was layered with papers, but I didn't want to do that.


This was taken at about 7.30pm as we were ready to leave for home, most people were still working on the afternoon project.

Monday, 25 October 2021

Skull in a Jar


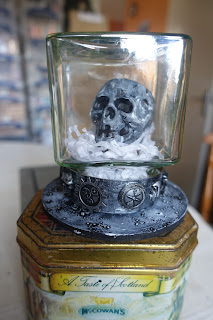
I cast a skull and coloured it up.  I needed it raised out of the lid so I used a cotton spool and some cardboard.


I glued a large spider on the top of the jar.


I added white shredded paper and some mini resin embellishments.


I used brushed iron alchemy wax on the embellishments.


And after I'd coloured them I decided that it needed a proper more stable base, so covered a coaster with black powertex and added in some small sand balls.


I used white powertex to dry brush over the coaster to show the sand balls and texture.


View from the left side.


View from the right.


And then finally a shot in the garden.

This is for sale in my online shop.

Sunday, 24 October 2021

Skellie in a Coffin


I picked up some plastic skellies and skulls.  I decided he needed a coffin.  So I made one out of cardboard.


I gave it a coat of black powertex and played around with some fabrics and resin pieces.


Then I decided I wanted to mount it on something and use a technique shown to us by Finn aka Anna, in one of her live shows.


After a coat of black powertex I dry brushed in white.


Then to see how he fitted in the box with the fabric in.


Once I was happy with everything I mounted the coffin on the background piece.


And a view from the bottom to the top.


And from the other side.


Close up of some of the embellishments.


And some more from the other side.


And a close up of the legs and feet.


And then a close up of the bottom right.


And finally a close up of the skull and skellie.

This is for sale in my online shop.

Monday, 11 October 2021

Skull & Cog Plate


I painted another plate with black powertex.


I then painted it in pewter metallic acrylic and pulled out a few pieces to decorate it with.


I arranged them how I wanted them on the plate.


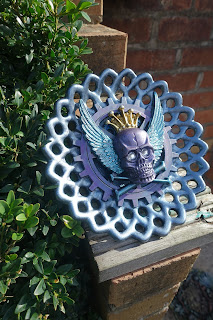
And then I coloured it up in purples and blues.


And I took this photo outside in the sun this morning which is a truer representation of the colours.


And a view from the left.


And the right.

This is now for sale in my on-line shop.

Sunday, 10 October 2021

Santa of the Dead


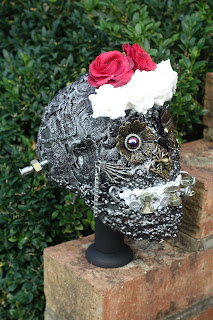
I covered a skull with a mix of powertex and different sizes of sandballs.  I added a couple of flowers in the eyes, but they have kind of got lost, so did the mouth, so I was playing around with some hardware in the shape of nuts, bolts and screws.


Once I was happy with the mouth/teeth, I then started playing around with pieces for the nose and eyes.


Added a gem to each eye socket and some red roses.


I then added hand charms and some chain. 


Due to all of the nuts and bolts at the front, I needed to add some 'weight' to the back so it would stand up on the wooden spool.


View from the left.


View from the front.

I actually love how he turned out. He is for sale in my on-line shop.

Blog Archive