Showing posts with label Babywipe. Show all posts

Tuesday, 16 January 2018

Button Eve


Using the fabulous ARTZONE stencils designed by Deb Wainwright I created this piece. The background has been coloured with red, orange and yellow Decoart premium acrylics, applied with a babywipe. I used blue twister crayola crayon through the essentials 1 and outlined the boxes with white crayon and smudged them. The main image, Eve, was stencilled with black Decoart modelling paste. I added two buttons for the other eye.

All the stencils (and more) can be found in Debs online shop here. If you get chance, please pay a visit. They retail at £5.75 and are excellent value. They are made from a very robust material and because of this they are very to use and also easy to clean. They are also very versatile as they can be used either way.


Monday, 15 January 2018

Skellen & Essentials


Using the fabulous ARTZONE stencils designed by Deb Wainwright I created this piece. The background has been coloured with cobalt blue, magenta and dioxazine Decoart premium acrylics, applied with a babywipe. I used titanium white through the essentials 1 and carbon black through the skellen stencil which is from the first release.

All the stencils (and more) can be found in Debs online shop here. If you get chance, please pay a visit. They retail at £5.75 and are excellent value. They are made from a very robust material and because of this they are very to use and also easy to clean. They are also very versatile as they can be used either way, which you will see in another post.


Saturday, 13 January 2018

Boho Jane


Using the fabulous ARTZONE stencils designed by Deb Wainwright I created this piece. The background has been coloured with magenta, orange and yellow Decoart premium acrylics which I applied with a babywipe. I used carbon black through the Boho Jane stencil, which is from the first release. I coloured in using twisted crayola crayons and added buttons and fibres to embellish.

All the stencils (and more) can be found in Debs online shop here. If you get chance, please pay a visit. They retail at £5.75 and are excellent value. They are made from a very robust material and because of this they are very to use and also easy to clean. They are also very versatile as they can be used either way.

Saturday, 9 July 2016

Open Doors


Over on Mini Marvel FB page we have a swap of fabrics, as the brief wasn't up before I made this I'm hoping I can use it. The image was stamped and transferred onto a piece of cotton scrim, next layer is a used baby wipe, next a piece of tulle and finally all onto the cerise felt.


I stitched the piece of wool all the way around the image to hi-light it and to hold everything together.


Once everything was secure I took the heat tool to it and singed the layers. And finally took my burnishing tool and melted some of the felt.

It measures approx 5.5" x 4.75".


Tuesday, 26 April 2016

Inspired by Jean


I usually try and drop in on Jeans streams if I'm not out at netball on a Monday, but for whatever reason, last night it wouldn't load up and let me in. But when I saw her journal pages on FB today I just had to go and watch the recordings which you can find here and here to find out what she did.


So basically I painted the journal page in rainbow stripes using Decoart chalky paints, added the image from a magazine, whilst waiting for it to dry, painted the page with chalky black, then used a baby wipe through a couple of stencils to wipe back and reveal the colours underneath. Once dry I outlined some of the images with a white sharpie to define them and make them pop.

All paints are from the DecoArt range.

By using a gel medium, this kind of makes the image transparent and you can see the colours of paint through it.

Thursday, 4 July 2013

Tag Screen


For Sue's final PA project this week she decided on a tag screen, to find out how she made it check here.


Stencilling on the tags with snowflake fresco paint.


Coloured with autumn fire and smoked paprika and wiped back with a baby wipe.


All images are stamped in black stazon and are from the PA Ink and the Dog or minis range.


Just by pure co-incidence each tag had a prominent word on it, so I used a white posca pen to hi-light it.  I mounted the tags on black card to create the screen.

Friday, 5 November 2010

Acetate Makes


I decided to heat emboss a few images onto acetate using versamark ink and black embossing powder.  I took a used babywipe and needle felted green and pink felted wool into it.  I sewed the images onto the babywipe and sewed the babywipe onto a piece of calico which I'd previously dyed. I used the heat gun to shrink the babywipe (it wouldn't burn) and I burnt the bottom of the calico but it started to set on fire so I didn't do any more. I stamped green swirls with momento bamboo and raspberry adirondack ink.  I printed 'just good friends' onto a piece of acetate, outlined it in black pen and used a candle flame to melt it.  I sewed it onto the bottom of the calico.  I turned the fabric over at the top and sewed a line across to create a pouch to thread the wood through to create the hanger.  I put a bead at each end of the piece of wood and added a piece of co-ordinating wool to hang the piece.


This is a close up of the acetate image.  It has been coloured with Pearlescent Watercolour Paints from Once Upon a Stamp.


And this is a close up of the just good friends on the acetate. It has been computer generated and outlined with a fine black pen.

Wednesday, 7 July 2010

New Stamp Sets


I finally found some time to have a play with the stamps sets that I won from Particraft.  I brayered ink from the mountain meadow big n juicy pad and stamped the main image in black stazon.  For the words and the music notes I painted neat bleach onto the stamp and stamped into the ink to remove the colour.  I also took a bit of colour away from the face and shoulders using a paintbrush.  I mounted a purple piece of card onto a black piece and stamped it with a flourish stamp using sand eco friendly paint.  I mounted the main image and added fibres.  It does look much better from a distance but I had to get in close to get the photo!!!!


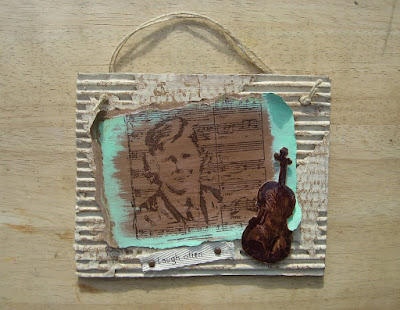
I painted a piece of white card with bronze eco friendly paints and when touch dry painted pool tide over the top, gave it a quick blast with the heat gun and then swiped some of the top coat off to reveal the bronze.  You can get a really good shine on the metalic by buffing it up.  I stamped the image using timber brown stazon.  Tore and curled the edges.  I stamped the instrument onto a painted surface, cut it out and covered it with diamond glaze.  For the background I painted a piece of corrugated card in sand and stamped with mulch eco friendly paint and attached some string to hang it from.  I added a piece of twill ribbon and brads.


These stamps are from the other set.  Again I used the mountain meadow big n juicy but only used 3 of the colours.  Stamped the image and a quote.  Mounted it onto a piece of used dry babywipe.  Painted the corrugated in sand.  Mounted everything up and covered with a piece of angelina fibre which had been ironed over a rubber stamp.

Blog Archive