Wednesday, 21 December 2016

Rusty Skull


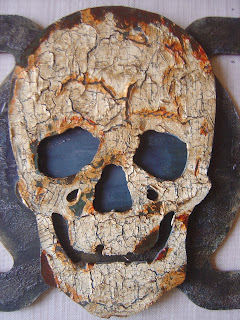
This piece kind of happened by mistake. We bought a box of oranges and the lid was a sturdy wooden figure of 8, so once in my hands idea started flowing! Above is an mdf skull which was bought for me from MDF man at one of the shows. I needed a large focal point, so decided to use it by giving it the mega crackle treatment, followed by the rust treatment.


I added all sorts to the back panel until I got what I wanted, then went on to add stenciling in white gesso and then an Andy Skinner dirty wash to tone it down. I also added rusty wire and some charms which I'd also rusted.


The metal numbers started off as a bright silver, but again I aged and rusted them.


Rusted more charms, a skull, flower and couple of leaves.


Rusty corrugated metal for behind the eyes!


And there, finished, or was I?


No, I wasn't! I decided to add a couple of chipboard nuts to opposite corners. 


And the rusty heart was looking a bit plain, so I added some stamping in black stazon.


And then I was finished!!!

I've just seen over on the That's Crafty challenge blog they have a theme of flower power and your project has to feature a flower, so I'm hoping this will count as I have a flower on the heart.

Sunday, 18 December 2016

Mini Canvas


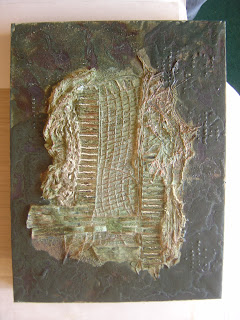
I covered a deep 4 x 4 canvas with a piece of hessian and simply stapled it directly to the canvas.


Using DecoArt media paints I darkened the edges, added an image, some embossed card and text paper, again all aged with the media paints.

Saturday, 17 December 2016

Heart & Rusty Cogs


I stuck a load of cogs very randomly onto an mdf heart and covered everything in a layer of a mix of ultra matte varnish and textured sand paste. I built up the layers using various colours of DecoArt media paints until I was happy with it.


Close up of the layers of colours.


And hopefully you can see the pitted effect from the textured sand paste to help create the rust effect.

Altered Key Ring and Envie


Over on a FB group I've joined we were sent a key ring to alter and then send on to our swap partner. I went very simple just using raspberry and sail boat blue alcohol inks on the frame, cut a printed image out and left the front panel clear.


This is the back.


And of course I then needed an envelope to send it in. So reaching for one of my many gelli plate prints I made this envelope and stamped and doodled over it to create some interest. PaperArtsy have a theme this week of mail art, so I'm entering the envie.

Sunday, 11 December 2016

Mail Art Money Envies for Christmas


As luck would have it, I needed some Christmas money envelopes for my niece and nephews and it just so happens that over on the PaperArtsy blog they have a theme of mail art.

A Play Inspired by Andy Skinner on Hochanda


After watching the rewind shows of Andy Skinner and DecoArt on Hochanda I was inspired to have a play yesterday. I didn't really have anything in mind, just got a few pieces of mdf out and tried out some techniques, most of which I've done before. Was slightly gutted when I emptied my whole mdf box to find I'd got no large tags left :o(


As I say, I had no real idea of what was going to go with what, so this morning once everything was completely dry, I started to assemble pieces and these are what I came up with.


The mini dream tag was originally meant for this background, but I love how the colours in the heart just co-ordinated perfectly.


I used prussian blue hue to enhance the cracks in the heart.


Lots of rust techniques going on in this one.


Close up of the rusty heart and cog.


I wanted to put this on a tag with a white background with a large crackle but instead I used a piece of embossed rust effect card and a piece of corrugated that I'd made at some other time.


Close up of the heart which was stamped and crackled on the 3 corners and then black antiquing cream used to enhance the cracks.


Close up of the rusted embossed card. You can see how I made this here.


This was one of Andy's new techniques, well the technique isn't new, it's the product you use that is different, luckily I had some triple thick glaze and the colours dispersed perfectly.


I stenciled the word onto a mini mdf tag and covered with clear media crackle and I got some wonderful cracks. I used white antiquing cream to enhance them.


And finally my large heart simply painted with relic and stamped with one of Andy's background stamps in everlasting chalky paint. 


Friday, 9 December 2016

Cas Card 50th


It's Martin's birthday today, so I made him this simple card. His favourite colours are black and orange.

Monday, 5 December 2016

Powertex Heart


I dipped pieces of kitchen roll into ivory Powertex and scrunched it onto the mdf heart to create texture. Once completely covered I pressed in two clay skulls, a wooden skull and a wooden half a circle. Then I sprayed with what I thought was going to be black Bister, but when it came out the bottle, it was actually a dark green.


It took an age to dry but I think that's probably because I absolutely saturated the kitchen roll with the Bister.


This was how it looked after being left to dry for 48 hours. It had gone really, really light.


Next I mixed some green Powertex pigment with media satin varnish and dry brushed over the kitchen roll.


I'm not sure if you can actually see the deeper colours, but next I went in with some patina pigment and again dry brushed all of the kitchen roll area.


And the final layer was Powertex rich gold pigement mixed with media satin varnish. I also went over the embellishments with the gold too.


I tried to capture the shimmer in the bit of sun we had but I'm not sure that I've achieved it!


Captured in the sun but from another angle.

Still haven't been able to catch up on the day time Powertex programmes as Hochanda haven't sorted them out yet!!!

Sunday, 4 December 2016

Second Powertex Canvas


Again using the fine sand and ivory Powertex mixture through a stencil.


Various natural bits and bobs dipped in the ivory Powertex, arranged on the canvas board and sprayed with brown Bister.


Left to dry over night.
 

Pearl ex pigements in gold and antique copper mixed with media satin varnish and also the Powertex rich gold pigment, but unfortunately they do not really show up on the photo.


The reason for adding the pigments is that they really help to bring out the textures in the materials.


I'm not sure if you might just be able to pick up some of the pigments on this photo.


The piece of corrugated to the right and the scrunched kitchen roll to the left surrounded by a piece of t-shirt fabric.


And finally this is mainly the sand and Powertex mix with a piece of mulberry bark over the top, they all make for very interesting textures, but you really don't know what you are going to get, it's just a case of playing x

Powertex Canvas


So after watching the 7pm Hochanda Powertex show I was inspired to have a go. I haven't been able to see any of the other shows in the day as they have a problem with them on the rewind. So here's my dining room table, all ready to go.


I mixed some fine grade sand in with ivory Powertex and put it through a stencil. 


Next in no particular order I added bits and bobs by first covering them in ivory Powertex and sticking them to the canvas. Once I was happy I sprayed on some green, however I'm not entirely sure if it was Bister or PA Infusions.
 

I left it over night to dry and this morning came back in with green Powertex around the edges, spritzed in brown Bister and used a hair dryer to dry it. I would have loved to have added some rust powder in at this stage, but I don't have any :o( xx


Next I took a very small amount of ivory Powertex and dry brushed it over the green Powertex to bring out the textures. I used green and brown pearl ex and satin varnish to dry brush the middle pieces.


This photo shows the effects of the ivory Powertex around the edge pieces and is more true to the actual colours on the canvas.


And finally a close up of the bits and bobs which consist of corrugated cardboard, cotton scrim, loose cotton jute, packaging, kitchen roll, natural sheep fleece, strands of cotton boucle and slub and a few other things.

Blog Archive