Monday 30 November 2015

More TM Inspiration


Created a border on a sheet of A4 card using TM and magazine images.


Created a main image using all sorts of bits.


Added some doodling, a quote and some pan pastels in the background.


And some gold pen doodling to fill in the gap. I was going to fill it with another quote but decided against it this time.

Wednesday 25 November 2015

TM Style Tag


Having seen a couple of TM pages that Chris kindly posted on my FB timeline, this inspired me to make a tag and I've been wanting to do a black and white one for ages! Unfortunately I was having that much fun, I forgot to take any stage photos!


I decided to add some grasshopper green by Molotow as I also wanted to play along with this weeks That's Crafty challenge which is Black and White and a hint.


Close up of bottom right hand corner with a hint of green.

Masterboard ATB


I created another masterboard using fresco paints, limelight, tango, submarine, cherry red and chalk. 


I cut them up and stuck them randomly on the two strips I'd made to create the box.


I stamped the Dina images and words in black versa fine.


Then I put the box together. It's roughly 3" square.


And the other sides.


And the top.

PaperArtsy have their final challenge of the year which is masterboards, go over and check it out.

Tuesday 24 November 2015

Mega Crackle Tag


When I saw Sues's blog post this morning, I just knew I had to have a play. I have been meaning to have a go at this ever since Andy put the video out there, but have been inspired by Sue. So I painted an mdf tag in lipstick, orange sherbert and school bus multi surface satin over a coat of gesso.


Then after a layer of weathered wood, I added the magic layer of crackle paste. This was just after I'd finished covering it.


And this is what it looked like when it was dry.


Close up of the crackle after a couple of coats of ultra matte varnish.


I stamped a variety of oriental images on the surface in black versa fine ink.


Close up of the stamped main image.

That's Crafty have a theme of black and white with a hint, so I'm entering my tag.

All products are from DecoArt.


Masterboard Tag Trio


Over on the PaperArtsy blog their last challenge of the year is masterboards. I created mine using fresco paints, malin, spanish mulberry, beach hut, eggplant and chalk, an old credit card, a brayer and a couple of stencils.


I cut it up into tag sized pieces, stamped the Dina images in black versa fine, added some background stamping in purple and blue stazon. Mounted them onto black card and cut round them.

Monday 23 November 2015

Powertex Canvas 2


This is the second disaster piece from yesterday and like I said, I just couldn't get it to do what I wanted and this is how it dried eventually in the airing cupboard.


As I mixed up way too much red pigment for the previous piece, I used it again on this one just to see if I could bring any of the texture out even though it's not highly textured, in fact, it's very flat.


To give a bit of contrast, I also added some renaissance treasure gold, you can't see it very well on the photo, but it is there.

Powertex Canvas


I had a nightmare yesterday morning with my powertex, it wouldn't mold, stick, dry or do anything but lie flat! I think it was too cold for it to work properly as it took 3 and half hours before I could do anything with it. I wanted to curl all the pieces like the couple you can see bottom left, but it just wasn't happening.


Later on we put the heating on and I put the pieces in the airing cupboard and eventually they dried.


I painted the face with DecoArt Dazzling metallics royal ruby. I mixed gloss varnish and deep coral primary elements pigment and dry brushed it on the fabric and cotton threads. 

Saturday 21 November 2015

Powertex Colour Experiment


My netball buddie Chris, brought me some empty wine bottles last night. I needed some to play further with my powertex and fabrics.


I wanted to see if I could change the colour of the ivory powertex without changing the properties of it. I know you can add pigments but I wanted to know if it would work with acrylic paints, so I added lots of drops of dioxazine purple media paint, which is a really, really deep purple, and I ended up with this lilac.


It mixed okay, it went on okay, the fabric stuck okay, but it seems to be taking an age to dry. So I left it overnight and checked it the next day. 


It still wasn't totally dry this morning so I gave it a blast with the hairdryer and that did it. I don't actually think it had anything to do with adding the paint, I think it was probably because it was the coldest night on record this year up to now!! So anyhow, I then added some more purple paint by using the dry brushing technique.


I did the same thing with another shade of purple.


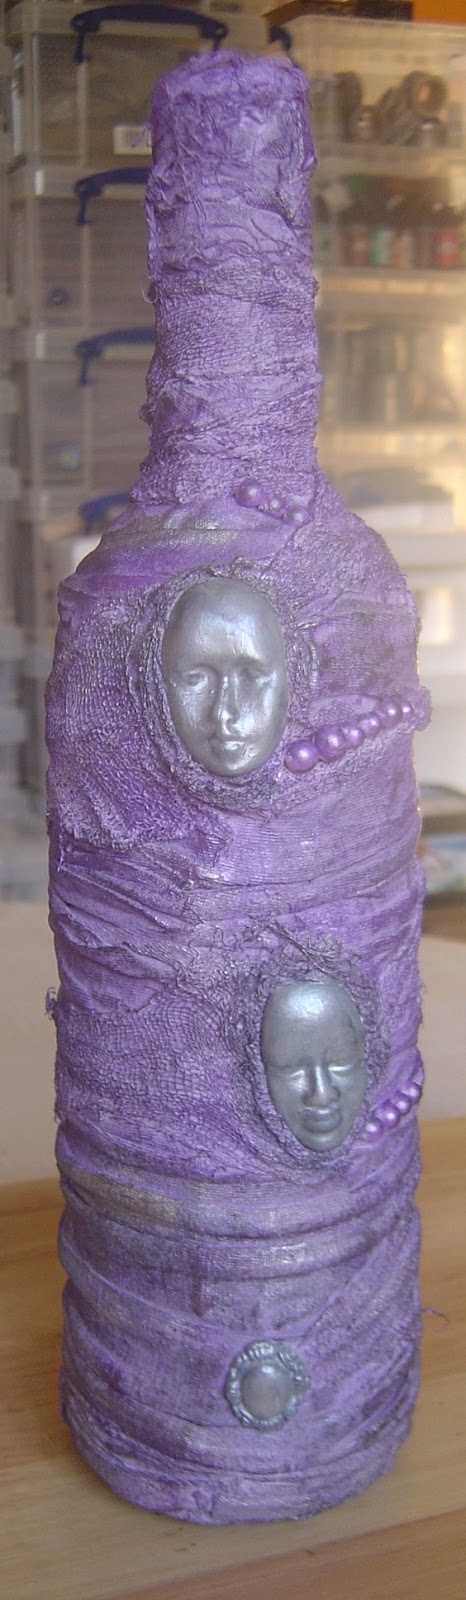
I also added a tiny touch of black paint, again dry brushing, just to hi-light some of the texture. I also painted the faces silver.


And finally I added some treasure gold in pewter and indigo around the faces.


And the back of the bottle.


And the balls and the faces.

Again, unfortunately, the photos don't pick up all the textures and the shimmer from the paint and the treasure gold, but we have also had 4 seasons in one day up to now today, so that hasn't helped either!!

So my verdict would be that yes it is very easy to change the colour of the powertex using acrylic paints, but I will keep experimenting.

Thursday 19 November 2015

Powertex ATC


I covered the random pieces of fabric in ivory powertex and positioned them on the mdf atc. I put the clay faces inside the piece of t-shirt material and built it up from there. Again I left it overnight to dry.


I painted all the elements with DecoArts dazzling metallics and media paints as a base coat.


Then once dry I went back in using more dazzling metallics and lightened it up by dry brushing. Using this technique means you can bring out more of the texture.


And although you can't really see on this photo but I used the DA metallic lustres in fab fuchsia and majestic purple again to bring out the texture.

Again, unfortunately, the photo doesn't really do it justice, it looks fab IRL.

All products except the powertex are from DecoArt.

Powertex Heart Plaque


Using ivory powertex I painted the mdf heart and stuck on the clay faces. Added some cotton threads and waited for it all to dry. I left it overnight to cure.


Then I painted the string and the faces with decoart dazzling metallic paints and for the background I mixed up some primary elements pigments and decoart gloss varnish. Left it to dry.


Then went back in with various colours of PA treasure gold and DA metallic lustres. 

Unfortunately the weather is rubbish again today, no sun, just dark and gloomy so photos aren't that good.

Tuesday 17 November 2015

Candle Holder


I started off with a pair of these on my windowsill but last Sunday, because I went out, Fraz knocked the other one off and unfortunately the terracotta pot smashed.


So using the remaining pot as mould, I dipped part of an old t-shirt into the ivory powertex, moulded it around the pot and left it to set. I turned it upside down so the bottom could air dry too.


Once it had set, I took out the terracotta pot and this is what I was left with.


After being left overnight to dry, I painted it using decoart dazzling metallic paints.


I used black pearl on the bottom, rich espresso on the top and royal ruby on the string and to hi-light.


This is the said candle that the holder has been made for.


And here it is sat in it's new pot, so if Fraz knocks it off again, at least it won't smash this time.

Apologies again for the photos but it's dark and raining outside!

Blog Archive