Monday 19 February 2018

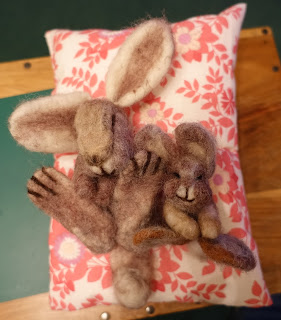
Sleepy Bunnies in Baskets


Large sleep bunny in a basket, the basket is approx 7" wide and 3.5" deep and has been filled with shredded tissue paper and then natural coloured raffia.


And this is a view of the basket and the lovely bright weave.


Smaller sleepy bunny. Basket size is approx 4.5" wide and 3" deep, again filled with shredded tissue and raffia.


And a view of the basket and its pink and yellow weave.


And finally the last bunny in the basket. This basket is approx 5" wide and 3.5" deep.


Pink basket with yellow and purple weave.

These would make lovely Easter gifts and there is room in the baskets for you to add some mini chocolate eggs.

You can find them all sale in my Etsy shop - https://www.etsy.com/uk/shop/SamsHandmadeStore
Another Mouse


I made another mouse to put in my Etsy shop.


He is wearing lilac, has blue buttons and a silver trim.


His bag and scarf are a lovely shade of deep yellow.


He is for sale in my Etsy shop. Please pop over and take a look as sleepy bunnies have also been added today too. 


Thursday 15 February 2018

Easter Basket Bunnies


I made a sleepy bunny and found a lovely basket to put it in, added some raffia and he looks so cute. Then I was asked if I could make another one, but slightly different. Well that was easy as I'm not sure I could make two the same anyway!! 


This is the first basket I picked up, a yellow one with purple and pink weave.


And this one is a pink basket with a yellow and purple weave. Which is brilliant as their favourite colours are these three but they are slightly different so will be able to easily tell them apart (no arguing, hopefully!)


All snuggled up in their little baskets ready for Easter.

These two are sold, but I will be making some more to put in my Etsy shop ready for Easter.

Tuesday 13 February 2018

Sleepy Bunnies


So yesterday I popped into Wilkos and picked up a wooden spoon and some (5 in a pack) wooden fence pegs. Brought them home and marked two inch increments on them both.


This is the official Sarafina zullitool which is the 'proper' tool but you can only get it from the US and with postage, custom and admin charges on top of the $22 for the tool, it works out a lot more than the £2.15 that I spent on my Wilko purchases.


 With the thin end of the tool, so the handle end of the wooden spoon (I need it sawing off at the scoop as it won't fit in my box), I made this little sleepy bunny.


Yesterday I also picked up a little Easter basket and some grass (ie raffia).


And with the wooden fence peg I made a much larger sleepy bunny.


Side by side, you can see the difference in size.


And on my felting platform which is approx A4 for approx size of each one. 

To make these bunnies follow the Sarafina sleepy bunny tutorial. She will also show you how to use the zullitool or an improvised version of it.

Sunday 11 February 2018

Leaves for Loren


One of the ladies (Colette Loren) on a FB group I belong to has asked for help as she was in need of leaves for all four seasons to help decorate a tree for her daughter. So I've made these to help out.


The only stipulation was that they had to be 3" or bigger, which they are. These ones are needle felted and decorated on both sides.


I wanted to try a wet felted one too. I decided to try a simple shaped leaf to start with.


And I wanted it in shades of green. The sparkle is angelina fibre.


You can see how big it came out, really pleased with it. It's now in the airing cupboard drying ready for the next step.


Once completely dried I got the sewing maching out to further embellish them.


And this is the back with some sparkle still showing through from the angelina.

These are now going to be posted off to go on the tree for Loren which her mum is making.

Saturday 10 February 2018

Unicorn


After making the hippo and putting pictures up on FB, I was asked by someone else if I could make a unicorn, preferably in purple, with blue and yellow. So again, I had no idea how I woud get on, but said that I'd give it a go. I made the body, head and legs from toy stuffing and then attached them for the basic horse shape as above. 


And this is how she ended up looking after been given some colour. The mane and tail are blue locks.


She can either stand on all four legs or have the front right slightly bent and stand on three.


Loved making the stripe on her horn.


She has big adorable eyes too.


And finally a photo of her other side.

She has been parcelled up and sent off to her new home.

She is a present for someone else, so I hope she likes her.


Wednesday 7 February 2018

Hippo


I was asked by a friend if I could make her a hippo. I said I'd give it a go and we'd see how it went. I made a huge egg shape for the body, four stumpy little legs and a figure of eight for a head shape.


Once happy with the shapes, I covered them in a light grey NZ carded batt wool (The Felt Box) and once I'd worked on the eyes and the nose, I started on the dinky ears.


Here is the face completed, but you can't see the big mouth (yet).


Here she is all finished with her head now attached to the body!


From the left side.


Loving that dinky tail.


And from the right side.


And as promised, the big smiley mouth.

I'm happy to say that she likes it and is coming round to pick it up before valentines day!! She has named her Henrietta!

Tuesday 6 February 2018

Mouse


After watching the Sarafina video on how to make tiny toes, I thought I'd give it a go. The green wire is 22 gauge and the white is paper wrapped and is 26 gauge.


You can find out more info on my blog post here about how they were wrapped.


From toy stuffing, I made a head and a body.


Then I added the arms and legs and wrapped core wool around the joins.


Added ears and a tail and gave him a bit more of a belly.


Next I made some templates to make some clothes for him using my new Merino wool from Pat.


I put three layers of wool on each side and proceeded to wet felt them.


Once I was happy with them I cut out the resists, re-felted the cut edges, put them on the mouse and left him in the airing cupboard to dry over night.


I added some buttons and needled felted a dark blue trim to his hat and collar. I rolled up his sleeves so you can still see his little hands.


His eyes are brads and I used Merino wool for his nose and mouth features with a bit of flesh coloured batt on his nose.


And this is how he looks from the back.


He is now complete with his accessories. My mum kindly knitted him a little bag and matching scarf which are both detachable.


Doesn't he look dapper. He is wearing them with pride. He is now off to his new home.

Blog Archive