Tuesday 31 October 2017

Wet Felting - 3d mini vase


I also watched another Youtube where the person used an orange and the foot of a pair of tights to make a vase, so off I went and this is what I ended up with. Instead of an orange, I used one of Fraz's balls. I found that using this method it was really hard to stop the wool from slipping off and it was also hard to get an even coverage.


But I did like the colour wave, which was actually more of an accident, as when I tried to place the ball in the end of the foot of the tights, it was that tight it moved all the wool.


It pulled up from the bottom of the ball and this is how I ended up with a really bare patch at the bottom of the vase. As you can see, you can see daylight through it. Had I have known what I was looking or feeling for, I could have actually cut this part and made it the top, but I didn't see it until I had shaped it and it had dried.


This is the back as it's the tallest part.


And this is the front, you can just see on the left that there is another bareish patch, as you can see through it.

On the video, they used sheets of batting for this method, but I didn't have any and wanted to try it, but now I know why!!!

Wet Felting Experimenting


I wanted to experiment with holes and shapes. I found a blog post which I tried to follow but it was in Russian and didn't translate well into English. There were photos but some stages were missed out. So here goes. I layered up three lots of felt over a piece of tulle. I decided to use different colours so I could see what was what in the end product.


Next I wet the middles with warm soapy water. Leaving a raw edge. (Easier said than done!)


Next step was to cut out some shapes from the wet section. Again, this isn't as easy as it lools.


Layer it all up using resists between the layers and then cover the whole piece. Again I used a different colour.


Wet it and start the felting process.


And once felted this is what I ended up with. The light yellow on the top didn't felt to anything and it also fell off the piece of tulle. So I took it off and then carefully stuffed some cloths through the holes and between the layers and left it to dry over night.


And this is it unstuffed this morning.


I was impressed how the brighter yellow layer underneath held its shape too.


And from another angle. You can see the brighter yellow through the top holes and also the orange which is the base.

However, one thing I did realise when I'd finished was that I stacked it up the wrong way round, which is why the top layer didn't stick to anything, so back to the drawing board for another try.


This time I didn't bother to leave a raw edge because it was too much faffing and I also wanted to felt these layers more.


Next I stacked it the complete opposite to how I did the first one, then covered the top with a four layers of merino wool and felted the whole piece, stuffed it with fabrics and left it to dry over night.


And this is what I ended up with. It's still not quite right as the cut out pieces are still a bit ragged, but at least I didn't lose any layers this time!


As I had quite a big rim on one side, I decided to cut some holes to see how that went, again I think I should have soaped them more to finish off the edges better.


Again I was impressed at how each of the inside layers stands up. Here you can see the light blue on top, then the bright blue and the dark blue underneath and none of these layers are touching anything, they are all free standing inside the piece.


And it's also held it's dome shape.


Not bad for a second effort, will keep trying as once I'd finished I wasn't really sure why I needed the tulle in the first place, unless it's to provide a bit of stabilty to help the inside pieces stand alone.

Also had I have done it all in one colour, you wouldn't see where the bottom joins the top layer, but I needed to do it like this to see what ended up where!!!

Tuesday 24 October 2017

Wet Felted 3d Objects


Chris very kindly bought me this lovely wet felting kit for my birthday. So along with the huge bag of wool tops that Jan also sent and the ones Joyce sent, I thought I'd best put it to use.


I prepped the dining room table in anticipation after watching a couple of inspiring youtube videos on a vessel and a bag. 


First layer completed.


Side one of second layer.


Prepping the second layer of the second side.


With the soap and water solution on it.


I think this was the third layer.


After it had been felted with soap and warm water, rolled and quarter turned it was time to take the middle out, so I cut a hole in what is going to be the top.


Getting the resist out the middle was easier said than done!!


I felted the hole and the inside by turning it inside out and more rolling and turning.


The template started off at 8", so as you can see, it has shrunk quite a bit.


Next I had to shape it. I really wanted to try and create a neck but I think it's probably a little bit small, or I needed to work it a little more, I'm not sure, but I had to settle for what I had! I stuffed t-shirt fabric inside whilst it dried to keep the shape.


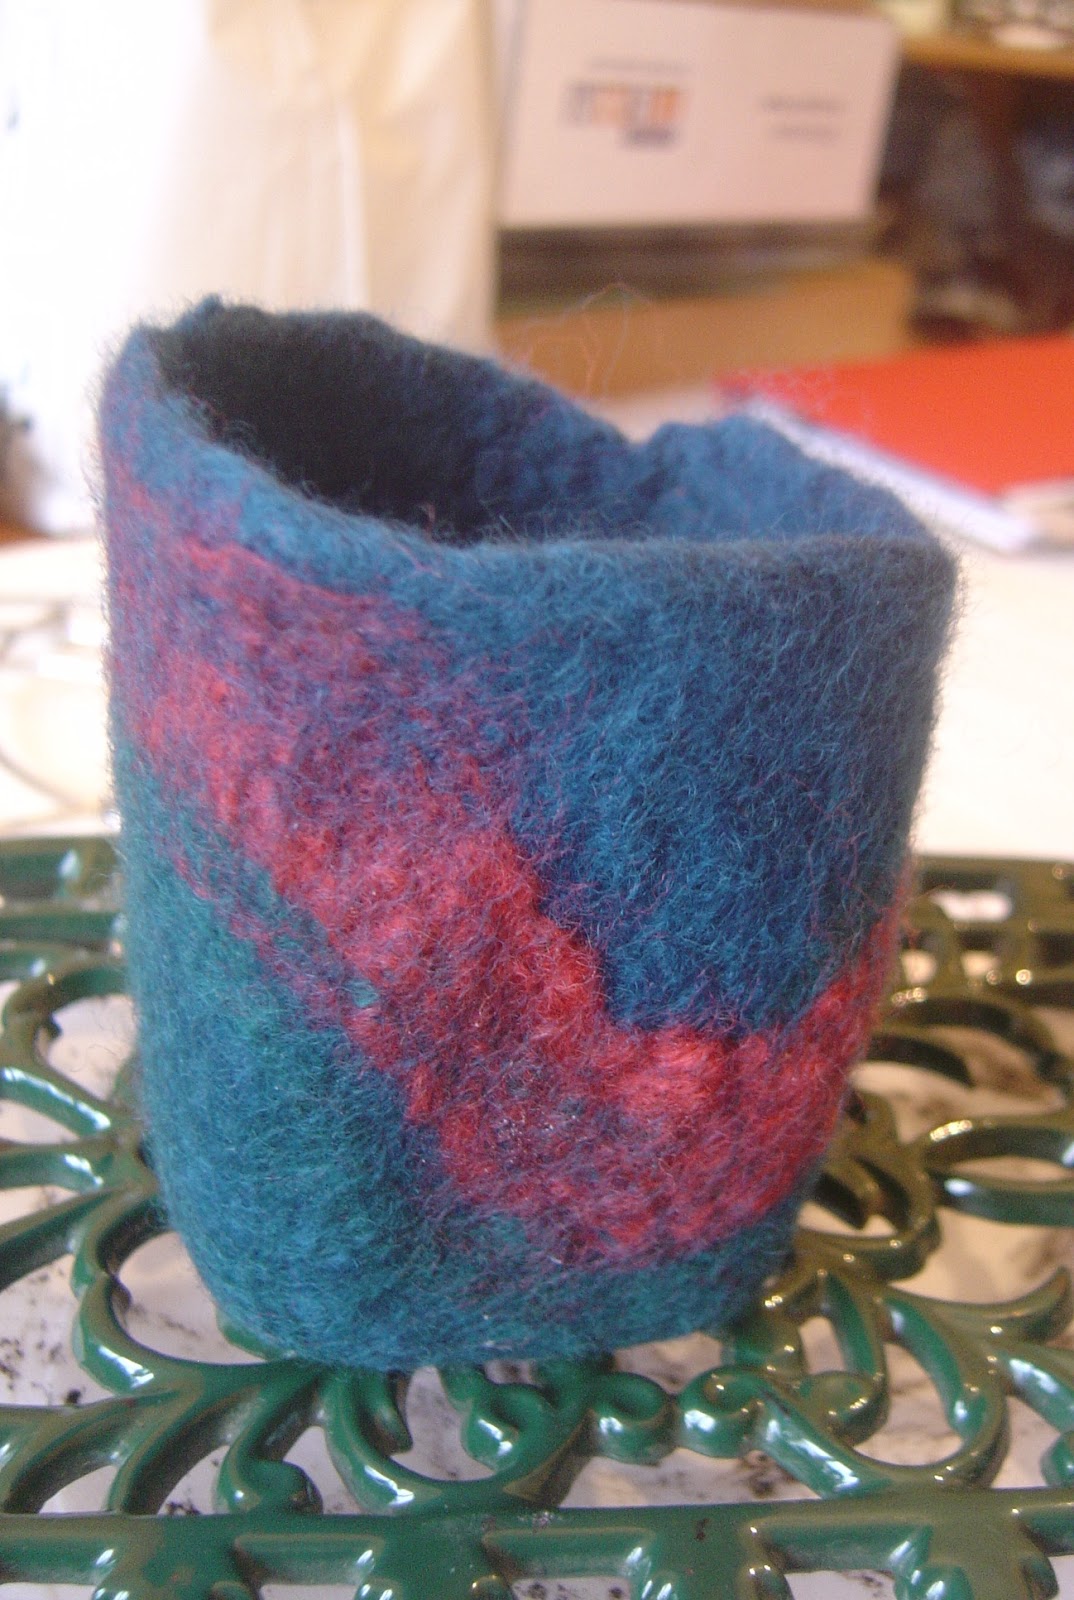
And this is it this morning after I'd take then t-shirt fabric out and low and behold, it's not only all stayed together, but it's held its shape too!!! WoooHooo!!
  

Then the sun came out so I took a few more photos.


I think it's come out pretty well for a first try as it's not fluffy or anything and it feels quite sturdy. I'm well pleased.


One thing I do need to remember to take into consideration, is that it shrinks. The blue template is what I used originally to make the shape, but look what size it ended up.


Next I started on the bag, this is my template or resist.


Layer one layered up to completely cover the resist.


This is layer two, a different shade of green.


Third layer has been added and the resist is still inside.


This is the other side of the third layer.


I did the same process as above and this is it this morning after it had completely dried.


And this is my favourite side. I want to make it into a bag, even though it is rather small, but I want to cut it down, put a flap on it and add a huge button.


Again the blue is the size of the resist I used and it's shrunk quite a bit. But you live and learn.


I am really pleased with how my first two 3d wet felted objects turned out. I'm not sure if I'm going to decorate the vessel or leave it as it is, but I am definitely going to make a bag from the other piece.

Sunday 22 October 2017

Finished Mini Journal from Kate Crane Workshop


I made my own version of a mini journal with the pages I created at Kates class on Friday at Art from the Heart. This is the front.


And this is the back.


And this is it when it's been opened.


This is a view from the top. It looks like a star book.


And these are the mini pages inside.


They are a mix of collage pages and T!m's paperdolls and we made loads of them!!

Blog Archive