Sunday 29 November 2020

Steampunk Torso


The 1kg bottle of powertex is just for scale to show the size of the torso which I covered in cling film.


I cut up small squares of denim from an old pair of jeans, covered it in black powertex and moulded it over the torso.


Once completely dry (after about 3 days as the denim was quite thick), I cut all the way up the back in the middle to get it off the torso.


I then attached a zip with powertex to the left and side, once dried I attached the other side to the right.


Once dried and put back together I decided to add some colour. I went for blue as I'd initially used pieces of denim.


I mounted it on a piece of wood and added metal embellishments.


And from the other side.


And finally from the front.  I added a couple of buckles onto pieces of leather and added some metal studs.

Wednesday 25 November 2020

Polystyrene Cutter


Using some of my birthday money, I treat myself to a polystyrene cutter.


And I'm extremely impressed with it.


Managed to cut a perfect circle first time, well it would have been perfect if I'd used a square piece to start with, but I just tried it with an off-cut as I really didn't think it would work!


And what a fabulous shape I am left with from the off-cut.

Unfortunately I can't do any more today as it smells when burning through the polystyrene and I can't open a window as it's peeing it down.

Thursday 12 November 2020

Powertex Figures


I just wanted to show how you can make a powertex figure on a shoestring.  This is a dolls head from Poundland, it was £1.  I cut off all the hair.  The base is a wooden meat hammer from Wilko - £1.50.  The body is crushed tinfoil to shape, covered in masking tape (both can be bought for £1 from Poundland).


Then some bits of cotton fabrics, a dishcloth, an old woolen scarf and some odd pieces of t-shirt wrap.  But you can use whatever you have. You might have an old shirt or t-shirt, anything will work as long as it's 80% ish or more cotton.  The most expensive thing you will need is the Powertex, but it does come in various sizes so you can get a small bottle if you aren't sure about it. 
(100g - £7, 250g - £10 or 1kg - £17)


I made another one, but this time instead of a meat hammer I used a cardboard tube and a piece of wood that used to be a panel in our old gate.  As the heads are plastic, I painted everything in a coat of black gesso.


And as I fancied something totally different, I used red powertex with the dishcloth and the t-shirt wrap and transparent with the pieces of scarf.


And here they are finished.

Saturday 7 November 2020

Table Decoration - Christmas Gifts


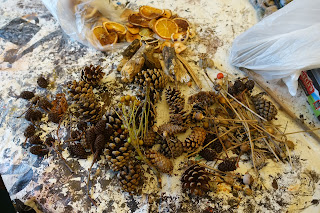
On our walks over the fields near where we live, I picked up these bits and bobs.  The orange, apple and lime slices were homemade and baked in the oven to dry out.


Close up of the fruit slices and pieces of wood.


Berries, pine and fir cones.


Then I powertexed them all in bronze.


Next I drew around a glass and then used crackle paste through a flourish stencil leaving the space around the inner circle free from paste.


Once dried, I coated in bronze powertex.


Next I cut up four pieces of corrugated cardboard and moulded them around a glass.


Once everything was dry, I started to arrange the elements on the mdf plaques and gave everything a coat of powertex as it also acts as a glue.


Once completely dry I used pigments and varnish to colour them up.  This one is tones of green.


And this one was coloured in shades of red.


And this one has been coloured in silver.


And finally a blue one.


And here they are all together, with led wax candles in.


And then later on this evening when it got dark and I turned on a couple of the candles.

I've made these for Christmas presents for my mum, sister, niece and boyfriend and my nephew and his girlfriend, hence all the different colours as they are done to tie in with their decor.

These are based on an idea that Jill at Purple Meadow Crafts had.  There was meant to be a workshop on them, but unfortunately, due to the lockdown all classes have had to be cancelled.  They are trying to reschedule but I wanted to get them done ready for Christmas so I made my own versions.

I also have some smaller ones for sale if anyone is interested.  They are not coloured up yet though so you can choose your colour.  If interested please email or pm me on FB.

Tuesday 3 November 2020

Nail Head


Decided to have a play with clay and stoneart.


Oh and a few rusty nails.


The majority is made up from 2 and a half polystyrene ball.  But I forgot to take a photo of it.


Love how the bister looks on the stoneart.


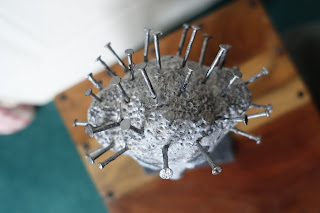
A view of the nails from the top of the head.


The nails were rusty, but I painted them silver.


Another shot of the black bister.


I had a go at sculpting a sort of face, don't think I did too bad for a first attempt. 


I really wanted to have a go a clay sculpting but haven't been able to find anyone, then last week I found someone local and this week we get locked down!!!  Never mind, at least it's something to look forward to.

Blog Archive