Saturday 24 September 2016

Update on Large Fairy Figure


Still no hair, but I've found something to sit her on, a ceramic pot that Lin gave me a while ago.


Using black powertex covered in t-shirt fabric and some lace and added in some clay flowers. Left in airing cupboard overnight to dry.


Used white, rich gold and bronze gold pigments to colour.


And a view from the other side.


And this is what she is going to look like when she's sat on her new seat. Just need to sort the hair and she'll be finished.

Mr Enchanting


Ages ago Chris gave me this bottle and yesterday I used it.


I bulked it out with tinfoil, covered it with masking tape and added a half of a polystyrene ball.


I then prepped everything I needed as this next bit is very, very messy!!


I poured some red powertex liquid into an old ice-cream pot and scooped in some stoneart.


Using a wooden stirrer I mixed it together. I kept adding the stoneart a bit at a time until I got the consistency I wanted.


Now this is the messy part, it's still really, really sticky and needed more stoneart adding to it.


Keep adding and kneading until you get it to something like this.


Using a plastic tube or rolling pin, roll it out. The white is talc which is used in the same way as flour is when baking.


Once you have it rolled out to approx an eighth of an inch, wipe the talc off with a babywipe.


The mixture would not stick directly to the masking tape, so I used the powertex liquid to paint over the masking tape and this helped it to stick.


I kneaded and rolled until I had covered the whole of the bottle. You can use water to massage the pieces together or add pieces in where you need to.


As you can see, it's still a bit lumpy but when I've put some coloured pigments on you shouldn't really see it too much, and it will add to the textures!


And again same thing from the other side. I think one of the reasons it's not really smooth is because of what's underneath. Had it gone directly on the glass I would have been able to get it a lot smoother as there would be something solid to press against.


Whilst it was drying I made a hat and was just checking that it fitted okay.


Then I blinged up the hat once it had dried over night.


**This is not one of the hats I've already made, this is another one which is much bigger and made specifically to fit on the top of the bottle**


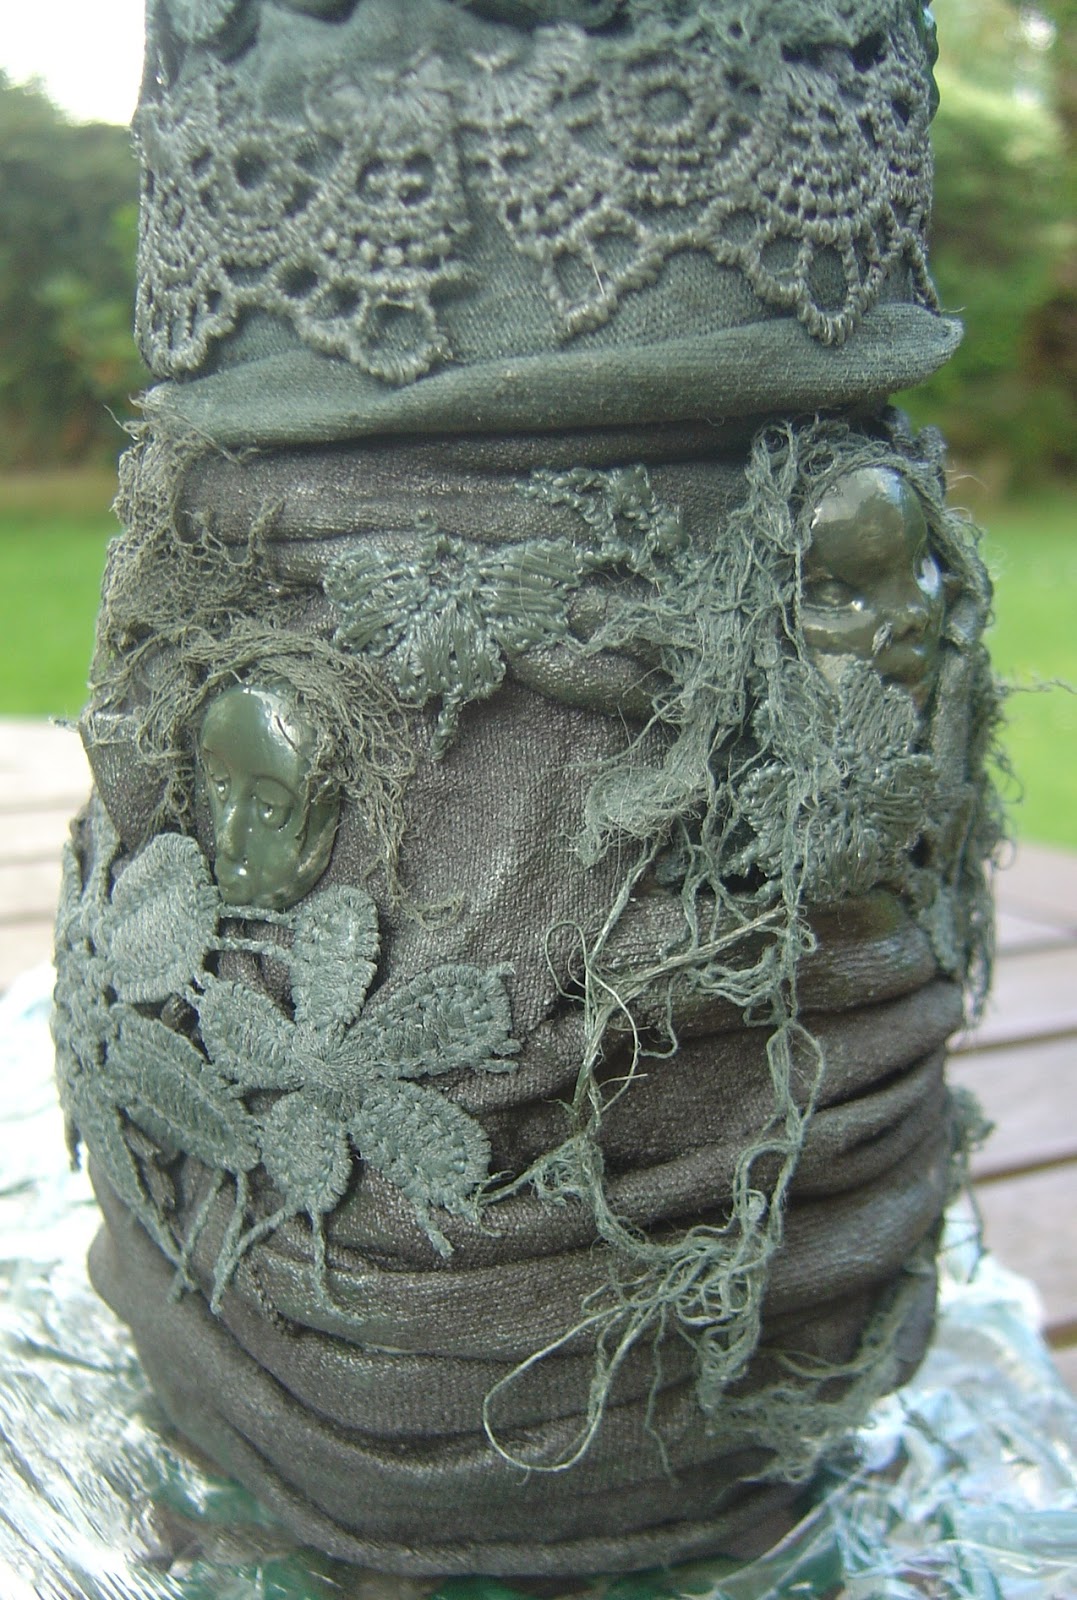
Next I added pigments to the bottle, including red, rich gold and bronze gold and from the Pearl-Ex range gold and bronze.


It really shows up the textures and looks fab IRL


Pleased with how the hat came out and how it sits on the bottle. This was taken outside this morning in the sun.


And finally I made some more of the stoneart and powertex mixture, but this time I used the black and once kneaded, I rolled it into a long sausage shape to make the mouth and eyes.


And lastly, a view from the side.

Even though at stages this is really messy, it's so much fun and you get great results.

Thursday 22 September 2016

Rainbow Goblin House Experiment


I made another house, this time from a jam jar.


I used up the remainder of my black Powertex so had to add some green to it.


I added some air dry clay and fimo clay faces.


Some lace and cotton scrim.


Flowers and powertex cotton threads.


T-shirt fabric used to cover the base of the jar.


Close up of the base of the jar.


And the same for the lid.


Now for the experiment. I want to put this piece outside for a few months to see what varnishes are totally weather proof. The soft and reg gel are by Golden and the soft touch, satin, gloss, ultra matte and matte med are by DecoArt, the rest you can see. I paired them up with either a primary element or a perfect pearl pigment.


So here we go, I've placed the lid on with the head towards where I started the cycle. I started with Golden soft gel with wild plum primary elements, the second was Golden matte medium with autumn skies primary elements.


Then I moved onto the Golden regular gel and deep coral primary elements. followed by Americana Decoupage matte with ginger peach primary elements.


Followed by Americana Decoupage matte with ginger peach primary elements.


The next one didn't work too well and when mixed became watery and frothy - Mod Podge Dimensional Magic mixed with kiwi perfect pearls. It didn't cover over the face either.


The next combination is DecoArt media soft touch varnish and royal orchid primary elements, followed by DecoArt media matte medium and yellow ochre Powertex pigment.


DecoArt media ultra matte varnish and true blue primary elements.


And the final strip, DecoArt media gloss varnish with spiced pumpkin primary elements.


And I completed the set by using the remaining two varnishes for the roof. On the left side we have Americana Triple Thick Gloss Glaze with green patina perfect pearls and on the right DecoArt Media Satin varnish with moss agate primary elements.


A close up of the base of the pigments over the fabric.


And another close up of the pigments over the flower embellishments.

I now have to wait 3 weeks before it can be placed outside and start the experiment. This is because the Powertex only becomes waterproof after 3 weeks of drying time.

Watch this space!!!

***Edited***


Three weeks have now passed since I blinged up my goblin house and so today I put it outside the garden in the boarder and my intention is to leave it out there for at least 3 months to get really weathered, then bring it back in, inspect it and report on which pigments and varnishes survived and which, if any, didn't!!

Sunday 18 September 2016

Powertex Hats


When we were at the workshop last weekend and looking around the shop and the displays, Chris saw this wizard / witches hat and I said I'd have a go at making one and do a step by step so she could see how it was made.


So firstly I needed a base to work from. I scrunched a piece of tinfoil into a sort of hat shape.


I wanted to make another shape too to see what the difference would be, so I drew around a small plate and cut it in half.


And then made a cone shape from it.


Covered the two pieces with cling film as I wanted to be able to take them out when I'd finished, and as powertex doesn't stick to plastic, cling film is the best thing to use.


Next I cut a couple of pieces of cotton material, a piece of t-shirt in an oblong type shape with a curve and the cotton piece of dress on the right was more or less a square shape as again, I wanted to try different things ie shapes and fabrics.


And this is how they ended up after the fabrics had been immersed in black powertex liquid and wrapped around the cone shapes. The left is the piece of blue cotton and the right the piece of grey t-shirt.


After I'd set them aside to dry for an hour or two I got some bits and bobs of lace, cotton fibers, cotton scrim, powercotton, string and more t-shirt fabric and roughly placed them as above.


After the additional pieces have been powertex'd and placed on the original fabric.


And the same thing for the second one. 


Then they both went into the airing cupboard to dry over night. 


This morning I took them out of the airing  cupboard and was also able to take the 'filling' out as they had completely dried and kept their hat shape.


They are now stood on their own and as you can see, the sun popped out too.


I put a first coat of colour on the one on the right and I just wanted to show you the difference between the two and how the colour brings out the textures.


Both have now been coloured.


View from the top which shows all the different layers of fabrics.


And finally after a few colours and a build up of layers of colour they are finished.

They are approx 3.5" x 4.5".


Blog Archive