Showing posts with label Water Brush. Show all posts

Tuesday, 14 October 2014

Brusho Splatting


I've been playing with three colours of brusho, burnt sienna, prussian blue and turquoise, a toothbrush, bubble wrap and white linen card.


Close up of the brusho splatted and flicked with a toothbrush.


More splats.


Close up of the brusho used with the bubble wrap.


Stamped the TH image in timber brown stazon and coloured the background with the same colours of brusho.


Added in idea-o-logy #7 and an arrow.


I stamped this guy from another of the TH stamp plates and again coloured him with burnt sienna and gave him a turquoise waistcoat.


Added a metal corner, and gave him a proper pocket watch!!


The TH men are stamped in timber brown stazon, masked off and the background stamp was stamped over them in gathered twigs distress ink.


I added tissue tape along the bottom and a selection of cogs, gears, a spinner and a brad.

Saturday, 9 August 2014

Pen Lady


Over on the PA blog this week Keren is back and I took inspiration from her first project which you can see here.  

That's Crafty have a theme of stamping ground, Simon Says Wednesday has a theme of make it sparkle and Anything but a Card have a theme of Repeating Pattern.

Thursday, 24 July 2014

Pen & Ink Tag


Over on the PA blog, Kate is back with a journal page. As you all know by now, I don't do journal pages, so I used some of the techniques on a tag.

Thursday, 5 June 2014

Butterfly Wings


I followed Tim's technique for his 12 tags of 2014 - June tag.

Also I'd like to enter into the following - 
DragonsDream TIO - Butterflies and the letter 'I'
Tag Along - Wings
ABAC - Summer Lovin


Sunday, 11 May 2014

Water Colouring and Embossing - Day 3


So one of the day 3 techniques was, I think, to stamp an embossed image and then colour it in with distress inks and / or markers to create the water colour effect.

I stamped the dragonfly image in blue, black and red wow powder and coloured the image with distress ink markers using a water colour brush. For the tops and bottoms of each tag I coloured them with distress inks and stamped random images.

Monday, 20 January 2014

Abstract Tag


Over at the PA blog there is a new designer this week, Ellen Vargo.  She made an abstract tag using a brayer to apply the paint and create the background, to see what she did check out the blog here. I pretty much followed what she did using guacamole, limelight, hey pesto and south pacific paints and the TH burlap layered stencil.


I added alphabet letters in vanilla fresco. I used wow powder to edge the tag and sectioned it off using my white posca pen. Aquamarine treasure gold and finally the images and words.

I think I put a bit too much GP on the tag as it covers up too much of the background, so may try this again with less stencilling!!

Wednesday, 8 January 2014

Canvas Atc's


Remember the pieces of canvas that I coloured previously here, well today I used some of them. I stamped the dragonfly image in versamark and heat embossed it with black wow powders. The images down the right are stamped in black stazon from a Traci Bautista stamp. I then coloured the wings and circles with distress inks, seedless preserve, dusty concord and faded jeans.


I again embossed the D stamp, top right and stamped another TH image down the left but it's very faded.  I stamped the PA image onto a separate piece of card, coloured it with Victorian velvet and added some wings. I tried to add some machine stitching, but had stuck the canvas to the backing with red liner tape and the needle kept getting glued up and the thread snapping, so I gave up!!

Friday, 6 December 2013

Die Cuts or Punches - Artful Times


This is my last week helping out over on the Artful Times blog and it was lovely to come back for a time to help out.

Die cuts or punches was the theme so I chose to use the mini and cabinet dies, one is an alteration die and the smaller one which sits inside to create the frame is a movers and shapers die, both by TH.

Sunday, 10 November 2013

A Christmas Cracker


Over at the Arty Inklings blog there is a Crimble challenge.  Now I don't normally do crimbo challenges but seen as she was lacking in players, I thought I'd join in.  I took a piece of strong tissue type paper and used the punch at the shorter ends.


I then made a tube out of kraft card.


Using the above 3 paints, I coloured the tissue.


You can't really see it here, but this is the tissue coloured.


I used the above stamps and brushed pewter distress paint to decorate the tissue paper.


You can just about make out the random shapes on the ice blue background.


I wrapped the tissue around the kraft tube and screwed in the ends. I stamped scary Mary (Stampotique), coloured her with distress markers, cut her out, along with the Merry Christmas sentiment and stuck her on the top of the cracker.


Here's a close up of the stamping on the finished project.

I'm also entering into this weeks PanPastelUk challenge which is anything goes or something altered.

Saturday, 26 October 2013

Clocks and Cogs


I decided to have another go at painting with grunge paste just like Liz did on her day #1 PA project this week. So I took a large mdf cog and set to it.


I gave it several layers of brown shades of fresco paints, Irish cream, mocha mousse, chocolate pudding and French roast.


Added stamping with PA minis, alphabet, mini bricks and flourish in black archival ink.


I then stamped the PA image from ink and the dog plate, wings #3 and one penny #4 although I now have this image in the wooden variety.  I cut them up and mixed them about a bit to create one main image. Water coloured the image with my new colours of distress markers, gathered twig and evergreen bough.


And putting it all together I used the pieces I'd previously created on a T!m Holtz CC102 day using UTEE to achieve the pitted effect on the clock face and the wings, and finally added a couple of metal pieces.

Sorry the photo is rubbish, but I missed out on buying a portable daylight lamp at the show on Sunday from Clarity stamps, and the weather here is torrential rain and extremely dark, so really could of done with it!!!

Monday, 16 September 2013

Atc's with Stripes


Over at Fun with Atc's this week they are asking to see stripes.  The background image was stamped in fired brick distress ink and coloured with hansa yellow tint pan pastel (220.8).  The Tin Can Alley image was stamped onto a separate piece of card and coloured with distress marker pens and a water brush.


I used the same background stamp but used it landscape, inked it with gathered twig distress ink and coloured with burnt sienna tint (740.8) pan pastel.  I stamped the face image onto kraft paper in timber brown stazon.  I stamped the quote onto white card, again in timber brown stazon, cut up the words and re-arranged on the atc.

Saturday, 7 September 2013

A Corrugated Canvas


The brief for this month over at Arty Inklings is to show a version of this canvas above.


So firstly instead of a canvas, I used a squarish piece of corrugated approx 9" x 9".


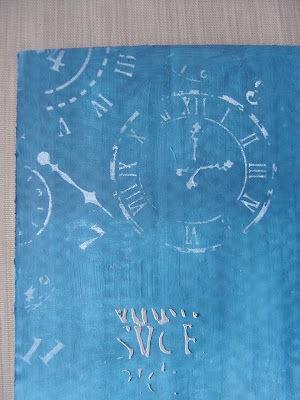
I gave it a coat of white gesso and painted it with baltic blue and sky fresco paints.  I mixed elephant fresco to grunge paste and put it through the diamond and roman letters stencils (only because I mixed way too much - again!!).


Close up of the GP diamonds.


And the Roman letters.


Using the clock stencil I pushed picket fence distress stain through on the top left corner.


Then I needed a focal point but I also wanted to use a die.  So I cut the arch from ribbed kraft card, stamped the TH image and coloured with distress markers and a water brush.


I stamped the T!m quote to the bottom in black stazon, attached the arch die/image and finally edged the frame with black eco friendly paint.

I do apologise for the quality of the photo, the blue on the bottom half is just reflecting back into the camera!!

I hope this is okay and fits the brief!!!!  Either way, I had great fun  making it.


Saturday, 31 August 2013

#3Up Challenge - Happy 10th Birthday


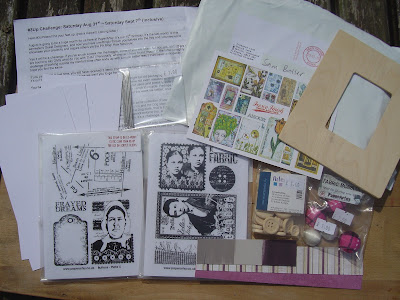
August was PaperArtsy's 10th birthday and to celebrate Leandra invited us to play along with the #3Up Challenge, except this time, instead of getting 3 items we all got a huge package of all sorts.  This was my bag of goodies.

There were instructions and some rules which are all documented on the piece of paper top left in the photo.


This was the colour pallet I was given to work with.


The wooden frame was coloured with squid ink fresco paint and given a light rub over with stone.

I stamped tissue paper in black stazon with an image from the Ink & the Dog, Buttons #5 plate.


The tissue paper was ripped and randomly stuck to the frame using mod podge.  Once dry it was sanded.


Now I had a bit of dilemma with these embellishments, initially I was going to use one as a pin cushion, but I couldn't push anything into it.  So, I decided to take one apart and discovered it was a metal dome!! Hmmmm.........what to do with that then!!


I wanted to give the image, Ink and the Dog, Buttons #6 platesome depth rather than just placing it in the hole, so I mounted it in a couple of polystyrene corners, the ones you get in packaging.  .

I used dusty concord distress marker with a water brush to colour the background, re-stamped the tailor tags onto white card, cut them out and stuck them over the top to keep them white.


Then after lots more stamping, cutting, colouring, painting, re-positioning and finally sticking, this is how it came out.

One of the rules was to use at least one stamp from each plate.  I managed parts of all of them on Buttons #5 and I used all but 1 image from Buttons #6.

Hop over to the blog and see what everyone else did with their bag of goodies.

Friday, 30 August 2013

It's a Man Thing - Artful Times


I never seem to have much of a stash of male cards, so when I saw this weeks theme for Artful Times that's what I decided to make.  


I used the steampunk on the edge die to create this card along with Time Travellers stamp set.

Blog Archive