Showing posts with label Pan Pastels. Show all posts

Monday, 17 July 2017

Atc's


Made a handful of Atcs this morning, I think I was half inspired byBecky and half by Chris. Becky for the atc's and Chris for the tag she did at a make and take on Saturday.


The background for these ones are earthy colours of pan pastel. I sealed them with DecoArt matte spray before I stamped on them. I dug down deep and found my box of wooden stamps that I've not used for a while, it was great to get them out again.


The two purply / blue backgrounds are again pan pastels and the one on the right is gelatos. The images are all stamped in versamark and heat embossed with WOW embossing powders.


And finally, these backgrounds are all gelatos and all the images have again been stamped in versamark and heat embossed with WOW powders.

Friday, 28 October 2016

Halloween Atc's


I started off with stamping the webs in versamark and heat embossing with black wow powder. I coloured them with pan pastels and sealed them with a spray matte varnish.


The pumpkin is a rub on, the cat is a die cut and the spider is a piece of chipboard.


The skull is a piece of chipboard and the bats are die cuts.

I have made them for an atc swap with the theme of Halloween and I'm also entering into this weeks That's Crafty challenge of Friday 13th part 2 as I also entered into part 1 earlier in the year.

Saturday, 30 July 2016

Skull and Arches


More playing with my new gothic arches which I thought might go well with a skull, so here it is.


Close up of the skull which was created with DecoArt white modeling paste through an Andy Skinner stencil.


The arches were stamped in clear ink and embossed with white. Dripage created with DecoArt black and purple media misters.

Monday, 4 July 2016

Another Couple of Pages


More magazine and Teesha Moore images to play with


Left page coloured with pan pastels and doodling with zig pens


Right page coloured with pan pastels, sectioned off and coloured with sharpies and bic pens


White sharpie pen used to hi-light the white of the eye and the teeth


Blocks of colour to create a maze effect

Entering into the PaperArtsy challenge, paper piecing.


Tuesday, 10 May 2016

Inspired by Sue


When I saw Sues tags which you can go and see here, I just fell in love with them and knew I needed to have a play. So out came my gelli plate prints, cut to size and mounted onto a size #10 black tag.


Out came the sewing machine and I whizzed around the edges.


I simply used black media gesso to stipple through three different stencils from the Andy Skinner range and I quite liked the look of it so didn't do anything more to it.


Again I stippled through a couple of stencils with black gesso. The main is the cathedral of love from crafters workshop, which is actually an arch, but I saw two people stood together, so using more gelli print papers I made them into people.


Using a sharpie, I outlined everything in white.


And more Andy Skinner stencils, but this time I used pan pastels through them. I sealed them with Americana matte varnish spray.


Close up of the main image from the Strike the Pose stencil.


My trio of tags - thanks Sue.

There are a few challenges I can enter these into - 


Wednesday, 4 May 2016

50th Birthday Cards


I was asked by my netball captain if I could make a card, the brief was, Rainbows as in Brownies and Guides, chocolate, especially cake, and taxi. So this is what I came up with.


And this one is just to prove that it does stand up!


It's my BIL's 50th next week too, so I made him this card. He loves rambling / walking, weight lifting and my sister has organised a flight on a bi-plane for his birthday.


And this is what it looks like folded up.

Sunday, 24 January 2016

Another Birthday Card & Envie


And today is Chris's birthday and this is the card that I made for her.


Close up of the bottom right corner.


And the front of the envelope.


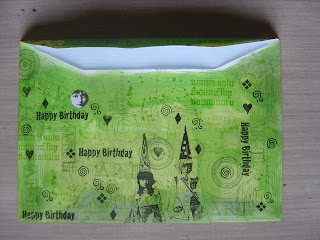
And lastly the back.


Saturday, 23 January 2016

Birthday Card & Envie


It's Lin's birthday today and this is the card I made for her.


Front of the envie.


And the back.

Monday, 30 November 2015

More TM Inspiration


Created a border on a sheet of A4 card using TM and magazine images.


Created a main image using all sorts of bits.


Added some doodling, a quote and some pan pastels in the background.


And some gold pen doodling to fill in the gap. I was going to fill it with another quote but decided against it this time.

Thursday, 8 October 2015

Let's Dance


I wanted to experiment with my set of Lindy's today as I wanted to try them direct onto the page, ie without gesso, and was quite pleased with how they turned out. I added a bit of background stamping in purple and olive green stazon and the main Dina images are stamped in black stazon and masked off to create the line.

Saturday, 3 October 2015

Journal Page Play


Been playing again with magazine and collage pages making up images, but wanted to do something different this time and do the writing in a colour. I still ended up adding a black and white just to help define it more.


And using my new Zig pens I did a lot more doodling on these pages with them. There is only one problem with them so far, when using a white sharpie over the top of them, the white turns a paler shade of the colour you are writing over. So I used silver on the left hand side page.

Thursday, 1 October 2015

Playing with new stuff


I've been so engrossed with cutting up images and making new ones that I've neglected some new things I recently purchased, so today I decided to play with them all!!  I scraped fibre paste through an Andy Skinner stencil, once dry added some Lindy's sprays, I recently got the French heritage set. I added some gold DA media fluid acrylic to some golden tar gel. This wasn't actually as drippy as I thought it was going to be, so unfortunately I ended up with bigger blobs than I really wanted, but hey ho.


I added some stamping to the background in iced spruce distress ink. Stamped in timber brown stazon the Dina image and Clarity word on separate card, cut it out, glued it on and outlined it with dark brown pencil along with some of the stencilled area. Used bronze pan pastel over the textured fibre paste. This photo was taken outside in the garden.

Sunday, 27 September 2015

Flip Flap Journal


This is the front cover of a journal I put together using six, 6 x 12 pieces of card, creating extra flaps. So the pages are 6 x 6 or 6 x 3 but the 6 x 3's create shutters over some of the 6 x 6 pages. I used brads and a piece of hemp cord as a closure.


This is the very first page you see when you open the cover. The inside of the flaps have been covered with a mask patterned card to hide the backs of the brads.


This is one of the 6 x 6 pages with it's two 6 x 3 shutters with borders and images.


The pages on the left are two 6 x 3 pages closed, so you are seeing the outsides and then another 6 x 6 page.


This one shows two 6 x 3 pages closed, a 6 x 6 page and another 6 x 3 page.


So the 6 x 6 page in the middle will be covered up with the 6 x 3 flaps either side.


Once all the pages and shutters had some sort of imagery on them I went back in and coloured all the backgrounds.


Added some stamping, doodling and low and behold, some writing!


Also added some pre-printed text to some of the pages too. 


I just love how the page on the left came out. The two pages on the right form the shutters to the 6 x 6 page underneath it.


And another 6 x 6 with a 6 x 3 flap each side. There are more pages as there 21 in total, but I didn't want to bore you too much!!


And finally an aerial view so you can see how the shutters fold in.

Blog Archive