Saturday 29 September 2018

Wet Felting Workshop - Spikes and Craters


So today I attended a wet felting workshop with felt maker, Jenny Pepper. It was a lovely day, which was lucky, as I travelled to Scarborough for it.


The first thing we did was laid out three layers of Merino wool and created a pre-felt.


This is Liz creating her prefelt.


This one belongs to Jenny who came all the way from Cumbria, somewhere near Hadrians Wall.


Jenny (the tutor) helping Liz out with her prefelt as it was quite thick and she needed to add more soapy water.


This was one of Jennys samples showing a few different techniques that I wanted to try.


We each created a base and then stopped for a bite of lunch. I just went with a plain cream. Jenny gave us a demo of how to create the different craters and spikes and flaps and then we had a play on our own pieces using the previously made prefelt.


We used the prefelt as it has still got some felting life left in it, so it will adhere easily to the background piece which was just laid down (3 layers), wetted and left until we needed to use it.


The after much rubbing and rolling and more rubbing and rolling and hot and cold water shocks x2 finishing with cold and rinsing out and cutting and sealing the cuts, this is what I ended up with.


I love how it came out, I forgot to say about the spikes on the bottom, they were the last thing to be felted after everything else had been wetted out and rubbed.
 

And this is how Carols turned out. I didn't get a photo of Jenny's and Liz's finished pieces as they left pronto, as their lifts had arrived before I got chance.

Had such a lovely day and my piece is now drying in the airing cupboard.

Friday 28 September 2018

Stone Sculpture


I made this piece from wire, tinfoil, masking tape and a polystyrene ball for the head.


I used Powertex and Stoneart to create the effect.


It looks rather light on the photo, but it does actually look like stone.


And the view from the back.


And another view from the front but the light was fading by this time.

Inspiration taken from a Pinterest post.

Monday 24 September 2018

KC Workshop at The Craft Box


So yesterday I attended a workshop Kate Crane at The Craft Box in Barnsley.


It's also an auction room and there were loads of antiques around.


Fabulous craft space, loads of room between the tables of four.


Lots of old uniforms and mini bottles waiting to be catalogued.


It was like an Aladdin's cave down that end, but that's also where the tea and coffee were.


We were making backgrounds using a gelli plate.


We were doing it Kate fashion and applying the paint to our plates with our fingers.


We were also using Kates new Carabelle texture plates on the gelli plates.


Anna chatting to Kate who she'd not met before.


Everyone busy creating their mini makes.


Using the texture plates on our pre-cut Tiny T!m houses.


This is the total sum of my purchases from the lovely craft shop.


These are all the lovely gifts I received from Anna, Lin and Chris. No coin excuses now!! Can't wait to Powertex that skull and I used some of the T!m images and words on my house I made.


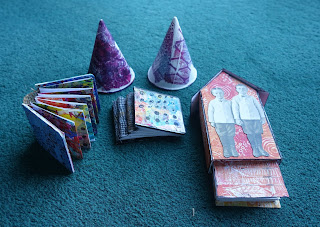
These are the mini marvels that I made at the workshop. A couple of cones, a couple of mini books and a mini T!m house with a mini book inside.

Thanks for a lovely workshop Kate and it was great to see Chris and Lin again and finally meet up with Anna. 


Saturday 22 September 2018

A Rectangular Glass Bottle


I found this great shaped empty glass bottle in a recycling box. I covered it in masking / paper tape and painted it with black Powertex.


Once it was dry, I added some stencilling to all the sides using black modelling paste.


Front


Back
 

Once the stencilling was dry, I added a skull, gluing it on with the black Powertex.


Using iridescent pigments, I dry brushed the bottle.


The back, where you can now see the skull stencil.


The side with more skulls.


I used acrylic paint to paint the skull on the front.


Tilted so you can see the colour wave better.


And this side has numbers stencilled on it.


I just need to find a candle to stick in the top and it'll be ready for Halloween.

Monday 17 September 2018

Powertex Creation


What can you do with an empty Corona bottle, tinfoil, bubble wrap and masking tape?


I rolled the bubble and placed it inside the neck of the bottle and secured it with masking tape.


I covered the bottle with masking tape and also covered the bubble wrap but at the same time, curved the bubble wrap. I left about an inch and a half at the top end without masking tape. I cut the bubble wrap in half.


I then put masking tape over each of the halves I'd created.


I decided the bottom of the bottle needed to be bigger so I added another layer of bubble wrap and covered it with masking tape. 


Emma kindly sent me some more Boodles which I wanted to use for this project.


I wanted a grey, so I poured some black and then added some white in. I used white NOT ivory. 


And I ended up with this grey which I quite like. I don't know how it compares to the lead coloured Powertex because I've never used it.


I cut off manageable lengths of Boodles and covered them in the grey Powertex. I opened the fabric out and wrapped them around the bottle and the bubble wrap covered in masking tape. I went up to the point where I'd cut the bubble wrap in half.


I covered some more pieces of Boodles in yellow Powertex and used them to cover the exposed pieces of masking tape. I then left it outside to dry.


Once it was dry I went over the yellow again because it didn't cover the lilac very well first time round, but with a second coat it now looks great.


And again I put it outside to dry.


I also touched up some of the grey where I found some splashes of yellow!


Have you guessed what it is yet?

Blog Archive