Showing posts with label dishcloth. Show all posts

Sunday, 6 June 2021

Up-cycled Angels


Apart from the head, these are totally up-cycled.  Piece of wood from the old gate, tubes from catering rolls of tinfoil, used tin foil, old wire coat hanger for the wings, old dishcloth, old t-shirt and scarf.

Covered the body with off cuts of an old t-shirt and painted the wings, all in bronze powertex.


Next I draped off cut of fabrics, lace and old scarves over each of the figures just to see how they would lay.


I then covered all the pieces in powertex and arranged them on the figures.

Coloured with silver and blue pigments.


And the back.


And on this one I just used the silver.


And again from the back.  

I just need to get a couple of pieces of slate now to mount them on.

#rusteffects #powertex #upcyclingchallenge

Thursday, 12 November 2020

Powertex Figures


I just wanted to show how you can make a powertex figure on a shoestring.  This is a dolls head from Poundland, it was £1.  I cut off all the hair.  The base is a wooden meat hammer from Wilko - £1.50.  The body is crushed tinfoil to shape, covered in masking tape (both can be bought for £1 from Poundland).


Then some bits of cotton fabrics, a dishcloth, an old woolen scarf and some odd pieces of t-shirt wrap.  But you can use whatever you have. You might have an old shirt or t-shirt, anything will work as long as it's 80% ish or more cotton.  The most expensive thing you will need is the Powertex, but it does come in various sizes so you can get a small bottle if you aren't sure about it. 
(100g - £7, 250g - £10 or 1kg - £17)


I made another one, but this time instead of a meat hammer I used a cardboard tube and a piece of wood that used to be a panel in our old gate.  As the heads are plastic, I painted everything in a coat of black gesso.


And as I fancied something totally different, I used red powertex with the dishcloth and the t-shirt wrap and transparent with the pieces of scarf.


And here they are finished.

Monday, 30 January 2017

Birthday Cards


I needed three cards for crafty friends with birthdays in January, so I decided to try a Powertex and Bister mini mixed media style and was quite pleased how they came out.


The hardest part was trying to keep them flat once they had been mounted on to the actual card, as they dried on the chipboard they curled!


I used teal pigment along with copper and gold on this one to hi-light the textures.


Bits and bobs, coffee stirrers, corrugated cardboard, cotton scrim, sand balls, string, dishcloth and t-shirt fabric to create the textures.


Everything was sprayed in a mix of brown or natural Bister and water and left to dry overnight.


Once completely dry they were all dry brushed very lightly with ivory Powertex and copper and gold pigments to finish.

Saturday, 17 September 2016

Larger Fairy Sculpture


I wanted to attempt a bit bigger fairy sculpture, so this time I cut three lengths of wire, 2 x 22" and 1 x 20", made my armature, bulked it out a bit with tinfoil and covered with masking tape, adding half a polystyrene ball for the head. The ball measures 20 cm across.


As you can see, the arms are way too long, but rather them be too long than too short as I wanted them to cross over.


I simply snipped them off with wire cutters and re-masked the ends.


Next I added one set of wings.


I prepared the second set, but haven't actually attached them yet.


Next I covered the head in a thin piece of t-shirt material and extended it down over the neck and shoulders. Once this had dried for an hour or two I went back and wrapped the arms in t-shirt yarn.


The following day I wrapped the legs with t-shirt yarn and covered the attached wings with t-shirt fabric and the second set I covered with dishcloth material, but still haven't attached them.


The following day I wrapped the body again with t-shirt fabric and because it was tightly wrapped to give some good ripples and textures, I attached the second set of wings between the wrapped layers. I also created a skirt out of wire and masking tape.


This is a view from the back of the double set of wings and the tight wrapping.


And here she is the next day with her skirt on drying. I used the heat tool to shape the skirt at the front but needed the base to be flatter so she could sit down with her legs crossed and hanging over.


View from the other side, arms crossed, legs crossed, just needs some hair and may add more to the wings depending on how the hair sits.


She is now coloured up, but still needs some hair. I'll be back to show you the finished figure once she has some.

Most of these photos were taken at night with the light on as I built her up over a few nights giving each stage drying time. I personally think it's easier to move onto the next step when other pieces have dried a bit and you can still manipulate the elements days after. I covered the head and arms on Sunday and by Wednesday they were still pliable enough for me to place them where I wanted them after I'd dress her.

She measures approx 9" x 10" x 4".

***Edited*** - The sun came out today


Hopefully these photos give you a better idea of the colours and the pigments which hi-light the textures.

Sunday, 21 August 2016

Ghoul House


After watching the 5 inspiring Powertex shows on Hochanda earlier in the week, Tracey inspired me to have a play with a fairy house, but in true fashion, I changed it from a fairy to a scary house!!


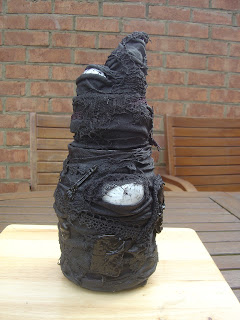
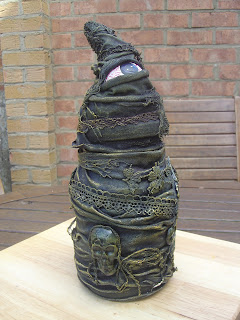
I used t-shirt fabric to cover the body of the coffee jar and added pieces of dishcloth, cotton scrim, lace and cotton strands


The skulls and faces are made from air dry clay and it takes the powertex quite well. I also wanted to incorporate an eye!


This is the lid or the roof. I wanted to create space to add in another eye!


The jar with the roof on.


As the lid is loose, I can position it where I want.


View from the other side.


Painted the eyes in once I'd taken them out of the cling film and popped them back in again.


From another angle with the roof on.


Dry brushed with yellow ochre pigment mixed with Decoart satin varnish.


From another angle, love how the pigment brings it to life.


Moved the lid round so that both eyes are facing forwards!


Close up of the bottom eye painted with DecoArt media paints.


Close up of the dry brushing to hi-light all the different elements.

Blog Archive