Showing posts with label Prestuds. Show all posts

Sunday, 18 May 2025

Industrial Bird House


I picked this bird house up today from Aldi for a fiver.


I prised the door and the starfish off the front.


Next I covered all the sides with an industrial style paper.


I cut up a sheet of rhinestones on a mesh background into various shapes and stuck them on the back and the two sides.


I took the roof off and covered both sides with air dry clay.


I pressed different embellishments, tiles and found objects into the clay and I left some of them in to create different textures and interest.


I added clay to the bottom of each of the sides and the back underneath the panel of rhinestones.


And again pushed found objects and embellishments into the clay.


I gave everything a coat of white gesso and once dry a coat of green paint. I used PaperArtsy Tinned Peas.


I added shades of yellow ochre and raw umber with water to the project and kept drying between adding the different colours.


Then I knocked it back a bit by re-apply the green but with a dry brush effect.


Next I added some waxes, aged brass, gold and silver.


I added some carmine for a rust effect and then started working on the top section of the bird house.


Once stuck down, I gave them a coat of gesso.


Then I painted the sides with the same green and umber and ochre paints.


Added the same colours of waxes.


Feet added and studs to the roof.


Monday, 6 November 2017

Small Fabric Steampunk / Gothic Book


After I'd printed some images onto fabric and cut them up, I started to lay fabric and trims around them to start to build up a page.


I did the same for all of them and added a few emblishments.


Nothing is stuck down yet as I was still playing around with placement etc.


Ribbons, lace and ric-rak.


Once everything was glued down on the pages I played around with the placement of them and paired them up.


Then the pinkish set of pages.


And the next two pages, these are five and six.


And the last two pages.


I put the pages together in the same way I'd made the other two books sandwiching lace inbetween the layers. I laid out the pieces for the front and back covers. At this point, nothing is stuck down.


This is the front cover stitched and glued down with all embellishments attached.


And the back cover which I've left pretty plain as it needs to be flat when laid down.


And this is the spine which has been re-inforced with cardboard to give it extra strength.


And finally a view from the top with the book closed.


And this is the bottom.

This was a thank you gift for Sheilagh who very generously posted me a huge stash of fabric. I made her this because she showed an interest in the first one I'd made, but I couldn't give that one away.
This one is a little smaller and measures approx 6.5" x 9". I just hope she likes this one as much as the first one.

Thursday, 25 August 2016

A Couple of Tags


Finally felt okay enough to be able to move some stash around to get to other stuff and ended up making these two tags. I've been wanting to do something like this for a few weeks now.


I embossed the card using a cog folder, coloured it in silver Decoart media paint and then rubbed over it with black carbon media paint.


The top half is white embossed and coloured with carbon black media paint and wiped back.


Crackle paint on the heart and covered with black antiquing cream and wiped back.


Pretty much did the same with this one except I used gold and transparent yellow oxide for the embossed background and again I tinted it with carbon black Decoart media paint.


The embossed stamping was coloured with platinum silver embossing powder. I used a dirty wash for the background and added a wooden cog.

All products used are from the DecoArt media range.


Thursday, 28 April 2016

Know in your Heart


Used soft gel medium to adhere bits and bobs to a square canvas. Black and white gesso used to cover the background including splats. Metal embellishments added to finish.


Wooden heart painted in white crackle paste, coloured with red chalky paint and wiped back the black antiquing cream.


Close up of some of the textures.

All products are from the DecoArt range.

Wednesday, 19 August 2015

Tag Swap - Texture


Sad, sad day, the last scrapings of my DecoArt media white modeling paste. Good job I have some more on order!!!


I managed to scrape enough out to put through these stencils.


I added white crackle paint to some areas and then covered everything with gesso.


I painted this one with a few colours of DecoArt dazzling metallics, venetian gold, emperor's gold, mink pearl and champagne gold.


Then I rubbed the whole thing over with relic chalky paint and wiped it back and ran over the cogs with champagne ice metallic lustre.


You can still see the shimmer from the dazzling metallic paints.


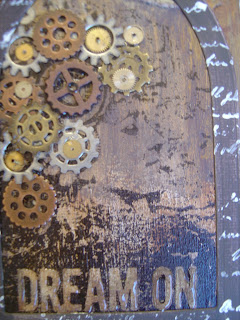
Next I painted some die cut cogs and an arch in a couple of coats of relic chalky paint and stamped script over them with everlasting chalky paint.


I stamped the Dream On image from my newest Finn set and added some gears for the hair, along with the chipboard cogs, prestuds, washers and gems.


Close up of the metal cogs and clock pieces.


Close up of the cogs, stenciled and chipboard ones.


And finally for more texture, I went over the words with glossy accents.


I used the DecoArt multi surface satin paints on this tag, chartreuse and true blue.


I stamped the main LP image and added a flourish, splats, blots in black stazon and script in olive green stazon.


I painted the two PA chipboard shapes in multi surface satin for the butterfly and serene for the flower shape. Stamped the LP images in black stazon and gave them white cheeks.


Added dots and a few hi-lights with a white posca pen. To bring out the texture I used metallic lustres in turquoise on the chartreuse and emerald on the true blue.


Close up of the chipboard butterfly over the main image.


More texture where the crackle paint was added. I think this would have shown up better if I'd of used some white antiquing cream to hi-light the cracks. 

All products are from DecoArt.

I'm also entering these into this weeks PA challenge which is gels and mediums.

Blog Archive