Showing posts with label Textured Sand Paste. Show all posts

Friday, 31 July 2020

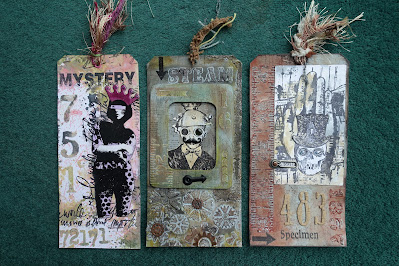
Day 27 Tags


I used acrylic paints and oxides to create the backgrounds.


I used a mix of modeling paste, textured sand paste and crackle paint.


I used distress stickles on the hat and the eyes.


A brad for the eye and the tash.


Textured sand paste through a cogs stencil.


A gem crystal for the eye and another brad for the tash.

Day 27 of the #fabtag30day challenge.

Tuesday, 21 April 2020

Masquerade MDF Tag


Unfortunately I picked up the wrong tub of embossing powder but didn't realise until I started to heat it.


So I stamped it and embossed it again in bright white.  I then rubbered over the image with silver treasure gold.


Added some fibre and a word.  Not ideal, but at least you can see the image now.

Thursday, 30 June 2016

At the Beach


Another couple of Atc's made for a swap, the theme for them is At the Beach.


I mixed DecoArt texture sand paste and ultra matte varnish together and applied along the bottom of the atc to create sand. Once dry I coloured it with titan buff, translucent yellow iron-oxide and yellow oxide. For the sky I watered down cerulean blue. The clothes were painted in quinacridone magenta and the flesh, a mix of translucent white, quinacridone burnt orange and magenta.


This is a paper bag studio stamp and it was inked with salty ocean and lemonade and mustard seed distress inks and stamped onto an atc. The image was coloured with watered down DecoArt quinacridone magenta.


Sunday, 31 January 2016

DecoArt Rust


Another corrugated background painted with black media paint, die cut clock washed over in silver, heart bubbled with decoupage matte glue, painted with black media paint and the texture pulled out with copper metallic lustres. The lock die cut has been made to look rusty using texture sand paste and media paints.

All products used are from the DecoArt media range.

Thursday, 22 October 2015

Mini Chest


Today I've been playing with pieces of chipboard and coffee stirrers which I picked up at Donny Dome on Sunday!!


Firstly I painted everything in carbon DA chalky paint, then a dry brushing of dolphin DA multi surface satin to give some definition and finally a dry brushing of DA dazzling metallics black pearl to give some shimmer. I painted the gold plastic studs black and then silver from the DA media range.


Then I built up my pieces to make this chest. It measures approx 11cm x 6cm x 9cm. I added a couple of straps and the studs.


And this is it open. The white specs inside are where the glue is still wet, but it will be clear when completely dry.


I wanted it to be on a Halloween theme, so I've started adding skulls, skeletons and potion bottles, but none of it is stuck down as I am hoping to pick up some other stuff at the Glasgow craft show at the weekend.

All products are from the DecoArt range and I'm also entering into their Halloween competition.

Monday, 12 October 2015

Mini Wooden Makes


So following on from yesterday's post on how I textured the backgrounds, here's what I did with the wooden pieces.


Added two sets of wings, a crackled heart, a rustic skull and rusty nails and a couple of metal embellishments.


Close up of the heart, skull and rusty nails.


Mini tag with another crackled heart and antiquing cream. Skull and spider and then a rustic handle holding the clock hands.


Close up of the spider and handle.


And finally the heart which I mounted onto a piece of card along with cogs, skulls and washers.


And again another close up of various pieces.

All products used are from the decoart range which you can find here.

I'm also entering into this months challenge over at Country View Crafts as they have a theme of texture.

Monday, 6 April 2015

Imagine


Made use of the extra day off and had a play with my DecoArt products to make the above piece. I painted everything with a layer of white crackle paint and then added various shades of washed out blues and greens then added the quin gold and the AS dirty wash.


Close up of the rusted cog and the metal embellishment and the crackle paint.


This is more true to the colours.


Close up of the cracked heart and crackle paint and quin gold.

Monday, 9 February 2015

Cogs n Clocks


Am loving playing with the DecoArts products to create rust effects, die cuts, skulls, hearts, cogs and the like. Coloured the clock in orange flicker and black shimmer metallic lustre. Corrugated background was spritzed with black media mister, chipboard a mix of gesso, textured sand paste, modelling paste black and white for contrast. Had great fun pulling it all together.

Monday, 19 January 2015

Timebound


I used a few die cuts on this piece. The background is corrugate cardboard sprayed with carbon black media mister. The TH framework die is coloured in black modelling paste, the background square of chipboard was painted with a mix of white crackle paint and textured sand paste, one dry, painted in paynes grey. Skull, washers and cog painted to look like rust. The clock die and banner were tinted with onyxite treasure gold directly onto the chipboard.


Clear crackle paste was applied to the clay heart and then coated in black anqituing cream and wiped back, love how it highlighted the fab cracks.

All media products used from the DecoArt range. Waiting for some metallic lustres to arrive, can't wait to compare them to the treasure gold products.

Sorry about the photos but we've had varieties of weather today but not much sun!!!

Sunday, 18 January 2015

Sweet


I took a square of corrugated and pulled most of the top layer off, then gave it a spritz with the carbon black media mister. I added the skull and wings die cuts which I'd coloured with silver media paint.


Painted some little nails to look rusty and added black eyes to the skull.


Rusted the charm, washers and clock hands using texture sand paste and quinacridone gold.

Think I might go back in and outline the idea-ology word with a black smudgy pencil.

All products are from the Deocart media range.

Friday, 14 November 2014

WIP and it may be a while!!!


Using the back off an A4 note pad I spliced the top off to make a squareish piece and then made the smaller piece into a tag.  Put some grunge paste through a couple of different stencils and then added masking tape.


Once dry I painted them with black gesso and then went over them again with white gesso using the dry brushing technique to draw out the textures. Next I randomly added some DecoArt textured sand paste.


Once that was completely dry, I painted over the sand pasted areas with paynes grey.  

Unfortunately I can't go any further with this as I need the transparent yellow iron oxide to create my rust effect, but I just thought I'd share what I've been up to!!!
 

Blog Archive