Saturday 28 March 2009

Memories


I had this one on the go too whilst I was doing the one below, as I had to keep waiting for bits to dry on each one!!! I covered a piece of glossy card in gold acrylic dabber paint. Used a photocopy of the girl and transferred the image into the paint. When it was dry I slid the piece of card into the back of the canvas. I painted the wooden frame with sandal acrylic dabber paint and added a touch of gold. To the middle I added a copper skeleton leaf, gold heather, 3 yellow flowers and 1 white and finished them off with a bow. Around the frame, the label, arrow and hinge are grungeboard shapes covered with gold acrylic dabber, washers, wire, screws and a bracket have also been added. The squiggle on the left and the word memories were done freehand using gold outliner paint

Forever Autumn


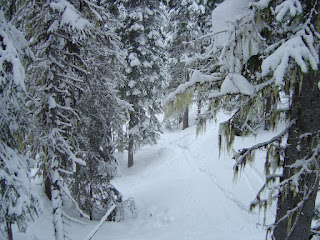
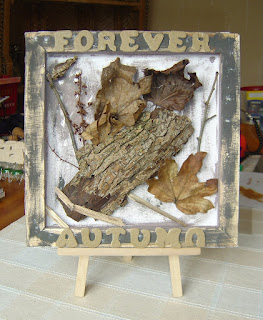
This inside out canvas happened by mistake. I was walking Fraz on Friday afternoon and I found a lovely piece of bark. I was wondering what I could do with it and continued to pick up bits of other things. Once home I turned over a 10 x 10 canvas and started to lay everything inside it. I took everything out again and used expresso, hazelnut and pearl acrylic dabber paints to paint the back of the canvas and the bare wooden frame. I glued everything back in place, got my wooden letters (another Canada find) , painted them with frayed burlap crackle and the above was created - It will all fall to bits at some point as it isn't treated with anything!!!!

Lotstodo Week 13 Challenge - Boxes


This weeks theme on the lotstodo challenge is boxes. Here is my slidemount box. For full details of how it was made visit the technique zone blog here

Thursday 26 March 2009

Wire Hangers - 2nd Attempt!!!!


Made a couple more and added a piece of metal to the middles - quite pleased how they have turned out. The 2nd one is by far the best as the wire came in a long strip, so it was easier to keep straight, all the others have come from a tightish coil

Tuesday 24 March 2009

Wire Hangers


Have been messing with pieces of wire tonight trying to make the wire hangers to display things from now that I have sourced some clips (they were found in Canada!!) As you can see from the colours, they are made from different types of wire and the top one is slightly thicker so it's maintained it's shape better. Will have to straighten the bottom one out (some how!!). All I need to do next is add a piece of metal or something to the middle, then they will look like the 'proper' ones!!!! Not bad for a first effort though!!!

Saturday 21 March 2009

Retirement Card


A work colleague is retiring in a couple of weeks, lucky thing!!! So I've just made her this card. I embossed the background with the swirls cuttlebug folder, added some flowers from the art flowers range from hero arts, attached them with brads, added the leaves and butterflies. Stamped and heat embossed the congratulations in copper and added a piece of cream rickrack ribbon to finish

Claireabelle's Birthday


I made this for Claire from the Lotstodo forum as it's her birthday today - Happy Birthday Claire. The 'C' is another find from Canada, a 6" high wooden alphabet letter. I coated it in black acrylic paint and when dry applied vaseline in various places. I then used 4 different colours of Adirondack Dimensional Pearls to completely cover it. This is one of the techniques Sir Tim uses on his lastest dvd, The Journey Continues. Once dry, I wiped off the paint where the vaseline was, this revealed the black base coat. I covered a thin 5" x 7" canvas, again another find from Canada, with purple twilight acrylic dabber paint and when dry, stuck the C to it and the rest of the tiled letters to spell out Claire's name

Lotstodo Week 12 Challenge - Working with Wire


I was quite pleased with myself after making these. They are made from champagne cages. I untwizzled and cut off the wire around the bottom, and made the legs with what was left. I used the wire from around the bottom to make the various different backs.

Sunday 15 March 2009

Black & White Canvas


Was having a play this afternoon and created this. Inspired by some of the creations in the latest Somerset Studio magazine. It's a 5" x 7" flat canvas which was staring straight at me. I covered it in mod podge, ripped a page of text out of an old book, stuck it over the canvas and gave it another coat of mod podge. When dry I placed vaseline over certain areas to act as a resist to the acrylic paint. I painted the whole piece and when dry, using a clean piece of paper towel, removed the paint from the areas covered with the vaseline. I tore a piece of black card, a piece of vellum and a piece of tissue paper, scrunched them up and used my paper distresser to distress the edges. I stuck the tissue paper down roughly in the middle of the canvas and I used silicone glue to attach the other two pieces as I wanted the piece to have a 3d look and not be flat to the canvas. I added a piece of magic mesh and rubbed over it with black stazon. I used one of my new stamps and stamped the image onto a glossy piece of white card using black stazon ink, again I attached it with silicone glue. I then added a piece of white lace to the right hand side, a black ribbon and a white button to the bottom right, a metal charm to the bottom left and a metal charm which says, love life, live life, middle top. It looks quite good in the flesh because it's got a bit of 'lift'.

Lasagne Frame


From this

To this

To this
This is one of my Canadian finds from Michaels, an unfinished 8" x 8" wooden frame for $1.50. I covered the frame with mod podge and let it dry. Using some cheap pasta sheets I broke them up and placed the pieces on the frame until I was happy with how they fitted together. I then stuck every piece down individually again using mod podge and when I'd stuck the last piece in place I gave the whole piece another coat of mod podge. When dry, I mixed silver and black acrylic dabber paint together as I wanted to create a pewter sort of colour, then I proceeded to paint the frame. When it was dry I thought it was a tad too dark and a bit harsh, so using a piece of cut n dry foam I painted a thin layer of pearl acrylic paint and gentley scuffed it over the frame. This has broken the colour up nicely. I just need to find a suitable photo to put in the middle now!!!
The original idea for this technique was discovered by our very own Sue, formerly of Paper Paradise. She actually wrote an article about this technique which was published in Simply Stamping craft magazine a few years ago. She stumbled across the idea whilst making a final piece of work for an exhibition for her City and Guilds Mixed Media Course about 8 years ago.

Saturday 14 March 2009

Lotstodo Week 11 Challenge - Mask It


This weeks theme on the lotstodo challenge blog was 'Masks'. I created this 8 x 8 canvas by firstly applying a thick coat of gesso and writing, stamping, pressing shapes and making squiggles with an old credit card whilst the gesso was still wet. When dry, I applied spiced marmalade distressed inks over the top and used a piece of damp cut n dry to move the ink around. I also blended in a bit of mustard seed. I then placed my TH flourish mask over the right hand corner and covered with fired brick distressed ink.

I then used acrylic dabbers to paint my wooden letters to spell out the word 'Hope'. I stamped the CI Hope caligraphy stamp over each of them with timber brown stazon. I used blaze red stazon to enhance the imprints made with the gesso and added a small amount of gold rub n buff. I then added a few rub ons, a few flourishes made with my cuttlebug, a button, an arrow and last of all a MASK charm.

Thursday 12 March 2009

2 Today


My little boy is 2 today. Here he is with his new glow in the dark squeeky dino

Monday 9 March 2009

Managed to find a few Bits

Just something a bit different

Some wooden bits

Stickers, 12 x 12 papers, cuttlebug alphabet, flowers and more

Some fab books and mags

A range of canvas's

Metal finds

Some Holiday Snaps


Through the trees!!

The town from the hill

And just to prove I was really there!!!

Saturday 7 March 2009

Dawne's Birthday Present


It's Dawne's birthday today. I created the background using texture paste and covered it with purple twilight acrylic paint, added a few splodges of cool peri acrylic and created an outside border with silver acrylic. Using black stazon, I stamped the 'Just Dreaming' and the flourishes down each side. I stamped the image onto the metal using black stazon and created a frame around it using the metal wheel tools. I painted the two metal corners with black acrylic and added to finish.

UKStampers Swap - Art


These are my atc's for the 'art' swap I am hosting on the UKStampers forum. My new wizard atc die has the word art on it, so it was appropriate for these pieces. Left has been covered with texture paste and coloured with purple twilight and silver dabbers. The word and the flourish are made from green metal. Middle is still my favourite stamp of the moment, but I've glitzed her hat up, given her another flower, the word art and added a metalic border across the bottom. And finally right, is made from corrugated cardboard, again with metal pieces added from the wizard atc die.

Lotstodo Week 10 - Gorgeous Gesso


I created the background for this mini canvas using adirondack dimensional pearls, butterscotch, lettuce and wild plum. I painted gesso onto some bubble wrap and stamped it onto the canvas. I then wrapped a rubber band around a thin tube, covered that with gesso and rolled it over the canvas.

I transfered a couple of basic grey flourish rub-ons onto the canvas, printed the main image onto acetate and attached, stamped the word 'dreams' from the CI plate 156 onto a piece of card, cut it out and attached bottom left.

Blog Archive