Showing posts with label Dylusions Paint. Show all posts

Monday, 4 May 2020

Bright Set of Tags


Been playing with some brighter paints from Dina & Dyan to create these backgrounds.


Painted the chipboard pieces with black gesso.


Covered them with a layer of gloss varnish to brighten them up.


And finally I used dimensional paint to create the dots on the chipboard pieces.


Friday, 20 October 2017

Mini Journalling Workshop with Kate Crane


Today I went to the mini journalling workshop at Art from the Heart taken by the lovely Kate Crane.


Other end of the table.


Gesso'd and when dry Dina paint mixed with a bit of white. Finger painting. We were creating the background. We added more colours until the background was covered.


Stencilled and marks made and Kate very kindly lent me her white gel pen to hi-light areas. We had some mini collage sheets which you can just see bottom right, which I started to cut out.


After lunch we started on the black card which had been covered with white gesso, but we left some parts of it black.


This time we used Dylusion paints, but again finger painted it on to create the background in pretty much the same way as the first one.


This one is pinched from Kate, just to prove I was there!!


These are my backgrounds after stencilling and stamping. They still need some doodling on them. Everyone was using the new Carabelle stamps but they were sort of flower and leaf orientated, so I chose not to use them, instead I wanted to use T!m paperdolls and was going to do them at home. But Kate very kindly found me some, I think you can just see some heads at the bottom of the photo!


When I got home, I cut out some more collage pieces and I think I am going to go with something like the above. Nothing is glued down yet, so things may change!!


And these are the paperdolls. I swapped some of them as some of the ones I chose were a bit big. Again they are not glued down, because I still need to doodle on the backgrounds.

I will be back with my mini bag and journal when they are completed. Thanks again Kate for a lovely day.

Saturday, 2 September 2017

Artzone Stencil by Debs Wainwright


Debs Wainwright has just launched her new range of stencils and I was asked if I could produce some samples using a couple of them. This was the first one I used - Boho-Jane DWSTC-HOBO Jane002.


I took a piece of corrugated cardboard and randomly coloured it with a few colours of Dylusions paints.


Next I used the stencil with black gesso from DecoArt.


One dry, I added some black and white paint in circles using small tops/lids and also a credit card to make the lines. I coloured the eyes in white, added the blue using a sharpie pen and red for the lips. I also hi-lighted some of the stenciled elements.


And the sun came out, so I took a photo on the grass as these are the more truer colours.


For my second piece I painted an mdf heart in pink, orange and green DecoArt vintage effect wash. I applied the colours with a sponge and dried between layers to get the subtle mottled effect.


I flipped the stencil over and used it the other way round. I mixed DecoArt pyrrole red media paint with white modeling paste and put it through the stencil. I also used part of the stencil to embellish the right hand top corner.


These are the five stencils Debs has designed. They are available to buy now from her Etsy shop here, and they are soon to be available at Country View Crafts and Handmade at Helens.

I haven't been paid to do or say any of this, I was simply sent a couple of stencils to play with. But what I would like to say, and this is only my opinion, is that the stencils are very easy to work with, they are of a good quality weight and because of this they are very easy to clean as there are no flimsy delicate parts. As you can see, they are very versatile, you can use them either way round, they leave a great impression and you can easily isolate different parts, so you don't have to use all the stencil. They are excellent value for money, they retail at £5.75 and I wouldn't hesitate to buy them.


Sunday, 20 August 2017

Fabric Art Journal Book


As I had lots of pillows embellished, I decided to put together another book.


And this is what I put together for the back cover.


Front and back covers sewn together.


I painted some of the pages in this journal and left some of them plain.


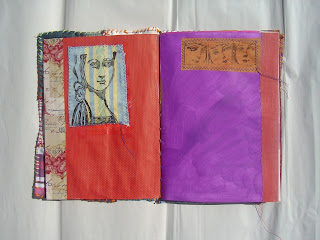
Selection of some of the images on the inside pages.


Sewn in images and fabric edges.


Inside of the front cover and first page.


Last page and inside of the back cover.


More of the inside pages, some painted, some plain.


Painted pages, plain pages, sewn in images.

Slipping this into the challenge over on the PaperArtsy blog.

This one is also for sale, info can be found on my FB Page.

Sunday, 13 August 2017

Fabric Art Book Journal


One day a couple of weeks ago I went al fresco in the garden which helped them dry!


Once completely dry, I added strips of fabric to the edges of the envelopes.


I made some little pillows to create the covers of the book.


Next I quilted them and turned over the edges. I decided to machine quilt them.


I arranged the individual pieces to create the front and back covers.


Then I sewed them together. This is going to be the front.


And this one the back, which is also now all sewn together.


I placed them next to each other and then sewed them together. 


Once the covers were completed I went through the pages and added images over addresses etc on the envies.


The completed book, this is the front with the signature now sewn in.


Inside front cover and first page.


A few of the inside pages with images sewn in.


Back page and inside of the back of the fabric cover.


Back cover with the signature sewn in.


And this is the whole book laid out flat showing the front and back fabric covers.

PaperArtsy have a theme of books this time around so I am entering this make.


Blog Archive