Saturday, 30 April 2011

FP Pellets & Ooze


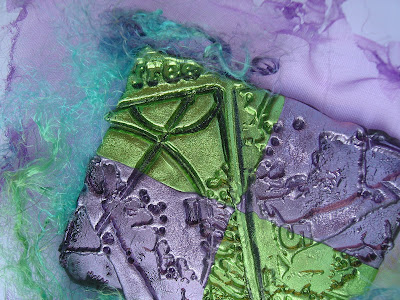
I've been having a play with the FP pellets today.  They look like frogspawn when they are all melted and they all stick together!!  They are clear when you pick them out the hot water and can be coloured with AI's.  I used meadow on the first layer of this piece and then stream on the outside layer.  The stream is usually a very vivid blue but it really does take a lot to colour them.


The inner piece is pellets and coloured with ginger AI, but it's way too thick.  I should have rolled it out more.  The outside piece is the burnt orange from the foiled strips. You can see the difference in colour!!!


Bottom right is pellets coloured with stream AI, again too thick.  The other five pieces are from the foiled strips and have had the ooze technique used on them.  I cut the bottom left with an 's' shaped cookie cutter, but decided to leave it in the square.  If you enlarge the picture you can see the ooze just coming through in the shape of an 's'.

Friday, 29 April 2011

Tanda Tag


Zoe prompted me to join in with this weeks Tanda Teaser, but little did I know that the theme was weddings/anniversaries.  As you can imagine if you know me, I don't have much stuff along these lines, so I had to improvise and hence created the above tag.  I started off with a dreamy/love Paris kind of theme with the Eiffel Tower images, added a few flourishes all stamped in walnut stain distress stain.  I stamped the words in timber brown stazon, cut them out and used sticky pads to raise them off the tag.  The image is from the CI book 'people and places 1'.  I die cut a dark brown piece of card using a spellbinder die and mounted the CI image.  Finally I added some fibres.

Background Papers


I made this piece using two of the background papers I created a while ago.  I stamped one of my favourite images in the marbled piece.

Tag with a Pocket


The Tag it on theme this week is pockets. I decided to leave the grunge alone for once, and went vintage instead!!  Although it's not very clear to see on this photo, the pocket is actually made from the piece with the script on.

Thursday, 28 April 2011

JFF - Week 13 - Triangle(s)


The last week of Vons shapes theme on the JFF challenge blog is 'trinagle(s)'  The base of the triangle is a piece of card with duck egg muslin sewn on to it and then roughly cut in a triangle shape.  The image, which has been coated in ice resin, was machine stitched to the fabric and card.  A button and a word were added.  Now you might think that I did not get that messy making this piece, but I can assure you I did!!  I got absoultely covered in tiny shreds of fabric from cutting and ripping all the tassles at the bottom!!!

Wednesday, 27 April 2011

FP Butterfly


I've made this butterfly from friendly plastic, peels offs, wire and a few beads.  I took a white strip of FP and coloured it using cool peri and salmon AI's from the lights selection.  I used surgical spirits to blend them together.  I shaped the wire into wings.  Heated the plastic and pushed the wire into it.  I also pushed in four peel off dots, one in each wing.  Once cooled, I cut them out.  I stuck two of the wings together by applying sticky silver foil to the back.  I strung some beads on a piece of wire and used it for the body.

**Yes Kate, it has gone a little pink, but that's just for you!!!**

Inspiration for this piece was gained from a Linda Peterson FP tv show.

Tuesday, 26 April 2011

Grungy Monday #5 #2


I so enjoyed making my Grungy Monday #5 piece that I made another one!!  Again I used a piece of corrugated.  This piece is about 7" x 7.5".  I cut the niche to house the word 'journey', a t!m movers and shapers die.  The background paper is a sheet from an 8" x 8" stack from GCD Studios - Paris Nights.  The background behind the niche was created with dusty concorde, peeled paint and weathered wood distress stains.  I embossed a piece of chipboard type card with t!ms steampunk embossing folder and swooshed weathered wood and peeled paint distress stain over it.  I cut the car from cork.  The extras (bumper, wheels etc) and the word were cut from brown white core cardstock.  The quote was stamped, die cut with a spellbinders label and coloured with antique linen and peeled paint distress stains.

Monday, 25 April 2011

Grungy Monday #5


This week over on Grungy Monday we are being taken back to a t!m technique which was first aired in May 2008.  It's the niche using foam board.  Remember the piece of railway track housed in the scrapbook page layout?? No, see it here.

Anyway I didn't have any foam board so I used an industrial piece of corrugated cardboard instead.

I cut out my niche to house my key.  I covered the corrugated with a piece from t!m's retro grunge stack and arranged pieces of friendly plastic to suit.

Simon Says Stamp and show some BUTTONS!!!


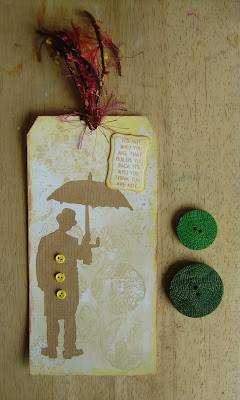
I created the background for this tag using the two green buttons on the right, which Zoe kindly gave me when we met up last Saturday.  I coated them in a layer of sand eco friendly paint and stamped them onto the background.  I didn't know if this would count for the simon says stamp and show buttons challenge, so I added the 3 small yellow buttons to the coat of the umbrella man just to be sure!!!!

Gift from Kath


I received this gorgeous necklace on Saturday from my friend Kath, aka LazyKay.  I'd seen it on her blog and adored it there, but to actually see it in the flesh is just something else.  That green in the charm is stunning, it's marbled, therefore there are lots of different shades of that emerald green.

Sunday, 24 April 2011

Friendly Plastic Peel Off Box


I've always wondered how this was done.  A box made with friendly plastic and my pet hate of the craft world 'peel offs'.

Well last weekend when I took Liz's class, she shared the technique with me.  It's so simple when you know how!!!


I was quite impressed how it all came together, no glue, just constructed by heating the plastic.


This is the lid.  I ran out of black FP so used silver around the edges and black peel off dots.  The handle is made using the smaller piece of tubing from the tubead kit on the previous post.


I have to say, I was totally amazed when the lid actually fitted snuggly onto the box.   This is the other side of the box.


This is the inside of the lid.  I lined the top with green organza/chiffon type fabric.  I didn't do all the sides though.


I did the same inside the box and lined all the sides and bottom with the same green fabric.

Friendly Plastic Beads


I had a FP day yesterday which was a bonus as I was saving it until Monday.  I was going to Maz's to show her some of the techniques I picked up from Liz, but she is now busy.

I picked up a tubeads kit from Liz last weekend, you can buy them direct from her on line shop (here).  This is a must have kit to assist with bead making.  The above bead is made using the smaller of the silicone tubing and I added some wooden beads.


This was made the same way except I didn't put any peel off's on the FP.  I made one bead shaped and the other one straight.  I cut the straight one into two and added a wooden bead between the two pieces.


Again this one was made in the same way but the larger of the silicone tubing was used.  Peel offs were used and the FP started of stripy.


This is a large green bead with peels offs.


This is just to show you the difference in width between the two beads, you can make them as long as you want.


And finally, these are the ends of the beads, this time finished off. 

Saturday, 23 April 2011

Mini Muse Texture Fades


An atc created with the umbrella man and black soot distress ink.


A postcard created with the car and frayed burlap distress ink.

Friday, 22 April 2011

Stamp Man Challenge 21 - Resist


This week the Stamp Man are asking for a Resist technique.  I decided to make a set of cog stamps from t!ms alteration dies.  Painted them with lake mist acrylic dabbers and stamped them onto a tag which I had primed with antique linen distress stain.  Once dry I applied a blend of old paper, rusty hinge, tea dye and black soot distress inks.  I misted a piece of kitchen towel and wiped the ink off the resist areas.  I stamped various images in black soot.  Added a couple of cardboard cog die cuts and some fibres.  I used a paper distresser to distress the edges and inked with rusty hinge.

Journey in Time


This background is the remaining half of the one used on a simon says challenge.  I cut the clock and word in black card from t!ms alteration and movers and shapers dies.  Dead simple but very effective, well I think so anyway!!

Friendly Plastic Lace Technique


Sorry about the picture quality but I had to cut this piece off the original photo I took of my pieces from Saturday.  Just to show you what it started off like.  I used Liz's lace technique.


I threaded a green fibre through the holes.  Run a piece of silver foil using the swirls embossing folder through the big shot and attached the FP piece.


This is a close up of the FP with the fibres running through it.

Thursday, 21 April 2011

Big cogs, little cogs


I ran the background card through the steampunk texture fade folder.  Using the new mini cogs I cut out the shapes in the background card.  I cut 2 more out of cardboard, coloured them with walnut stain and vintage photo stain and placed them in the holes.  Swooshed across the background with wild honey, tea dye, walnut stain and frayed burlap distress inks, together with antique linen stain.  I distressed the edges and inked with walnut stain.  I cut a larger piece of chipboard like card and used walnut stain distress stain to colour the edges.  The quote is from t!ms mini stamp set and I used a spellbinder nestie to shape it and inked it with tea dye distress ink.

Grungy Monday #4


Over on the Grungy Monday blog, week 4's challenge is texture fades and distress.  Having watched t!ms video I just had to have a go with my new mini texture fades.  I used the mini car off the plate Maz lent me, inked it up with walnut stain distress ink and stamped it onto the blank part of the folder.  I carefully placed a piece of card in the fold and snapped it shut, proceeded to put it through the big shot and emboss it.  As you can see it also transferred the ink from the folder onto the card.  I coloured the card with a blend of weathered wood and walnut stain distress inks.  I distressed the edges and coloured with walnut stain distress ink.

The background is the pocket watches texture fade swiped with weathered wood and edged with walnut stain distress inks.  I stamped the words in walnut stain ink.

JFF - Week 12 - Square(s)


This weeks JFF shape chosen by Von is 'squares'.  The black section in the middle is square and everything else is slightly more, shall we say, rectangular!!!  I masked off the number 2 and whitewashed the square with diluted black acrylic paint and stamped it with a homemade foam stamp in orchid eco friendly paint.  The main background is sprayed with dylusions fuscia and lime ink.  Once dried I inked the scrathes stamp with black distress ink and spritzed with water.  The section with the image on is a piece of the sprayed paper and crumpled and curled at the edges and outlined with black acrylic dabbers.  I scrunched a piece of music paper up and added that to bottom right.  The word friends was stamped with white eco friendly paint.  The letters are cut from the postage cuttlebug plate and dabbed with various colours of eco friendly paints.  Everything is attached to a piece of card painted black.
Wednesday, 20 April 2011

Simon Says stamp & show a t!m technique


To use a t!m technique is the challenge on Simon Says Stamp this week.  I've used the masking technique with the distress stains for the background of this canvas.  I die cut the umbrella man and the middle sized cog from black card.  The sentiment is from t!ms special mini plate done for QVC.  Maz kindly lent me them as I was on holiday when the programme aired.  I die cut it in a spellbinders labels nestie and used black soot distress ink around the edges.

Friendly Plastic Card


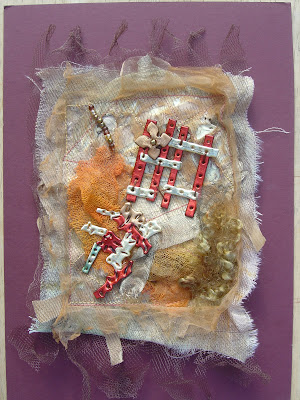
This FP piece started off life as the back of the book cover, but I decided to house it in fabrics and fibres and place it on this card instead.  Once in place I framed it with my dusty concord distress stain.


I was really pleased with the depth and crispness I got from the rubber stamp image, so it seemed a shame to hide it on the back of a book cover.

Tuesday, 19 April 2011

FP Bowl


This is my first attempt at a free form bowl using the FP.  I was quite pleased with how it came out although I should have made it bigger before I moulded it in the bowl shape - live and learn!!!  I then soldered the organza backing onto it and melted away the excess from around the edges.  I've had to put it on the black backing so you can see it!!!

This actually started off as the front of my book cover on Satuday...hmmm...how things change - lol.

Monday, 18 April 2011

Friendly Plastic and Fabrics


I incorporated a couple of the FP pieces I made on Saturday into this piece.  I used various fabrics, including organza, muslin, tulle, scrim and tyvek.  I layered the pieces up and also added some strips of brown paper as I wanted to know how they would react.  I added a pocket of beads under the scrim and whizzed in under the sewing machine.  Using the heat tool I gave the whole piece a blast.  You might have to blow the photo up for a close up!!  Hand sewed the FP pieces on, together with the piece of ribbon and the mohair wool (right bottom).  I added the beads to finish.

Sunday, 17 April 2011

My make of the day


A bead, using nothing but a peel off and some friendly plastic!!


Don't you just love the chain and that fabulous clasp!!!


This is me wearing it 10 seconds after I'd made it.  I was in that much of a hurry I forgot to finish the ends off properly!!!!

Saturday, 16 April 2011

A friendly plastic day with Liz Welch


Today I was lucky enough to take a friendly plastic class with Liz Welch.  Even better, there were only 4 of us in the class.  Liz is so down to earth and 'oozes' with enthusiam, she just wanted to share everything with us.


The class was called 'little book of secrets'.  The idea was to make the covers as above, but we sort of digressed!!!


Liz showed us some techniques, most of which I've seen before, but nothing beats seeing them for real with Liz leading the way.  The one I couldn't get my head round was the 'peel offs'.  No don't worry, you did read that right, it does say 'peel offs'!!!  But now I know how to do it, watch this space!!!


This is one of Liz's samples using the peel offs in the friendly plastic.


This is Liz showing us her lacework but in a 'knitted' style. 


She then cut the heart shape out, added some flowers and ribbons.


More playing.  It was amazing how quick the time went!!  But we all had a fabulous day - thanks Liz.


So this is us from left to right. Zoe (who I met for the first time today), me, Mary (no blog yet), Liz and Frankie.


These are Mary's pieces.  She was the only one of us who managed to construct the book - well done Mary.  The colours are gorgeous, so bright and virbrant. 


These are Zoe's makes from today.  The oozed diamond at the top is stunning IRL.  The flower charm is actually embedded in the FP.


These are Frankies makes.  Patchwork, oozing with lace and sequin waste.  Knitted lace effect on the large heart.


And lastly, my pieces.  My prize possession is actually still around my neck, but Zoe took a photo, so I will have to wait for her to forward it to me or blog it.  The red square bottom left, is housing waste peel offs!!!!

Thanks to everyone for a fabulous day, really enjoyed it xxx

If you ever get a chance to go on any of Liz's classes, I really urge you to take the opportunity.


Blog Archive