Saturday, 27 June 2009

Thanks Alison


Alison very kindly sent me this wonderful 'Friends' tag book that she had made. She made it using my favourite colour - green. Thanks Alison, it's stunning.

One to One Swap


I recently did a 1 - 2 - 1 swap with Sue for a canvas, a tag and a surprise. These are my swaps back from Sue - thanks Sue, I love them. I've even saved a lid off an empty jar to have a play with

Lotstodo Week 26 - Grunge Board / Paper


Polly gave me and Sue a clock mechanism on a cd to alter as a challenge between the 3 of us to see what we'd all come up with. The first thing I did was to take it apart and replace the cd with corrugated cardboard. I painted the cardboard with gesso and then added 3 shades of green acrylic dabbers, juniper, lettuce and citrus. I used hazelnut on the sequin waste to create the dots and frayed burlap crackle paint top left. The flourishes actually glimmer as I used Tims new technique with the distressed ink and perfect pearls. I used peeled paint distressed ink and green and brown perfect pearls. I cut the numbers in grunge board with the cuttlebug and painted them with espresso. Top right is a grunge board flourish from the mini set, I covered that with peeled paint distressed stickles. The arrow and the other flourish are cut from cuttlebug dies and patterned paper. The gear and the spinner are from Tims idea-ology range. And yes it does work, it's ticking away merrily as we speak!!!! Also the bottom is cut at an angle it's not my photography!!!

Friday, 26 June 2009

Thank You for Visiting My Blog


As a token of my appreciation to those of you who visit, read and leave comments on my blog, I would like to send one of the above to the first 8 people who leave me a comment stating that they would like to be sent one. If you prefer one in particular then please state which one and I will TRY and send you that one - first come first served.

All but the Mona Lisa one are 4 x 4, that one is slightly larger, 5 x 5 I think!!!! Some have acetate overlays and some have fibres, some have both!!!!

Images and words are from Lisa's Altered Art

Tuesday, 23 June 2009

Acetate Overlays


My 'friend' Chris, kindly sent me some overlays, so I decided to use a couple of them. They have both been posted to their recipients so they should be in their new homes by now. I used my only 3 light alcohol inks, juniper, salmon and willow, for the backgrounds. I used silver and gold Crayola Metalic Markers to colour the flourishes and the watch outline. On the top background I applied the AI's to the glossy card and on the bottom one I applied the AI's direct to the acetate. Watch bits and hands were added to the top one and the word cherish and brads to the bottom one. They were both mounted onto black mountboard and a piece of fibre added to the bottom

Sunday, 21 June 2009

Altered Book - WIP


I picked this up for 20p from our local library


Then using watered down PVA glue I glued some of the pages together


Once dry, I gesso'd each double spread


I then proceeded to create backgrounds for the double page spreads


Still got a couple more spreads to do


Now all I need is a theme!!

Will be back again after I've done a bit more!!!!

Saturday, 20 June 2009

Lotstodo Week 25 - Haberdashery


This started life as a round wooden photo frame found in the charity shop for £1.50, that was until I got my hands on it!!! I simply tore strips of paper from my new Brenda Walton 12 x 12 Maison Scrap Pad, and stuck them on. Inked a doylie and cut the middle out, stuck it to the frame and added buttons, ribbon and string

Tuesday, 16 June 2009

Canvas


Sue and I were having a 1 2 1 swap and one of the items on the list was a canvas. I used the Josephs coat stamping technique on the stamped image. Was quite pleased with the results apart from the stamp was probably too detailed. I covered the canvas is texture paste and then used my acrylic dabbers to create the bold bright colours and sectioned each piece and the edges off with the black. I cut the letters using the cuttlebug with the remaining card from the stamping technique above.

Saturday, 13 June 2009

More Playing Ball


Ready and waiting........


Had enough now but won't give up his ball.......


Now in need of a rest!!!!

Lotstodo Week 24 - Anything Goes

This weeks challenge is a submit what you like theme, I've been working on this piece


From the front


From the back


Front from the side so you can see the dimension

Back from the side so you can see the dimension

Kath sent me a link to a blog full of inspiration, so I decided to have a go myself. I firstly got Martin to cut me a piece of wood, then covered it with metal which I'd run through the bug. I splodged it with expresso and pitch black acrylic paint.


I made the face and the 3 hearts from clay and baked them in the melt pot. I coated them
in micaceous iron oxide so I could colour them easier later on. I painted the face silver and the hearts copper and added a bit of gold rub n buff.

I bent the fork prongs to make the hair in the gas flames on the cooker, but if you try this be very careful, as I managed to burn my finger and thumb!! I used a piece of corrugated cardboard for the body and wrapped it in copper wire. The boots and arms are artgirlz charms. The cardboard piece has a piece of metal wrapped around it with a charm attached. The whole piece is attached to the wood by a nail.

For the back I used large silver mica flakes, coloured some of them copper and gave them a coat of mod pogde to seal. I cut a piece of wire mesh and attached it with rusty nails. Painted the letters with black acrylic and wrapped wire around them.

And the last thing I did was added some copper acrylic paint to the sides.

It took a while to make, mostly waiting for things to dry or cool down!!! But it was well worth it!!!!

Friday, 12 June 2009

A Few More Cards


I've had a couple of days holiday this week and yesterday I decided to play with the resist technique. You may not be able to see them very clearly but they are the main images on the card above and below


I used my new AI's to create these 2 cards. I only have 3 colours, juniper, willow and salmon. For the background of the top one I decided instead of dotting the colours around the card I would 'draw' lines with them instead. So basically I loaded the tool with ink and pulled it straight down a few times. I then stamped an image over the top using black archival ink. I'm not keen on the archival ink as I tend to smudge it, but this time it's worked out ok. I chalked the edges of the card to try and correspond with the AI colours.

Below I used the traditional method of dotting and swirling the ink on the paper, again stamped the image using the archival ink, matted the image onto a couple of different colours added a couple of flowers and a flourish from a cuttlebug die. I inked the edges and stamped across the top and bottom.


I stamped this paper with dragonflies, script, the TH scratches stamp using various shades of orange. The quote is stamped in olive green stazon. I inked up a piece of acetate with butterscotch, caramel and latte AI's and then stamped 2 dragonfly images with olive green stazon, cut them out and attached to the the card. The flourish is another cuttlebug die from the same set as above

Fraz Hiding from the Dust Cart


He started off a brave soldier, barking in the garden as I was hanging the washing out


But then he took refuge under the garden furniture!!!


Then he squashed himself into the gate hole between the bricks!!!


How sad and worried does he look.................. all because the dustbin men came to empty the bins!!!!


Wednesday, 10 June 2009

Jigsaw Piece


I've had this jigsaw piece hanging around for a while but haven't really known what to do with it due to the shape, as in, there are lots of holes cut out of it and not much space to work on. But then I came across a lovely little image on Junes blog which she'd used from a digital challenge. I don't know how to do digi-art so I just printed him and cut him out. He's the little guy on the right. And as they say, the rest was history!!!!

Apologies for the location of the photo but it was the only place I could hang it and get some light on it!!!

Saturday, 6 June 2009

Quick & Easy Cards


Made a couple of Fathers Day cards. I sort of started to use the Bev technique with the card for this one with the layering and the punched piece across the bottom. I did use water colour paper, but I stamped the image with distressed ink instead of colouring it!!!! That one is for Martins dad and he won't appreciate it anyway!!!

My dad is into bikes and he's at the Isle of Man TT now with mum. The first two races have been rained off!!!! Again, just simple matting and layering.

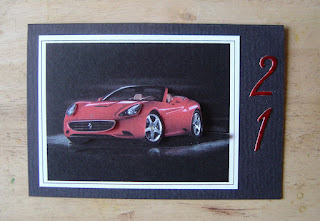
More matting layering, the car is decoupaged. This was made for the son of the guy Martin works with and yes, he's 21!!!

One of the ladies who has worked in our department for over 20 years has decided to retire at the beginning of July. She has a 1 year old golden retriever. Again this image is decoupaged and the blue background run through the bug

And yes you will recognise this and no I haven't gone mad and made another one. I have made it out of what I did last weekend, but as I was putting it together I just couldn't bring myself to put that image on. It all looks way way to busy and pink for me already, but I know she will appreciate it, so she might as well have it, as I would never do anything with it!!!! 'She' is my colleague who is also leaving us on 03 July, but to go to another job

Lotstodo Week 23 - Charms


I made these 2 charms with my crafty tool which can also be used as a solder iron. They are only my first attempts, so I will keep trying. It's very fiddly and quite awkward as you have to use your left hand quite a bit, or right if you're a leftie!!!!

Blog Archive