Tuesday, 30 August 2016

Two Atc's


A couple of weeks ago when I was much worse for wear, I managed to create this background using a handful of DecoArt media paints and Kate Cranes new to me hand carved stamp set.


These are the stamps I bought from Kate's Etsy shop.


Well today I needed a play and now feeling much better and able to move boxes, I ended up with these two atc's.


Lin had kindly stamped me some of the TM boy images and I found him a brass pan for a hat and did some further doodling.


And I had sooo much fun with this one. It started out as a black and white stamped Dina Wakley image, again I added doodling and hat which was incidentally, half of a bikini top!


And from the off cuts of card I made these very mini cards which are approx 1.5"s.

Friday, 26 August 2016

Hochanda Ghoul


Having watched Tracey Evans on Hochanda I made a ghoul using a Wilkos meat basher, a clay skull from a mold, tinfoil and masking tape to get to the above stage.


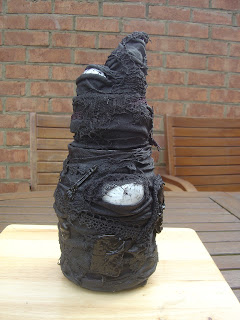
This was him having been given the black Powertex treatment using lots of different fabrics including t-shirt material, lace, ric-rac and power cotton. 


Here he is outside after being in the airing cupboard all night. Now at this point I was going to wait before I coloured him.


I'm visiting a shop in a couple of weeks that carries the whole Powertex range, so was going to get some more of the pigments, but............


I couldn't wait that long so out came the Ranger Perfect Pearls, the Primary Elements and the DecoArt satin varnish. 


I really can't believe how dull the colours look even though the sun is out, but IRL they are really vibrant, I love him.


Front view, I used about three different colours of blue to give him a bit of colour.


I did the hat in heirloom gold perfect pearls and also gave his face a light brushing with it too.

Thursday, 25 August 2016

Powertex, Pigment and Varnish Experiment


I conducted an experiment to see if the primary elements pigments when mixed with various varnishes would stand up to outside weather, mainly rain on a piece of Powertex conditioned fabric which was more than 3 weeks old.


I put the piece of fabric in the border and waited for it to get rained on. After about two hours it was wet and the water just sat on top. I tried rubbing the pigment whilst it was still outside in the rain on all 3 strips and nothing happened, it just stayed where it was.

So I brought it in and absolutely soaked it under the tap and scrunched it to screw out the water. Again I tried rubbing and nothing happened. I dried it with a heat tool.


This is the same piece recycled and dried. On this photo the colours don't look as vibrant as they did before I started the process, but that is because it's still raining and it's got darker, I can confirm that IRL it is exactly the same as it was when it first went outside.

Result, Americana Triple Thick Glaze, Folkart Textile Medium and DecoArt Media Satin Varnish are all waterproof when mixed with primary elements pigments and adhered to Powertexed fabric. 

*** Edited***


This was taken just now (next day) in the sun and as you can see it's as good as new.

A Couple of Tags


Finally felt okay enough to be able to move some stash around to get to other stuff and ended up making these two tags. I've been wanting to do something like this for a few weeks now.


I embossed the card using a cog folder, coloured it in silver Decoart media paint and then rubbed over it with black carbon media paint.


The top half is white embossed and coloured with carbon black media paint and wiped back.


Crackle paint on the heart and covered with black antiquing cream and wiped back.


Pretty much did the same with this one except I used gold and transparent yellow oxide for the embossed background and again I tinted it with carbon black Decoart media paint.


The embossed stamping was coloured with platinum silver embossing powder. I used a dirty wash for the background and added a wooden cog.

All products used are from the DecoArt media range.


Sunday, 21 August 2016

Ghoul House


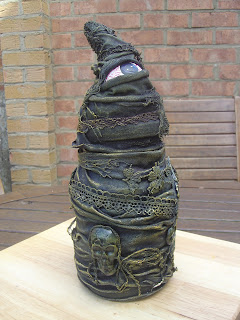
After watching the 5 inspiring Powertex shows on Hochanda earlier in the week, Tracey inspired me to have a play with a fairy house, but in true fashion, I changed it from a fairy to a scary house!!


I used t-shirt fabric to cover the body of the coffee jar and added pieces of dishcloth, cotton scrim, lace and cotton strands


The skulls and faces are made from air dry clay and it takes the powertex quite well. I also wanted to incorporate an eye!


This is the lid or the roof. I wanted to create space to add in another eye!


The jar with the roof on.


As the lid is loose, I can position it where I want.


View from the other side.


Painted the eyes in once I'd taken them out of the cling film and popped them back in again.


From another angle with the roof on.


Dry brushed with yellow ochre pigment mixed with Decoart satin varnish.


From another angle, love how the pigment brings it to life.


Moved the lid round so that both eyes are facing forwards!


Close up of the bottom eye painted with DecoArt media paints.


Close up of the dry brushing to hi-light all the different elements.

Tuesday, 16 August 2016

Shabby Chic Life Frame


I picked up the frame for half price at the Donny Dome craft show way back in June with the intention of decorating it for my mum for Christmas.


Then I turned it round and got a photo in the sun.


Painted the word in DecoArt chalky paint and stamped the Andy Skinner scratch stamp in brown stazon on the top.


I built up various paper flowers and used mini buttons for the middles.


More flowers, paper and crochet.


Mdf heart with DecoArt crackle paste.


Die cut butterflies with mini gems and mini safety pin.

I've found a box for it, so in 4 months time, I just have to remember where I've put it - lol xx

Sunday, 14 August 2016

Stone Art Sculpture


Guess where I've been today??


I've wanted to make one of these ever since I saw the one Alli showed on her FB page.


After she'd smoked the holes with the drill to put the thick wire rods in, we got to work with the coated wire for the arms, shoulders and neck.


Made something like this and attached it to the metal rods with masking tape.


Alli then cut another piece of metal rod which we used to strengthen the body.


Next we had a little break as Alli took in a delivery.


If you think it was tricky getting it out of this van, what do you think about getting it into a mini!!
  

And down she goes with Alli at the controls.


And here is the lovely barrow in all its glory - it really was fabulous.


Back inside, all masked up and ready for the next stage.


And here she is all stone art and powertexed up.


And here is Alli giving mine a good old bash and slash with the blade of the scissors to create some texture, as I'd given up by now as my ribs and back wouldn't let me do any more.


Alli tied her arms across the back of the body with cling film as that's where she wanted them positioned.


And then just to prove I was actually there, Alli took a couple of photos of me.


And then another shaping the head.


Next we covered the base and gave it some texture.


And from the back.


Close up of the face and the boobs. 


And Alli's from the front.


No, your eyes are not deceiving you, she has made her pregnant!!!


After a heat gun session, we dry brushed with green, bronze and gold pigments. I took mine outside to look at in in the natural light. She is sitting on the barrow that was delivered earlier.


Close up of all the wonderful texture. Would have been nice if the sun was out, but it wasn't.


And finally a close up of the bum and the pitted legs.

Had a really fabulous day with literally 1:1 tuition. Thanks Alli for having a class with just me and for mixing the products and adding texture for me as I really didn't want to cancel even if it did hurt at times.

If you want to find out more or if you want to take a class with Alli, click here.

Blog Archive