Friday 30 September 2011

Anniversary Card


It's my mum and dads anniversary early next week and they go away tomorrow, so I made them a quick card from a piece of printed vellum, part of a napkin, a skeleton leaf and some sandpaper!!!

Thursday 29 September 2011

International Atc Swap


I've made these 8 atc's for a swap.  There was no theme and no limit to the number you can send in to be swapped.  I created the backgrounds using my even newer stewart gill paints (had to get some more after the first batch!!).  Cut them into atc size and created the above.  They are now winging their way to Oz to be swapped.

Sunday 25 September 2011

Bees Wax Canvas


I've been joining in with a few streams lately and yesterday Jamie finished a fabulous 12 x 12 canvas and Dar was playing with bees wax, so I decided to combine the two.  I have to say that they are all a great inspiration and all the ladies are very talented.  Mine is only a small canvas 6 x 8, but I got to use my new paints and some more of my new TH stamps.  They are not new out new, but new to me.

Saturday 24 September 2011

A Kerri File!!!!


After having watched a stream by Kerri, I just had to have a go at making one of these.  It's not the same as hers as she has used a US tab file and I have used a cardboard wallet file.  The sizes and material are slightly different, but the idea is the same.


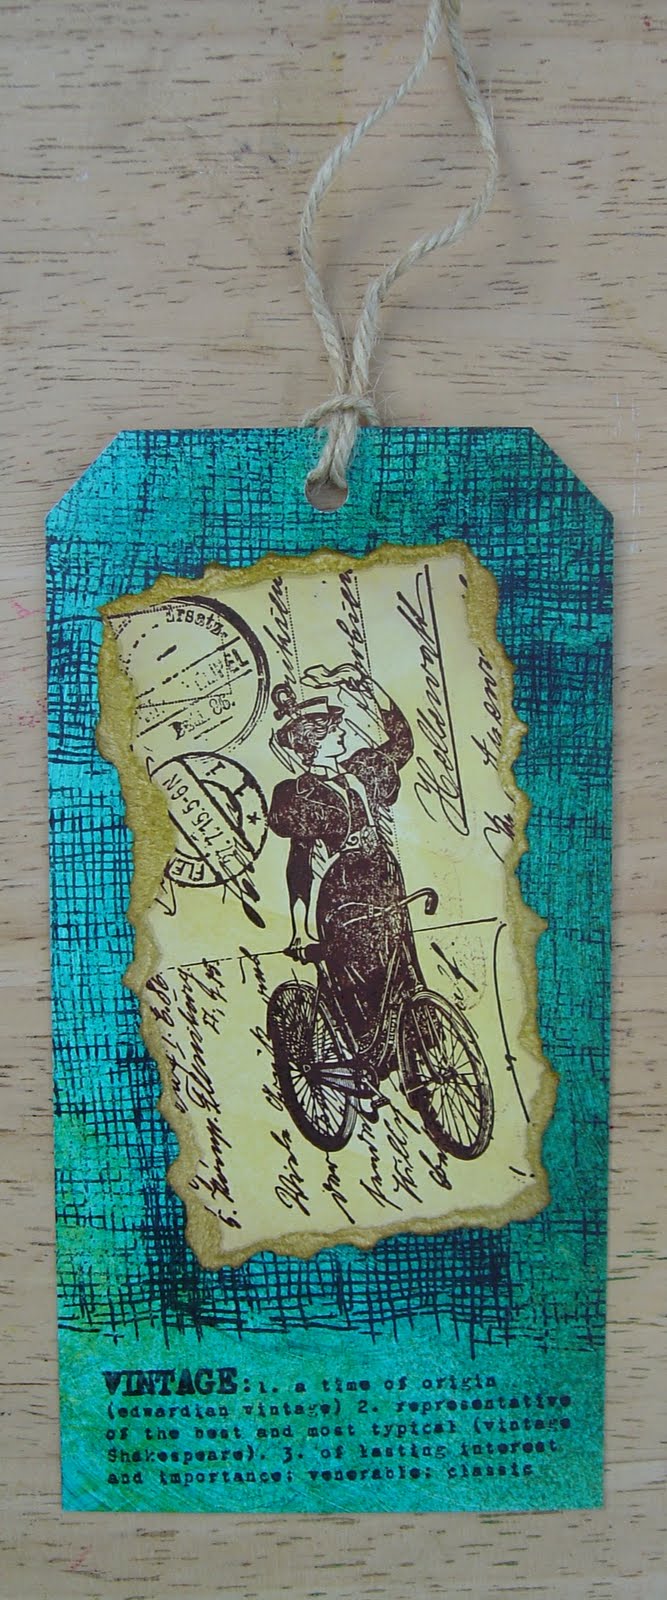
This is the outside and is decorated with my new stewart gill paints and stamps from my new TH  sets, along with a few other bits and pieces.


This is the inside with the tags in with the tabs turned up.


This is the inside with the tags in and the flap turned down.


This is the outside with the flap turned out.


Then it all concertina'd together.

Sunday 18 September 2011

Altered Clay


I recently got some new glimmer paints which have a lovely sheen to them.  I also ordered just one of the starburst stains from the Stamp Man, I shall now be going back for more, they are fab.  Oyster Stamps had a the TH enamel accent on offer at a very respectable price too, so I grabbed some of that and used it to frame the above piece.  The clay pieces as you know are ones I made a week or so ago.

Atc Background Swap


I've recently joined a new international group and one of the things they have going on at the moment is a background atc swap.  As I liked the idea of this, I've decided to join in.  Basically what you have to do is prepare a background only so they can be swapped and finished off by the recipient.  I've used dylusion spray inks on most of them and added paint and stamping.  They will take a couple of weeks to get to their destination as it's in the USA.

Just For Fun

Hi all, just thought I'd let you know that I have decided to leave the Just for Fun design team and challenge blog.  Hence the reason I have taken the logo off my side bar.  For me it was getting to the stage where it was no longer 'just for fun'.  It started to get too political with rules and disqualifications etc.  Fun and interpretation of the theme to some people is different to others and in my opinion we should all be able to express ourselves freely without being judged.


See you around


Sam

Saturday 17 September 2011

Triptych & Clay


The walls are made from chipboard and run through the bricks TH texture fade.  Coloured with old brass, pewter and metallic rust lumiere paints.  Various colours of rub n buff used to contrast.


The clay pieces made previously were added along with the original key.


They were pieced together with tabs from my new TH alteration die.  The brads were picked up at the Harrogate show.  A bag of just brass coloured ones, not seen them before, usually have to buy a mixed bag.

Friday 16 September 2011

Texture Paste 4 x 4


Base is corrugated card cut into a 4 x 4 and covered it in texture paste.  Cut out the keys and lock from my new TH and Sizzix dies.  Covered them in texture paste too and stuck them onto the base.  I then wrote 'lock n keys' in the paste whilst it was still quite wet.  Then the boring part, had to leave it over night to completely dry.  Painted it with metallic olive green lumiere paint and added a touch of russet.  Once dry, I covered the whole area with black acrylic paint and wiped most of it off just leaving it in the nooks and crevasses.  Once dry I gave it a coat of glossy mod podge.

Thursday 15 September 2011

Steampunk Chipboard Jigsaw


The base of the chipboard is painted with black acrylic paint and smooched over with metallic russet lumiere paint and edged in old brass.  The cogs, key and lock are dabbed with old brass, metallic rust and pewter.  Chains and the clock charm were added along with the labels from a TH alteration die.  The brads are from a papermania kit and the images I purchased from an esty digi site.

Monday 12 September 2011

GNPE - Harrogate


Made a trip over to the GNPE at Harrogate yesterday and managed to find a few things to buy. 


I also met Neet there too, she was demo-ing for Oyster Stamps.


These next few pieces are samples which the Stamp Man had made up.  They were brilliant.


Then there was a 'make a card in 3 minutes' challenge, to which Barbara Gray (clarity), Amy (off QVC), Julie (sorry I have no idea) and Jean (once upon a stamp) all took part in.

And Sheena was there demo-ing too.


Friday 9 September 2011

Clay Pieces


A couple of evenings ago, I finally got round to making some pieces with clay.  I did some face moulds and some stamping.  For the key, I placed an actual key in the clay to get the impression and cut round it.  For the locks I stamped a background into the clay and again pressed the keyhole into it to create the impression, but then tore the edges of the clay and smoothed it over with my fingers.  I used a couple of colours of perfect pearls to colour some of the pieces with.  The faces were coated with micaceous ironoxide before baking, so if I want to add perfect pearls at a later date, I can.  All pieces were created from black soft fimo clay.

Saturday 3 September 2011

Let's Travel


I sprayed the white card with vanilla and lime dylusions spray ink.  I collaged the background with steampunk style stamps in walnut stain.  Stamped the main images onto card sprayed with butterscotch adirondack colour spray.  The tickets were stamped and cut out of card coloured with vintage photo stains.  The travel is coloured with crushed olive distress ink.  Brads, prestuds and a metal swirl added.  The whole piece was then mounted onto black card.

Vintage Tag


I used stream and butterscotch adirondack colour spray to create the background.  Stamped the mesh image onto the tag.  On a separate piece of card, stamped the main image in brown.  Once dry I coloured the white card with old paper distress ink.  Added the vintage definition and string to finish.  I am entering this into this weeks Just For Fun challenge as the theme is words.

5 x 5 Stamp Man Challenge


This was going to be a fat page (4 x 4), but it looked too cramped, so it became a 5 x 5!  The background is coloured with a mix of distress stains with distress inks blended in.  The pieces on the sides were left overs from the previous tag.  The background was stamped in script and a flourish.  The car was stamped in walnut stain stain onto cream card and cut out.  The saying was stamped onto vintage photo stained card and the edges ripped and edged in walnut stain ink.  Mesh was added to the top right and the 3 cogs were painted in black acrylic and rubbed over with rub n buff.  Again the edges were distressed and coloured with walnut stain ink.


The Stamp Man's challenge this week is travel.

Huge Tag


I coloured the white tag in antique linen distress stain, I blended in walnut stain and brushed corduroy distress inks.  I stamped the map background in black archival ink.  I ran a piece of black card through the cuttlebug clockworks embossing folder, painted it with black acrylic and used rub n buff in various colours over the top to bring out the embossing.  I stamped the tickets onto a vintage photo distress stained background, cut them out and attached them with a mini clipboard clip.  (I think this may have to be toned down a bit!!)  I stamped the main image in pitch black adirondack ink onto cream card.  I used brushed corduroy distress ink to slightly tinge the background, I used a paper distresser and edged in black soot.  I attached it using 2 brads.  The other end is intertwined with a piece of fabric held on with a couple of mini safety pins.  Finally I used a paper distresser on the edges of the tag and inked with black soot.  The stamps are IndigoBlu.

Friday 2 September 2011

Leaving Card


My Line Manager is leaving us soon, although she is taking a career break, so should be back sometime within the next 5 years!!  So it's not really a leavers leaving card, it's just for a while.  I used Dylusions fuschia and cyan spray inks to create the background.  I stamped with black archival ink using the Nature and Grand Tour I stamps from IndigoBlu.

Thursday 1 September 2011

Large Jigsaw Shape


This is a large chipboard jigsaw piece which measures approx 7" x 5".  I stuck various findings to the raw chipboard, then covered in silver sticky tape.  I burnished around each shape using my metal tools and a paper stump to define each shape.  Using meadow, stream, eggplant, sail boat and citrus alcohol inks I coloured the background, this took a few coats to achieve the desired colour.  I then used black acrylic paint to swipe over and wipe off the access.  Once dry I applied rub n buff in red copper, jade and pewter.  Finally I cut up a quote, edged each word in black soot distress ink and applied to the jigsaw piece.


If you fancy a go yourself, I've got these corner pieces and the 2 nobble and 1 hole style of the chipboard pieces for sale at £2 with free postage.  I also have some of the embellishments available for £1 a bag too.  Use the email button on the side bar to contact me if you are interested in anything.

Mini Wooden House


I painted the wood with a coat of white gesso, then proceeded to add various colours of acrylic dabbers, mushroom, hazelnut, black, silver, copper.  Once I was happy with the way it looked I cut some papers from TH retro stack and stuck them into the little compartments.  I added all the little game pieces, mini bulb, mini bottles, bulb safety pins, washers, buttons, charms, chain and gems.  I used walnut stain distress ink to colour the saying, bent the opposite corners back to make it look more distressed.


If you fancy a go yourself, I've got the houses for sale at £2, but I'm having to charge £1 postage as they are £1.72 to post.  I also have some of the embellishments available for £1 a bag too.  Use the email button on the side bar to contact me if you are interested in anything.

Blog Archive